rung fu clone RF-45 ZX45 cnc conversion

Bernie,

What did you order and from whom? My mill is not here yet to measure and I am curious what lengths are needed for each axis.

Thanks,

Jay

I ordered the screws from a ebay seller http://stores.ebay.co.uk/linearmotionbearings But I did not order the standard sets. I made a specification and sent it to them for qoute. The specifications can be read here: http://www.omegav.ntnu.no/~hembre/Ballscrew_specification_20131129.pdf

Please note, the lengths vary from model to model among the ZX-45 clones. And my Y-axis is to long. But at the time of ordering I was not sure how it would work out. So I ordered a longer screw than what is needed. I have extended the travle on Y the same way as Jumps4 has. My only consern regarding the Y axis is if the free moving end is to long. But I don't think that will be a problem. On the free moding end of the X-axis I'm planning on putting the original handle. That way I can use the mill in manual mode untill I have sorted out the wiring of the steppers.

I have redrawn all the drawing for the X and Y with the exception of the ballnut holders. I have not desided on how to do the Z-axis yet. Main reason for redrawing everythin was to get good drawings for manual making the parts. I do not have access to a CNC, so all the parts are made on the ZX-45. And also I wanted to get everything metrical. :). Tha DXF provided by Jumps4 was a great starting point. I can add my new drawings here if you are interested.


Cheers
Bernie
 
Bernie,

Thank you for the link to the ebay seller and the PDF. It helps me to get an idea of how long the screws need to be. As my machine is a different brand I think I will wait for it to arrive so I can get the exact dimensions.

I noticed you ordered two ball nuts for the Y axis and only one for the others?

Best of luck with your conversion!

Jay

- - - Updated - - -

I'd be happy to help jay
start a thread in the cnc section here and i'll post any information you may need including wiring diagrams there.
using the words zx45, rf45 and cnc conversion in the title will also draw in other people to your thread who are searching the web
steve

Steve, thanks for offering to help. I can do that but I am mostly interested in the low voltage wiring with the switches and relays for the power supplies, spindle, 4th axis and coolant system.

If you think it is best to start a new thread for that, I will when I have the power supplies, stepper drivers and breakout board installed and wired.

Thanks,

Jay
 
Bernie,

Thank you for the link to the ebay seller and the PDF. It helps me to get an idea of how long the screws need to be. As my machine is a different brand I think I will wait for it to arrive so I can get the exact dimensions.

I noticed you ordered two ball nuts for the Y axis and only one for the others?

Best of luck with your conversion!

Jay

Funny you noticed to extra ball nut, the seller didn't... Got mye ballscrews today. But without the supporting ball bearings. Was my description unclear for you guys to? I intended to ordere 2 BK-12, one BF12 and one BK15 ball bearing supports.

My idea with the extra ballnut was to have one spare. And to have one I can use as template when I (mayby in the future) will add one more for additional backlash elimination.

Jumps4: Do you have any backlash at all on the Z-axis?


Cheers!
Bernie

It was clear to me! Looking at other conversions I see some use two ball nuts or double-nuts on each axis to zero out any backlash. That's my plan for the X & Y but I'm not convinced the Z needs it. My current plan is to counter balance the head with upward bias.

Jay
 
It was clear to me! Looking at other conversions I see some use two ball nuts or double-nuts on each axis to zero out any backlash. That's my plan for the X & Y but I'm not convinced the Z needs it. My current plan is to counter balance the head with upward bias.

Jay

It was clear to the seller as well, the missing parts are on they way. That way I should be able to make all the other parts before the bearings arrive.

The reason for not having any backlash on the Z-axis is because the weight of the milling head offsets the forces causing the backlash. But it only offsets them by a force equal to the weight. I'm guessing the milling head weights about 150-160. So if there are forces larger than this on the Z-axis (upwards) there will be movement/backlash. If you offset the weight of the Z-axis, I think you reduce this margin. Given the low price on the NEMA42 stepper and the simplicity of Jumps4's design I think this is the best way to solve this for me.

But I'd like to work out a better solution with less backlash on X and Y. The plan is to build the X and Z axis fisrt. Then use the 2 axis CNC to machine the parts for the Z-axis. And if/when I desided to reduce the backlash I will machine new parts or modify the parts I have for the X an Y ball-nut with the addition of a extra set of nuts.

My motors should arrive today og tomorrow. Christmas come early this year :)


Cheers!
Bernie
 
I use this mill almost every day for hours without any problems. backlash is running a about .002 - .003 and mach3 comp takes care of that. nothing on the mill or screws has shown any sign of wear so far. I use marine grease in the ballscrews and way oil on everything else.
One thing i did learn was to not overtighten the ways, to get everything set correct I had to loosen the ways, set my preloads and measure the backlash and write it down. then adjust each gib untill the backlash increases and then back off just untill it stays the same. any more and your not measuring backlash correctly because it included the torque required to overcome the gib tension, and it will through everything off. the table is actually snapping into the next position if too tight.
thanks for looking
steve

Hi Steve,

How much of the backlash do you think i caused by the ballnut? And is there any backlash caused by the couplings for the motor, as they are a bit flexible when it comes to torque?

I have ordered this couplings: http://www.ebay.com/itm/37072451129 (For X and Y). I guess it is similar to the ones you are using. Do the axles meet inside the coupling, or do the have to be a bit apart? If they have to be a bit apart, how much is it? I'm making the spacer plates between the plate holding the stepper and the plate holding the bearing now, and am curios how long these have to be.


Cheers!
Bernie
 
hi Bernie
I tried to look up the ebay item number and it must be a typo I could not find it in ebay
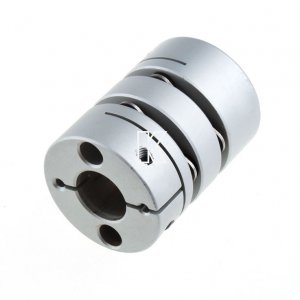
I had a problem with the spiral cut couplings because they would coil like a spring under torque so that is why I use the plate type.
the closer to perfectly aligned the motor and shaft are the less critical the gap between the 2 shafts become. I set mine at an 1/8". some brands of couplings do not have the bore larger in the center and require a longer gap so they will flex.
I hope that helps
steve
 
Hi,

The link got cut off in my editing of the post. This one should work: http://www.ebay.com/itm/370724511297

1/8" sounds good to me. I might add a little to the Y-axis as I have extended it slightly and need the extra room between the stepper and the Mill itself.


Cheers!
Bernie
 
the best I can get out of the ballscrews I bought from china is .002. for my needs and the fact mach3 compensates well this has been fine. having the gibs any tighter than just closing the gap causes the screw to torgue up before you get motion and it gets worse as the machine warms. so only test backlash with the gibs loose, then use the difference in backlash to tell when you are over-tightening the gibs. as you tighten the gib recheck the backlash, when you see the backlash increase back the gib off a small amount until is goes back to what it was and lock it down.
if you use the thrust bearing mounts like I used the nut has 2 set screws to lock it to the shaft, make sure they are tight, they loosened on me once. I was afraid to tighten them too much because they are screwing against the threads. so to get the preload on the thrust bearing correct I unbolted the bearing block from the mill so it was free to spin just on the screw. I adjusted it until a small amount of binding is felt and then backed off just until I had smooth rotation plus a very little bit for temp change but no wobble.. at that point I locked the set screws down really tight. there is no need to ever readjust these bearings unless they wear and if they are worn they are bad.
another thing I just remembered was I didn't try to get any of these setting right until I had quite a few hours of running on the machine and a good break in. I wrote a g-code to move all 3 axis their max distances and just let the mill run for hours oiling every so often.
I hope that helps
steve
 
we tried to use those couplings on a bf20 build we did at my house with poor results. the rubber center is to squishy lol
and I had a problem with torgue flex on my lathe build until I installed these couplers (the same style as on my zx45 )
steve

$(KGrHqV,!lcFHC18VP)!BR2mNslKGw~~60_3.jpg
 
Back
Top