-
Welcome back Guest! Did you know you can mentor other members here at H-M? If not, please check out our Relaunch of Hobby Machinist Mentoring Program!
You are using an out of date browser. It may not display this or other websites correctly.
You should upgrade or use an alternative browser.
You should upgrade or use an alternative browser.
Received my PM949 and PM1340GT!!!
- Thread starter [X]Outlaw
- Start date
So a little update.
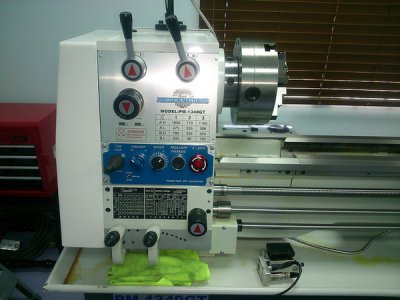
In the process of installing Mark Jacobs control system in the lathe I needed to modify the current control panel to add two additional switches; Proximity override and braking stage.
Taking a bit of inspiration from Mark's custom panels I opted to make a new panel from scratch instead of modifying the original.
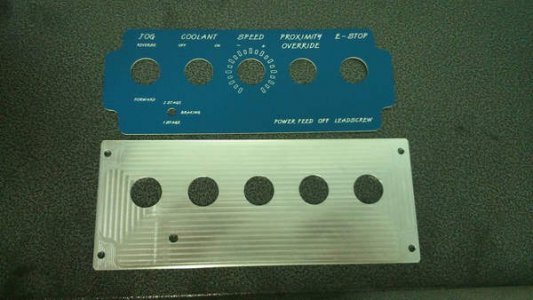
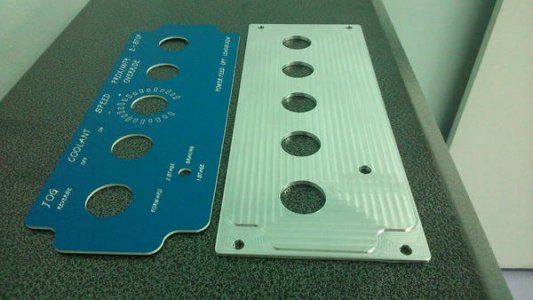
The panel consist of two parts, an aluminum back plate and an engraved legend plate.
The border around the legend plate was machined to 2mm thickness to keep the same fit and flow of the original panel. The rest of the plate is 2.9mm thick to give it a nice solid feel.
As always, all the work was done in my shop
Back plate and engraved legend plate.
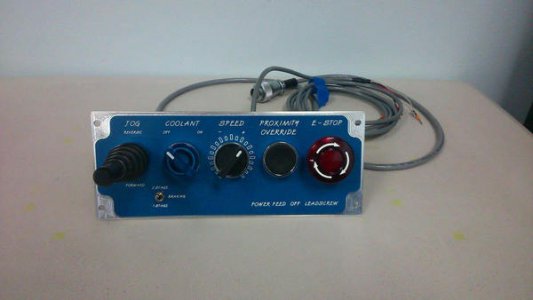
Assembled and ready for installation on the lathe.
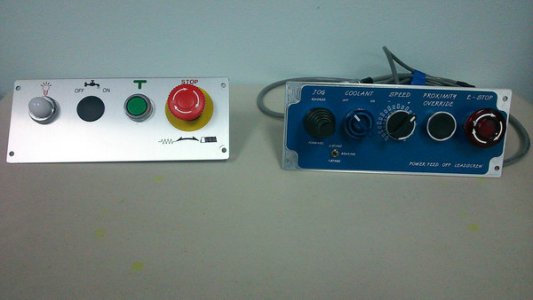
Original panel vs mine.
In the process of installing Mark Jacobs control system in the lathe I needed to modify the current control panel to add two additional switches; Proximity override and braking stage.
Taking a bit of inspiration from Mark's custom panels I opted to make a new panel from scratch instead of modifying the original.
The panel consist of two parts, an aluminum back plate and an engraved legend plate.
The border around the legend plate was machined to 2mm thickness to keep the same fit and flow of the original panel. The rest of the plate is 2.9mm thick to give it a nice solid feel.
As always, all the work was done in my shop
Back plate and engraved legend plate.


Assembled and ready for installation on the lathe.

Original panel vs mine.

So quite a bit of time has passed since my last update. In that time I've got a bit more done. Here are some pics of my progress.
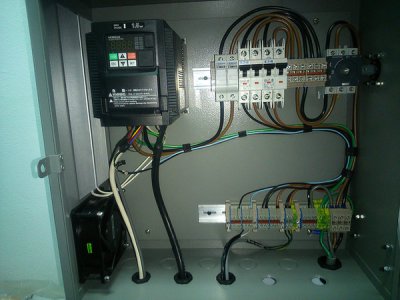
Lathe VFD and power distribution box completed.
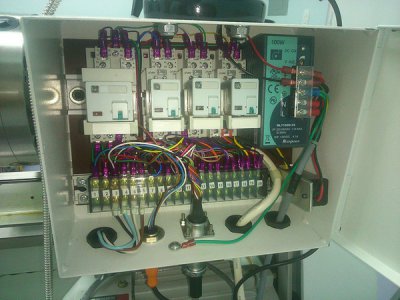
Mark Jacobs Control system installed
Control panel with custom legend plate installed.
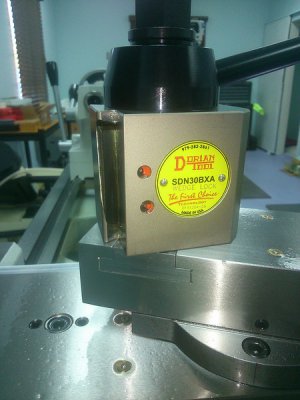
Dorian BXA tool post. I spent a lot of time researching tool post and I really wanted to go with the multifix system but when I looked at the cost of the holders it became less attractive to me. Import holders for Aloris type tool post cost about $20 while a multifix holder cost around $70. I bought a couple holders from Shars, a couple from Amazon (Accusize brand) and a boring bar holder from Matt. All fit perfectly. The hardware included with them were not bad quality either, I actually tried to strip a couple of the set screws and could not. They did come covered with that gritty oil so before putting them into service they got a clean down with brake cleaner and oiled back up to prevent rusting.
IMO the Accusize were finished just a hair better so I got about 20 in those to hold all the tools I've been accumulated while I got the lathe ready.
Y axis DRO scale installed. I opted to make all my mounting brackets instead of using those that came with the kit. This allowed me to fit everything exactly as I wanted.
When mounting the scale I was very hesitant to drill into the machine with a hand drill, so I made up a drill jig and clamped it to the machine. This work out great. I had to space my scale out about .25" since the casting wasn't perfectly flat. I also had to use a shim on one end to take out a bow of about .015". In the end I got my scale aligned in both axis to 1.5" end to end.
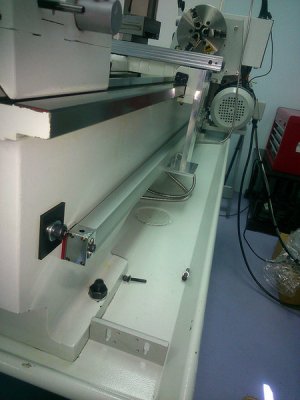
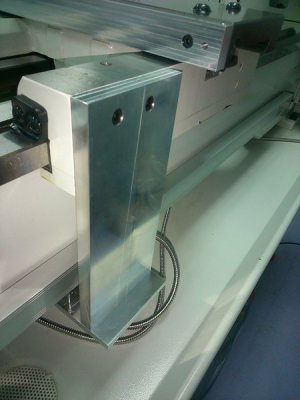
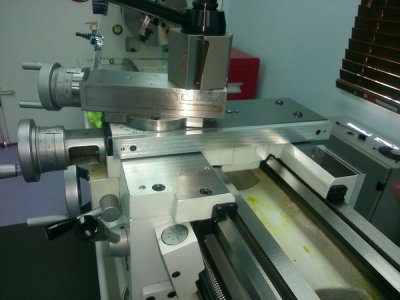
Cross slide scale spacer. The drilling and tapping of the M5 mounting holes into the cross slide was done on the mill. On top the spacer there are two M5 threaded holes to mount the scale shield.
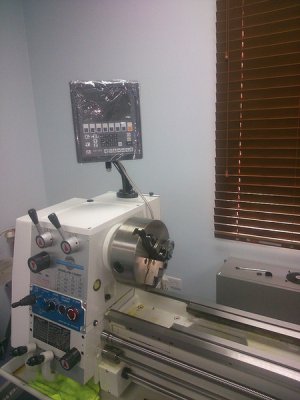
Easson ES 12B DRO mounted on the electrical box. The holes were drilled on top of the electrical box before the control system was installed.
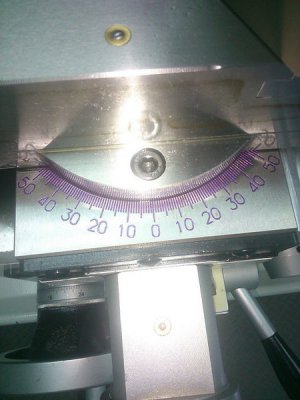
Compound graduations. Just having a little fun here but it does make the scale easier to read. I used my wife's nail polish to do the inlay, to my surprise it holds up perfectly against oil.
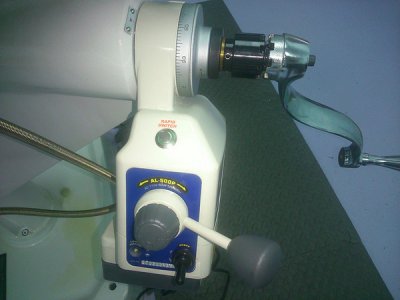
Knee powerfeed installed on the mill. Align Model AL-500P. They are about twice the price of other powerfeeds on the market but in my research the quality of these units are worth it. I also have one on my X axis.
Installation was pretty straight forward and Matt from PM was very helpful when I ran into a snag removing the dial nut. After everything is installed and adjusted with the provided shims, the assembly is then drilled through and pinned with a 5mm roll pin as can be seen in the picture between the castle nut and the bevel gear. I made up a little jig that clamped onto this assembly to ensure I drilled this hole straight.
I must say...I cannot (refuse to) fathom operating a knee type mill without powerfeed LOL!
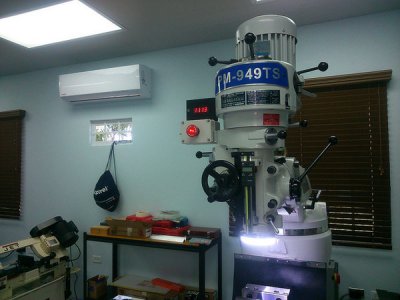
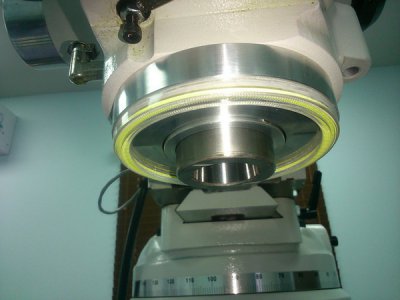
Tachometer and LED work light installed. Mark Jacob designed the tachometer and work light setup for this machine, its quite elegant in its design I may add. On of the problems with mounting a tach on this machine is there is no where sutabble for mounting the sensor.
Mark overcame this problem by mounting the hall effect sensor into the housing that holds the LED ring light. This mounts on the end cap of the quill. The magnet for the sensor to read is embedded into a ring with is mounted on the spindle nose. The ID of both assembles where machined (by Mark) to a tight fit (based on measurements I provided) and secured in place by two tiny set screws.
The only change I made to the system was a toggle switch to turn the LED off when not needed.
Close up of the two assemblies. You can just see the magnet to the right.
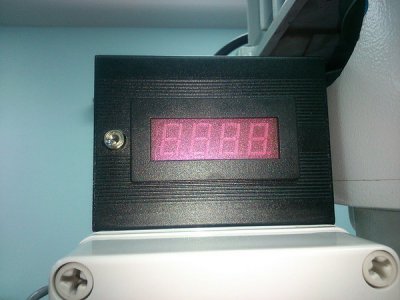
Tach enclosure with LED switch. I got a few of these little enclosures from amazon for about $10 to house the tach display and associated wiring in. They are pretty nice for the price. The tach display for the lathe will be housed in the same type of enclosure.
https://www.amazon.com/gp/product/B014K8XJSM/ref=oh_aui_search_detailpage?ie=UTF8&psc=1
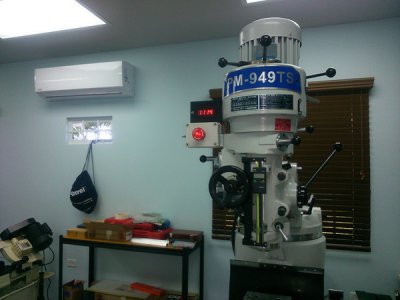
Mitutoyo quill DRO installed. I've relied on this unit many times since installing it to do slotting and counter sinks to a precise depth.
Installation wasn't as smooth as I hoped. There were two holes that I had to countersink a little deeper for the bolts to sit flush otherwise the backplate would not sit flat against the head. Also four bolts that mount the backplate to the reader head were not long enough. Once I sorted out those two issues it was a bolt on and indicate straight affair. I also have a similar scale that I plan to mount to the tail stock of the lathe.
Once installed the unit performs very nice.
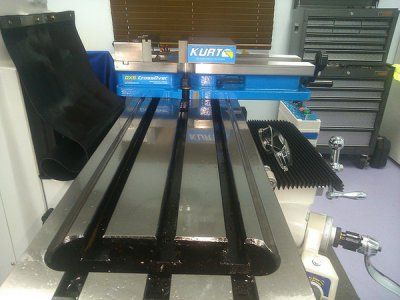
I've been using the mill almost everyday since the beginning of the year and I really enjoy the Kurt DX6 vise. As far as vises go its a real beauty. The only thing I added was a speeder handle. I didn't bother to install vise keys because it doesn't take me long to tram a vice in. I've been contemplating getting a second for when working with long parts.
The mill itself is a beautiful machine, I enjoy every minute working on it. Even though I don't have DROs installed on it yet I am able to hit all my desired dimensions to within .001" using the handwheels and taking care to account for backlash.
Well thats all for now, hopefully in my next update I will have the DROs installed on the mill.
Chevy
Lathe VFD and power distribution box completed.

Mark Jacobs Control system installed

Control panel with custom legend plate installed.

Dorian BXA tool post. I spent a lot of time researching tool post and I really wanted to go with the multifix system but when I looked at the cost of the holders it became less attractive to me. Import holders for Aloris type tool post cost about $20 while a multifix holder cost around $70. I bought a couple holders from Shars, a couple from Amazon (Accusize brand) and a boring bar holder from Matt. All fit perfectly. The hardware included with them were not bad quality either, I actually tried to strip a couple of the set screws and could not. They did come covered with that gritty oil so before putting them into service they got a clean down with brake cleaner and oiled back up to prevent rusting.
IMO the Accusize were finished just a hair better so I got about 20 in those to hold all the tools I've been accumulated while I got the lathe ready.

Y axis DRO scale installed. I opted to make all my mounting brackets instead of using those that came with the kit. This allowed me to fit everything exactly as I wanted.
When mounting the scale I was very hesitant to drill into the machine with a hand drill, so I made up a drill jig and clamped it to the machine. This work out great. I had to space my scale out about .25" since the casting wasn't perfectly flat. I also had to use a shim on one end to take out a bow of about .015". In the end I got my scale aligned in both axis to 1.5" end to end.


Cross slide scale spacer. The drilling and tapping of the M5 mounting holes into the cross slide was done on the mill. On top the spacer there are two M5 threaded holes to mount the scale shield.

Easson ES 12B DRO mounted on the electrical box. The holes were drilled on top of the electrical box before the control system was installed.

Compound graduations. Just having a little fun here but it does make the scale easier to read. I used my wife's nail polish to do the inlay, to my surprise it holds up perfectly against oil.

Knee powerfeed installed on the mill. Align Model AL-500P. They are about twice the price of other powerfeeds on the market but in my research the quality of these units are worth it. I also have one on my X axis.
Installation was pretty straight forward and Matt from PM was very helpful when I ran into a snag removing the dial nut. After everything is installed and adjusted with the provided shims, the assembly is then drilled through and pinned with a 5mm roll pin as can be seen in the picture between the castle nut and the bevel gear. I made up a little jig that clamped onto this assembly to ensure I drilled this hole straight.
I must say...I cannot (refuse to) fathom operating a knee type mill without powerfeed LOL!


Tachometer and LED work light installed. Mark Jacob designed the tachometer and work light setup for this machine, its quite elegant in its design I may add. On of the problems with mounting a tach on this machine is there is no where sutabble for mounting the sensor.
Mark overcame this problem by mounting the hall effect sensor into the housing that holds the LED ring light. This mounts on the end cap of the quill. The magnet for the sensor to read is embedded into a ring with is mounted on the spindle nose. The ID of both assembles where machined (by Mark) to a tight fit (based on measurements I provided) and secured in place by two tiny set screws.
The only change I made to the system was a toggle switch to turn the LED off when not needed.

Close up of the two assemblies. You can just see the magnet to the right.

Tach enclosure with LED switch. I got a few of these little enclosures from amazon for about $10 to house the tach display and associated wiring in. They are pretty nice for the price. The tach display for the lathe will be housed in the same type of enclosure.
https://www.amazon.com/gp/product/B014K8XJSM/ref=oh_aui_search_detailpage?ie=UTF8&psc=1

Mitutoyo quill DRO installed. I've relied on this unit many times since installing it to do slotting and counter sinks to a precise depth.
Installation wasn't as smooth as I hoped. There were two holes that I had to countersink a little deeper for the bolts to sit flush otherwise the backplate would not sit flat against the head. Also four bolts that mount the backplate to the reader head were not long enough. Once I sorted out those two issues it was a bolt on and indicate straight affair. I also have a similar scale that I plan to mount to the tail stock of the lathe.
Once installed the unit performs very nice.

I've been using the mill almost everyday since the beginning of the year and I really enjoy the Kurt DX6 vise. As far as vises go its a real beauty. The only thing I added was a speeder handle. I didn't bother to install vise keys because it doesn't take me long to tram a vice in. I've been contemplating getting a second for when working with long parts.

The mill itself is a beautiful machine, I enjoy every minute working on it. Even though I don't have DROs installed on it yet I am able to hit all my desired dimensions to within .001" using the handwheels and taking care to account for backlash.
Well thats all for now, hopefully in my next update I will have the DROs installed on the mill.
Chevy
- Joined
- Oct 27, 2016
- Messages
- 288
Superb job, very tidy.
On the mill I see just the Tach and Emergency Stop, where did you put the forward reverse control?
David.
On the mill I see just the Tach and Emergency Stop, where did you put the forward reverse control?
David.
Chevy, Congrats on getting it all up and tuned up. First class machines and upgrades.
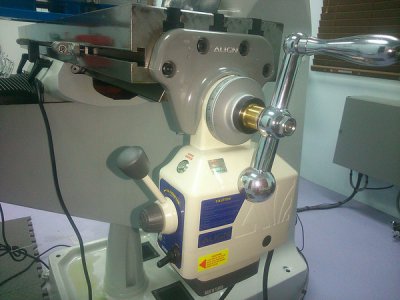
I am curious about the powerfeeds on your mill. What brand are they? You mention Align but I see Bestline on one of them.
I am curious about the powerfeeds on your mill. What brand are they? You mention Align but I see Bestline on one of them.
Thanks for the compliments guys.
David, all the other controls for the machine are mounted on a bracket bolted to the knee. Check out post #28 of this thread (linked below). Halfway through that post details the control box wiring and mounting.
https://www.hobby-machinist.com/threads/received-my-pm949-and-pm1340gt.59421/post-512098
Hey Alan, they are both Align brand.
The X (AL-500PX) axis power feed I bough from Eisen Machinery via ebay and that came with an Align nameplate as well as an Align hologram sticker.
The Z powerfeed was ordered from penntoolco.com. I did call them before hand to make sure that they carried the latest model, AL-500PZ and not the older AL-500SX. They informed me that it would be the latest model since it would drop ship from the Bestline which is the Align dealer in North America.
I could only assume Units that come from Bestline are re-badged with their nameplate, so I don't know if Eisen gets their units from another supplier.
Bestline website :
http://www.bestlinepro.com/power-feeds.asp
Align Powerfeed web page
http://www.align.com.tw/other-en/powerfeed/
In any case both came with Align documentation and packaging.
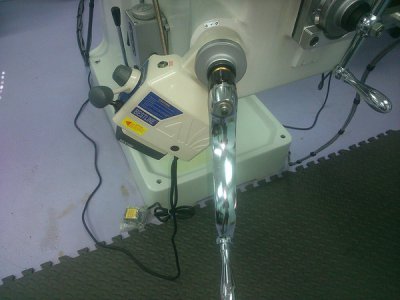
I know you are in the process of sourcing a knee powerfeed for your PM935 so here are a couple of extra pictures showing both the X and Z units. Hope it helps you out.
Knee powerfeed
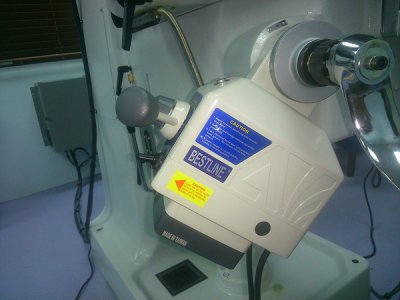
Table powerfeed
Chevy
Superb job, very tidy.
On the mill I see just the Tach and Emergency Stop, where did you put the forward reverse control?
David.
David, all the other controls for the machine are mounted on a bracket bolted to the knee. Check out post #28 of this thread (linked below). Halfway through that post details the control box wiring and mounting.
https://www.hobby-machinist.com/threads/received-my-pm949-and-pm1340gt.59421/post-512098
Chevy, Congrats on getting it all up and tuned up. First class machines and upgrades.
I am curious about the powerfeeds on your mill. What brand are they? You mention Align but I see Bestline on one of them.
Hey Alan, they are both Align brand.
The X (AL-500PX) axis power feed I bough from Eisen Machinery via ebay and that came with an Align nameplate as well as an Align hologram sticker.
The Z powerfeed was ordered from penntoolco.com. I did call them before hand to make sure that they carried the latest model, AL-500PZ and not the older AL-500SX. They informed me that it would be the latest model since it would drop ship from the Bestline which is the Align dealer in North America.
I could only assume Units that come from Bestline are re-badged with their nameplate, so I don't know if Eisen gets their units from another supplier.
Bestline website :
http://www.bestlinepro.com/power-feeds.asp
Align Powerfeed web page
http://www.align.com.tw/other-en/powerfeed/
In any case both came with Align documentation and packaging.
I know you are in the process of sourcing a knee powerfeed for your PM935 so here are a couple of extra pictures showing both the X and Z units. Hope it helps you out.
Knee powerfeed

Table powerfeed

Chevy
- Joined
- Oct 27, 2016
- Messages
- 288
OK thanks Chevy, I forgot you did that, but as soon as I went back I remember seeing how you did yours.
Not the first time I've forgot something and probably not the last time.
David.
Not the first time I've forgot something and probably not the last time.
David.
Thanks Chevy,
I think Bestline claims to be the distributor. But if you look at Firestopper's thread on his new 1640 he bought from Acra, Paco posted a photo of Acra's warehouse. In that photo you see they have a load of Aligns on the shelf. In addition, as you mentioned, Eisen sells them too at an attractive price.
BTW, I spoke with the owner of Penntool and traded a few emails with him. He confirmed that he gets his via Bestline.
I have been a bit confused as to why Bestline is rebadging Aligns and tried to find out why but gave up since it was low stakes to me. Perhaps it is an arrangement with Align, who knows? Meanwhile I also became doubtful that Bestline really has the exclusive distributorship in the US. I suspect if you can do a large enough volume, Align will sell direct to you. I see evidence that Eisen and Acra are examples. Was your Penntool order shipped to you from Bestline?
So enough speculation, what is important is that the Aligns are top shelf. Their turndown on the speed control is vastly superior to the Chinese made ALSGS units. The ALSGS units are widely rebadged and their business model must be premised on this method of distribution. The ALSGS units are okay but they are not equal to the Aligns. I now have one of each since I actually now have an Align on the Z of my PM935. I am now evaluating replacing the the X I have with an Align. The PM935 and PM939 are fine machines and deserve the best!
So congrats on the great equipment and thanks for the detailed background on the powerfeeds.
Last edited by a moderator:
- Joined
- Dec 31, 2016
- Messages
- 166
Very nicely done, I just ordered the same mill and am learning from what you are doing. Thanks for posting.Hey guys,
So here's where I'm at in getting my machines up and running. So far all my efforts have been focused on the mill. Besides cleanup and leveling I haven't done anything with the lathe yet. Hopefully I should be able to start working on her later this month.
This is the VFD and power distribution system I built (Many thanks to Mark for his wiring diagrams). Apart from powering the VFD it provides 12V and 24V DC power for devices such as work lights, tachometer solenoids and relays. It also supplies 120v to the DRO and powerfeeds. This way all equipment for the machine is powered on or off with one switch.
View attachment 259112
The motor on this machine is a two speed, 3ph, 3HP, constant HP. Below is the motor name plate showing the wiring diagram for the two speeds. I opted to wire it on the low speed side (4(8)P) this way you get double the torque on the low end. For top end speed I would run the VFD between 60-100Hz. On the highest pulley @ 100Hz I should get a top speed of ~4500RPM.
View attachment 259113
When I opened the motor wiring box I realized that the entry hole for the motor wires had a sharp edge to it. So I took out the box filed the edges of the hole then used some fuel tubing to make a grommet so that the wires have zero change of coming in contact with any sharp edges.
View attachment 259114
Motor wire up in 4(8)P configuration. For motor to VFD I used 14 AWG shielded VFD cable that has both a braided shield as well as a drain wire.
View attachment 259115
Wiring for my control box. I should have really used a 9 conductor cable for this but I couldn't find any at a reasonable price. I had a good supply of shielded 3 and 2 conductor cable from previous projects so I opted to make use of those.
View attachment 259116
Now I bought legend plates for the direction switch as well as the speed pot. However when I installed them they looked..well I didn't like how they looked lol. So I decided to design and make my ownBelow is my Taig CNC mill engraving my legend plate. I didn't have the proper V bit on hand so I just used my smallest spot drill and tested at different DOC till the engraving looked right.
View attachment 259117
Finished plate
View attachment 259118
View attachment 259119
I knew from the start I wanted the controls mounted to the knee in front the machine. I don't like (read loathe) drilling holes into machines unless its absolutely necessary such as mounting DRO scales. So I designed and machined a mount for the control box that utilizes the existing M8 bolts on the Y Axis end plate.
Top to bottom:
1. Switch box mounting plate. The slots cut in it are for 1/2" velcro straps for some cable management.
2. Bracket that mounts to the Y axis end plate
3. Extension that connects the Bracket and the mounting plate together. These two parts could have really been made as one but the Taig mill doesn't have that amount of travel and more importantly I just didn't want to machine one half, index and then machine the second out of one piece of stock.
4. This is an isolator made out of some scrap .062" engraving plastic. The Y axis end plate is aluminum and I wanted to prevent any chance of it galling when the mounting bracket is bolted on top of it.
View attachment 259120
Switch box mount assembled
View attachment 259121
Cable straps
View attachment 259122
So that's where I'm at. This week I hope to wire up the controls to the VFD and make the mount for the E-Stop switch which will go on the head, where the stock switch was located.
Chevy
