Rd14x40 Bed Twist

We are your family now son, get back in yon workshop!!:cheerful:
YES SIR! :)

I was able to level the bed very well with the arrangement for bedding the lathe.

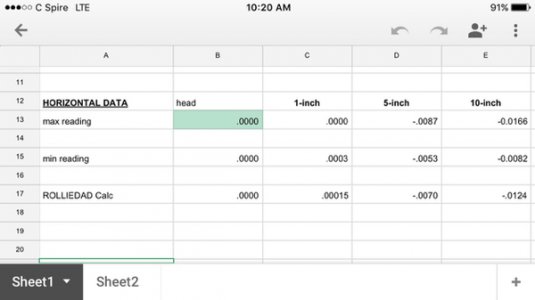
The headstock on my lathe is out of alignment by approximately .012" over a 10" length in the horizontal plane. The error indicates the headstock chuck is pointing "to the back" (away from the lathe operator.)
The indications were arrived at using the Rollie Dad's method after leveling the bed with a Mitutoyo precision level. If I make a test cut on a bar, the taper is larger the further you are from the chuck as if the tailstock is set back to purposely cut a taper ( test cut did not use the tailstock for support).

Looking at the lathe manual and the lathe, there are no adjustments to "swivel" the headstock. I hate to think about taking the head off and doing any scraping. I do not see any way to adjust the spindle within the headstock. There is no measurable "slack" in the spindle bearings. Runs quiet.
Checked for the easy obvious problems.
Does anyone here have experience correcting this by shimming or some other method?
 
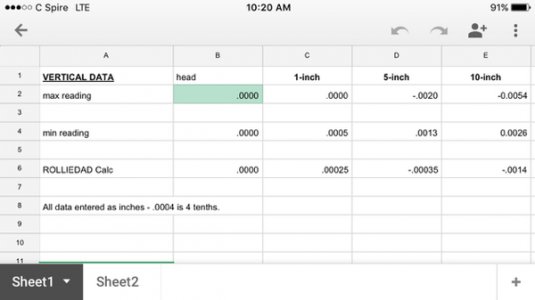
Looking at the data, I am out very little in the Vertical , this would be head "nod".
I am looking at a remarkable amount of Horizontal error which substantiates the
taper I was getting on test cuts.
 
Last edited:
I saw your thread on the Rockwell Lathe group a while ago. I follow along with your measurements, but I doubt very seriously that the headstock is out of alignment. Look for tail-tale signs of the bolts holding the headstock in place of being tampered with. If none, I would look at another method of checking headstock alignment that does not involve using your carriage. I know you did the vee block check on the vee ways a while back and showed very little change. I think you may been getting false readings by that method. The vee block could have been resting on part of the vees that were not worn, giving a false measurement. Your measurements shown in the table tell me that your bed has heavy wear. But before me saying that, you need to rig up some kind of fixture that will ride on portions of the bed not subject to wear such as the areas between the ways and the sides of the bed. With that fixture, use a test bar that has a known accuracy to it and mount to the spindle by either the internal spindle taper or a 4-jaw chuck and indicated trued up end to end. With this arrangement, check headstock alignment. Using the carriage is not an accurate method of checking the alignment of the headstock. It only tells you that you have wear in the bed.
Ken
 
Point well taken, Thank You Ken, I will progress to a fixture that does not involve the carriage.
 
.012" over 10" is a lot! Trouble is I have no knowledge of Rockwells at all, so I am going to lurk and watch what comes up. Some headstocks that are "loose" or removabe from the bed, ie theyre bolted to the bed, use eccentrics or adjusting screws to give slight adjusment of alignment, if your lathe has ben moved a lot and lifted on slings it is possible the headstock has moved but as I said, I have no knowdge of Rockwells, so I can do no more than say, good luck!
hil
 
My lathe headstock is bolted on with no adjustment for alignment. I'm not sure that there's a head alignment problem but the data thus far correlates to it. I am going to apply some additional tests you and others have suggested.


Sent from my iPhone using Tapatalk
 
Looking at the data, I am out very little in the Vertical , this would be head "nod".
I am looking at a remarkable amount of Horizontal error which substantiates the
taper I was getting on test cuts.
Don't believe in my expertise in a case this subtle, but I would consider the
possibility that this is an old problem, and foolish re-bedding of the tail stock
has moved the" center" in a tiny orbital error. I'm not sure how to measure this ,
but it should exclude the tail stock. Patience, care, and Good Luck......BLJHB.
 
Today I chucked up a steel disk 1" thick and 9" in diameter in the 4-jaw chuck.
I rough faced it then took a light cut with a new sharp insert at a very slow cross feed rate. I had a very good smooth resulting finish.

I took my machinist precision straightedge and placed it across the face of the disk. The face surface geometry was neither convex or concave to any remarkable degree.
(I used a small light behind the ruler). This was a very encouraging test.
 
if your headstock is misalinged and actually points away from the operator by 012" over 10" this test will not show up that error as convex or concave on the work. did you notice that you had to take more cuts off the outside edge of the disc in order to clean it up all the way to the centre? that would tend to confirm your 012" misalignment theory.
phil
 
Back
Top