POTD- PROJECT OF THE DAY: What Did You Make In Your Shop Today?

Did some finishing touches on the jumbo fly cutter. I trued up the od and adjusted the counter weight right in the spindle. I made a few test cuts. I ran it at 150rpms initially, but was getting a little chatter. I increased rpms to 200, and it started to cut smoothly. This cut was with koolmist for a lubricant. After I get the mill trammed I will try it with WD40. I looks like it might work.
20220110_225257.jpg20220110_231347.jpg20220110_231745.jpg20220110_231944.jpg
 
Vise done... painted the same anvil gray as the drill press.

IMG_4056.jpeg

Everything nice and clean. Way oiled... Adjusted the gibs. Working fine...

4" wide jaws. 3-3/4" max opening. Maybe make some jaws with the V grooves...

IMG_4054.jpeg

IMG_4055.jpeg
 
If you can get a 1" x 2" long annular cutter, you can core the hole form both sides, saves a lot of time. When I make lathe spiders, I use the annular cutters for solid round stock, takes 1-2 minutes from each end (usually on the lathe), then I follow with a boring bar. You could also do it on the mill if you have a jig/stop system to keep the alignment.
I have 2 of those cutters, thanks to the "pass around box" last spring but one is 1.5" and the other is 2"!!
Will use the 2" to drill the holes in the 1/4" wall square tube to receive the sleeves.
 
One of the things I love about having a mill and lathe is the ability to build or rebuild things in our everyday life. This last weekend I was using my snowblower once again due the the lousy weather we have been having. Just before finishing up the handle that moves the chute assembly for aiming where the snow will go broke. The handle just came off the one end and dropped out of the handlebar assembly. It was not a big deal as you can still turn it manually to where you want but you have to stop and walk around the bars to move it.

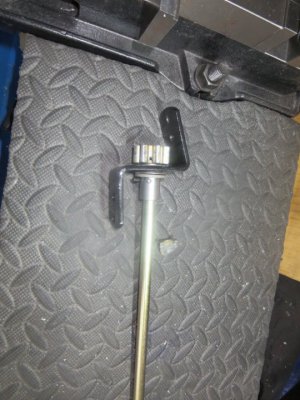
I took it apart and found that the pinion gear that hooks to the handle had broken off of the gear. Thus a project was born. The original gear had a short sleeve that slipped onto the handles shaft and was clipped into place by a hole drilled through the sleeve and shaft.

I took the original gear and faced off the broken parts and milled the hole through the center to 17/32". I built on the lathe a longer sleeve to fit the rod the same diameter as the bushing it rides in and the friction washer that hold it all in the bracket, center drilled it to fit the shaft of the handle. I cut a step on the end the same size as the hole I milled through the gear and pressed it into the gear. I further drilled the gear and installed a 1/8" friction pin to prevent turning. I then drilled the sleeve i had built to accept the original through clip that held it on the rod.

Assembled it all together with the bracket, fibre washer, press on friction washer, and slipped in the rod and installed the through clip. project complete and much more robust than the original being much longer with better purchase on the rod and made of steel. I think the original part was cast iron judging by the chips. I didn't take any before or during pictures, only an after shot. You can see in the pic the broken piece of the original and how short it was, all in all it probably had only 3/8" or so purchase on the end of the shaft. No wonder it broke.

It is so nice to be able to improve the part rather than buy a replacement that might take weeks to get and would definitely break again in my opinion. So in the end I spent a couple of hours time and some scrap rod to build a part that probably cost $25.00 or so, but what fun is that? Besides I like my improved version much better.
 

Attachments

  • IMG_0950.JPG
    IMG_0950.JPG
    88.1 KB · Views: 46
Made a simple extension to the back gear lever. It was so short that the guys with bigger hands had trouble. Simply a 3/4” piece of brass with a internal and external threaded of M16 x 1.5 and a through hole using a “S” drill to fit a scrap piece of round stock and the original spring. Cleared the area on the door and no more needing to open the that door and call it done.
Pierre


6862D86C-1954-487B-B9BC-09E9DF3CCA37.jpeg8709561C-7047-4613-9764-9AA0B9A1F2A6.jpeg
 
Santa brought me a Pit Bull stand for picking up the front of my motorcycles. Included was a sort of universal pin
the fits up into the hole in the bottom of the steering head. Of course, it was too large for one bike and too small
for the other, so I made a couple of new ones. I used material on hand, which is why one is stainless and the other
is blued.

IMG_1717.jpeg

IMG_1716.jpeg

IMG_1715.jpeg
 
Santa brought me a Pit Bull stand for picking up the front of my motorcycles. Included was a sort of universal pin
the fits up into the hole in the bottom of the steering head. Of course, it was too large for one bike and too small
for the other

Yeah, I hear that his reindeer's noses aren't all identical either!

;)
Brian
 
Today i was finally able to get up out of bed, i've haven't had a cold since the pandemic started. I had to get tested for covid, thankfully i'm negative but spending few days indoors and eating all the time, i've become fatter than ever. So this morning with a small fever i got down in the small heated garage to get some work done. First to be repaired is my brothers Astra, It has a major oil leak on top of the engine around the injectors. So 4 new gaskets and i apply silicone sealant as an insurance. Then the annoying issue, it has a good battery and it keeps dying, there is no parasitizing draw but whenever you turn the ignition on headlights come on and stay on even when cranking. Being a diesel it need lots of power but the battery tray is very small so this is the biggest battery it can accommodate. Lot of people rewrite their headlight to the ignition ( lazy people). So i took apart all the wiring to fine where has someone cut the wires. I looked and looked but no spaces, when i put everything back together got my diagnostic out and seen it's the ecu that commands the lights on with the ignition on. I also tried finding the fuse or relay and guess what there is no fuse or relay it all goes thru the BCM. As stupid as it sounds it's a daylight running lights strategy, i tried to change it but it needs a Car Pass code which i don't have. And this being a GM product there is only one dealership, their service is awful and they simply don't pickup the phone. So this issue remains, one of the issues why i don't like GM vehicles is they always have something wrong with them. And there is no dealership support, If this was a Peugeot, Citroen i'll be done, one phone call or an e-mail dealers have access to the code thru the vehicles vin.
IMG_20220108_200151.jpgIMG_20220108_200144.jpgIMG_20220108_202011.jpgIMG_20220108_201959.jpgIMG_20220108_205418.jpgIMG_20220108_205545.jpg
 
Today i was finally able to get up out of bed, i've haven't had a cold since the pandemic started. I had to get tested for covid, thankfully i'm negative but spending few days indoors and eating all the time, i've become fatter than ever. So this morning with a small fever i got down in the small heated garage to get some work done. First to be repaired is my brothers Astra, It has a major oil leak on top of the engine around the injectors. So 4 new gaskets and i apply silicone sealant as an insurance. Then the annoying issue, it has a good battery and it keeps dying, there is no parasitizing draw but whenever you turn the ignition on headlights come on and stay on even when cranking. Being a diesel it need lots of power but the battery tray is very small so this is the biggest battery it can accommodate. Lot of people rewrite their headlight to the ignition ( lazy people). So i took apart all the wiring to fine where has someone cut the wires. I looked and looked but no spaces, when i put everything back together got my diagnostic out and seen it's the ecu that commands the lights on with the ignition on. I also tried finding the fuse or relay and guess what there is no fuse or relay it all goes thru the BCM. As stupid as it sounds it's a daylight running lights strategy, i tried to change it but it needs a Car Pass code which i don't have. And this being a GM product there is only one dealership, their service is awful and they simply don't pickup the phone. So this issue remains, one of the issues why i don't like GM vehicles is they always have something wrong with them. And there is no dealership support, If this was a Peugeot, Citroen i'll be done, one phone call or an e-mail dealers have access to the code thru the vehicles vin.
View attachment 391876View attachment 391875View attachment 391878View attachment 391877View attachment 391879View attachment 391880
first, take care of yourself, drink plenty of water.
that sucks about the code, can't you put a relay in between using a switch and relay to turn them on, or a relay and timer, let the car start, then turn on the lights after 15 or 20 seconds.
 
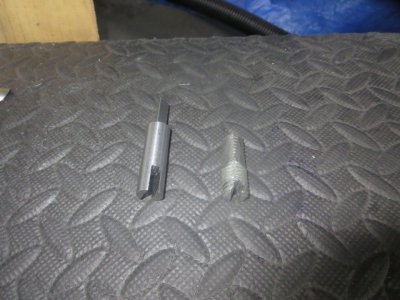
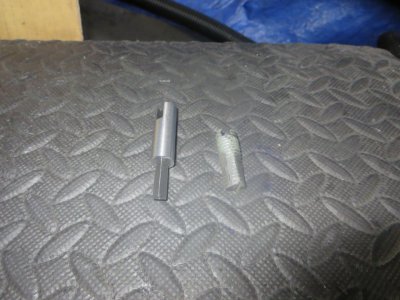
I finally got my hands on a VW Beetle line boring tool. The guy that had it before took very good care of it and it is in excellent shape. In fact I used to have him do our boring when needed so I trust the machine.

He had made an adapter to use a drill to power the bar, apparently the original got lost somewhere. I didn't like the look of his adapter and figured I could make one a little better. There is a hole drilled in the back of the bar and a steel pin near the edge. The tool slides into the hole and around the pin to drive the cutter. I made my tool to go nearly to the bottom of the hole and fit pretty snugly so there wouldn't be much movement there. I also made the drill end a little smaller to be able to use a 3/8" drill on it. Most guys use a 1/2" drill on it to keep the speed low for cutting, and I have one of those old gear drive drill, but I hate the wind down time on them. I figure I can moderate the feed speed with a variable speed 3/8" drill well enough, or if not I can use the 1/2" instead. Both will chuck up on the end of the adapter.
 

Attachments

  • IMG_0951.JPG
    IMG_0951.JPG
    122.3 KB · Views: 51
  • IMG_0952.JPG
    IMG_0952.JPG
    123 KB · Views: 57
Back
Top