Over a few days really, but here goes. A buddy has a 120 year old clock in a wooden housing. The top of the case is surrounded by a molding but as you can see in the pic, the 7 inch piece from the front to the back is missing on one side:
View attachment 500658
He has had the clock since the early 1970's, and this piece was missing when he got it. He lives in an apartment, and has no access to tools. So when I saw this, I decided to see if I could make a replacement part.
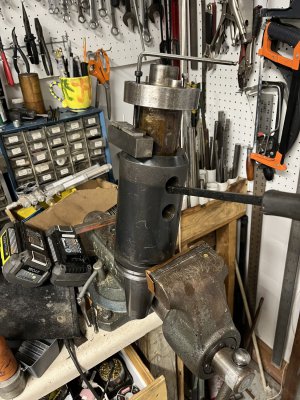
I have a table saw and miter saw, but no other major woodworking tools (or woodworking skills to be honest). So I decided to figure out how to make the part on my metal lathe and milling machine. The smaller round feature has a diameter of .5 in, and I have a 1/2 in ball end mill so I know I could cut that feature on the mill. I determined that the larger "cove" has a diameter of 1 3/8 - radius .6875. I had no way to cut that. After thinking about it, I came up with this:
View attachment 500664
That is a length of 1 inch aluminum bar with a 1/2 inch hole bored to fit a small fly cutter from the milling machine, with a set screw to hold the fly cutter in place. I ground and sharpened a HSS bit that I thought would cut wood, and carefully set it to .6875 radius from the center line of the lathe. In the pic I am trying it on a piece of scrap mounted in a tool holder. To my surprise, it cut a nice 1 3/8 diameter cove in the wood.
My first attempt didn't fit the clock due to working only off of a contour tool and making a couple of invalid assumptions. So I went to my buddy's home with a digital caliper, and made some careful measurements. Using these, I was able to machine a part that fit! The pic shows my first attempt and the contour tool, along with a cutoff from the finished part.
View attachment 500666
Machining wood was fun. Imagine cutting metal with a tool hung almost 9 inches from the chuck - not a chance. If nothing else it was a good exercise in thinking outside the box....