POTD- PROJECT OF THE DAY: What Did You Make In Your Shop Today?

It must be contagious.
I need 6 of these little brass bushes, threaded M6 inside.
bush.jpg
a length of 12mm brass rod and turn down the smaller section to 8mm dia and 5mm long, drill and tap 6mm, then use a die to cut a M8x1.25 external thread so it can lock into the hole in the 5mm plate.
All going well till almost finished the 8mm thread when it tore off, ok do it again but single point the 8mm thread instead.
ooops, tore it off again.
What the?
Then the dumb cluck bell went off, the only metal holding the 5mm bit on was where the threads crossed each other. :bang head:
 
Left this printing late last night… Done by the time I woke up. This is to sharpen the rods for the still new in the box TIG welder that I have never used… :rolleyes:

But I got to test the new carbon fiber reinforced filament… was a bit of a pita getting to the correct temperature settings and feed rate… but it came out great even without enabling support structures…

35D95D17-0B55-44C5-97CE-E8CE2EDA6F1A.jpeg
D330E6A3-A10F-406F-82B1-B46659914B13.jpeg
4AD9A6B8-62CF-4097-87E8-164BC363BA41.jpeg
3F7FC571-EA03-44FB-AC13-1FC32FDEDFD0.jpeg

 
Last edited:
That looks great. I have been looking for a project (read excuse) to try some carbon filament.
 
I have my set of very nice dial indicator, and test indicators... Starrett, Mit, Federal, BesTest, B&S... but I recently broke my cheap HF indicator . It was mounted on the ways of my lathe, and when I looked down the crystal was shattered. I don't know what happened. I was quite glad it was a cheap HF indicator and not one of my better ones. But I don't want to take a good one and risk it, so I either buy another HF or fix what I got..
So a piece of lexan some sanding, (put a bevel in it so it would drop in) and silicone..
Yep, I'm cheap, but not stupid either.. If it happened once it might happen again... Now it's bullet proof :grin: 20220408_214925.jpg20220408_214944.jpg
 
the damage I did today continued tonight.
I went to drill the cross bar for the lathe key. the 4140HT is not that hard, but it was not easy. The small pilot was fine, but the larger hole just wouldn't cut. Took out the cobalt drill bits and still wierd, then grab, finally got through.. Reamed.. deburred.
brought it over to the vise, heated it, started putting the bar through, going, then it started coming out of vise.. readjust it, in a better position... it's already tight and not even 1/3 in. tried reheating, but the key and t bar are heating together, tried cooling the t bar with acetone.. not helping.
ok, time to use the press. going, then stop... I think it galled up.. put some antisieze on it. not moving. heat it, press, bent the the t bar. straighten it. try again. nothing. Bang it in there. not moving. now banging the key.. what a mess.
change the bottle jack to a higher tonnage. it's moving again.. ok.. pretzel...
straighten it ... snap...

shower... hard alcohol... anger, ... realization I should have stopped when it was stuck and given it more thought... licking my wounds now...

The key is damaged from hammering... its usable, but not pretty. I might be able to fix it up with some knurling to hide the damage.
probably going to cut the T handle, then drill it out. Grrrrrrrrrr...

that sucks :( I've been practicing my "I'm mad, better walk away before I break something" skills and my success to screw up ratio has been getting better :) I've found that reaming onsize for an onsize rod makes a nice secure fit for something like a chuck key, without having to use a temperature differential. I screwed up too many of those - the slightest bit of cocking/ galling/ pausing = lock up and damage. You have to get it through in one go or you're toast. Another trick I've found that helps is turning/ sanding down the first 1/2-1" of the rod to a bit below the hole diameter (say 0.499 for a 0.500" hole). That then falls in easily and helps align/ guide the rest for a quick push. no faffing around trying to get everything lined up right while that temp differential disappears.

Also, what size chuck key you working on? Might have a spare body for postage if it fits.
 
that's ok. I wanted a longer key, because I keep running into the dial indicator. So I made this one 10 or 11 inches. still trying to avoid it right now.
what I thought I would do, is take the side of the tbar that didn't get bent (badly) and use that for a reference to put it back in the square collet block so I can drill out the T bar. I figure I can take a square, and a parallel and hold it up against the Tbar and get it relocated straight up and down.
then take it over to the bandsaw, cut off the tbar, then drill it out and do whatever.
After that, I'll see if I can turn down the hammer marks on the key.. if they aren't too deep, or out of shape. If not, I'll see about covering it with knurling.. if not.. I'll wear the scars as a reminder as I often do.

still don't understand the 7 thou cut on one pair of sides for the square... My collet block is only out about 2 or 3 thou on one side. I should mark it or re-grind it.
 
Yeah, I dunno what's going on with your collet block, maybe such a gauge pin in and see if there's some movement when you rotate the block.

Most of my day was spent on a bike ride with a friend, but after that I helped my daughter with her terrarium project. She drilled all the holes in the ventilation plate herself and I deburred one side. Have to do the other side when we get home from band practice. There aren't enough hours in the day!IMG_20220410_171929.jpg
 
Last edited:
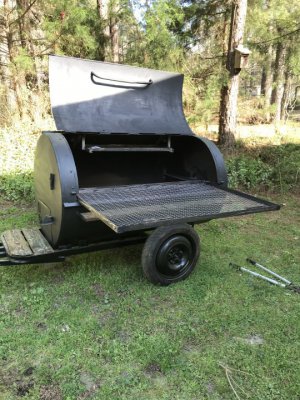
Finally finished a pig cooker for a fellow. Took me much longer than normal due to feeling bad from virus. No energy and aches all over.
 

Attachments

  • ED9E746E-1600-492C-859B-32B6A689D4DF.jpeg
    ED9E746E-1600-492C-859B-32B6A689D4DF.jpeg
    147.3 KB · Views: 74
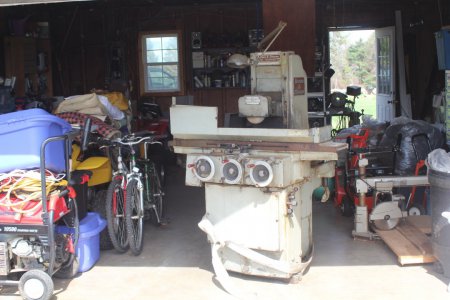
Moved this to the front of the garage today . Moving the equipment is not an issue . Moving everything to GET TO the equipment is . :big grin:

Haven't made my mind up on the Bridgeport as of yet , but it may go once I see how much space I have . :encourage:
 

Attachments

  • IMG_9079.JPG
    IMG_9079.JPG
    138.8 KB · Views: 65
Back
Top