POTD- PROJECT OF THE DAY: What Did You Make In Your Shop Today?

Joe,
Is there a name on that corner clamp set?
It looks very useful.
I have looked at this set from Lee Valley, but they seem stupidly expensive for what they are:
https://www.leevalley.com/en-ca/sho...ixtures/51101-90-assembly-braces?item=03F0305

Thanks!
Brian
They come in two sizes from what I can find, 4.7" and 5.5" . Just search on Amazon for "90 degree positioning squares right angle clamps", and you should see a whole slew of Chinese knock offs, about $40 for a pair or$70 for four. They are knock offs of Woodpecker squares from what I've gathered after a purchase. Check them for square, as not all are.

Unfortunately, the drawers I am gluing up are smaller than the 4.7" size, and I cannot find them smaller, so I'm making a smaller set.

Sent from my SM-T500 using Tapatalk
 
I did general shop and machine clean up while listening to sweaty Teddy.
View attachment 431655


One of life’s greatest pleasures is TIG welding while listening to Ted Nugent’s Double Live Gonzo really loud on headphones. The trick is to have all the material prepped so you can be in the welding hood for the full length of the double album.
 
Last edited:
I gas welded a root weld on this 1” mild steel plate. I learned that *a #5 tip is much too small for this thick of plate*.

Recommended oxygen pressure is 6-12 psi, & recommended acetylene pressure is 5-8 psi.

It was a really bad time because it was so difficult to get the base material to puddle. The photo below is my attempt at the root weld using a 1/16” landing. Once it cools off, I will upload a photo of the back side to see if full penetration was achieved.

The filler rod is 3/32” RG45. I wish I would have had 1/8” filler rod.

A #7 tip is recommended for 1” plate, but I don’t have one because my 145 ft.³ cylinder can only support up to a #4 tip. This is because the maximum rate of acetylene withdrawal is 1/7 of the cylinder’s capacity per hour, & a #4 tip consumes 10-25 ft.³/hour.

8BAE59DE-3EAE-40EE-9430-7B1402507488.jpeg

40822C81-E703-4FA8-8427-14FB331B407A.jpeg

This went so badly that I probably won’t gas weld on thicknesses greater than 1/2” ever again. Even thicknesses greater than 1/4” are approaching the limitations of a 145 ft.³ cylinder.
 
Last edited:
Project of last couple of days, finished up a replacement VFD control system for an Acra 1660TE lathe, today did the wire labeling and bench tested that the controls operated correctly. Ironically one of the relay contacts was bad and was replaced. Next will be building the VFD cabinet and programming. This system is built for use Hitachi WJ200-075LF, it will be run in derated mode for a 5Hp motor. The Yaskawa drives that I normally would use in these types of builds have an 4 month lead time. One aspect of the Sunmaster lathes that is often an issue is the limited space behind the front control panel, so the switches are mounted horizontal when possible and the wiring needs to be tucked in tightly. The Idec switches are much nicer than stock, but like everything these days are hard to get and much more expensive then the stock ones.

Acra 1660TE Lathe Control System 1.jpg
Acra 1660TE Lathe Control System 2.jpg

Acra 1660TE Lathe Control System 3.jpg
 
Whereas I've been working in this for a few weeks, I did finish it today. I built a 10 drawer companion tool chest to attach to the 17 drawer chest I built years ago.

The frame is 2x4 and 2x2 1/8" wall aluminum extrusion. The drawers along with the chest sides and top are 1/8" aluminum. The drawer pulls are cut from 1" square x 1/8" aluminum tube. The drawer slides are 50lb, full extension slides. It's all MIG welded using 5356 wire.

Long story shortened. Years ago, I worked for an aluminum fabricator who was making aluminum concrete forms and I bartered for a short pallet (about 200 lbs worth) of 1/8" aluminum panels that got oxidized. I'd always wanted a large tool chest but was at the time (and still am) too cheap to buy one...so I built my own.

Fast forward about 18 years, I needed a storage solution for all the recently acquired machining tools; and still have some of the old 1/8" aluminum left over. I designed the largest chest that could be made with the material on hand, and have at least 8 drawers.

Some day when I don't have anything better to do, I'll buff out the drawer fronts and frame of the older chest to match the new one.
closed.JPGopen.JPG
 
This is the most of the progress so far of 5/8” plate being side milled. Up next is face milling, & then half of them will get a bevel.

I bought a lot of this 5/8” plate a long time ago for *really* cheap.

I am not doing this work, although they are being done on my mill. I have some young whippersnapper helping me; he is really excited about learning to use the cutting torch, mill & lathe. He has a really good attitude & work ethic. Part of his compensation will be a *really* nice shop made bicycle with only 8 miles of use. I love making stuff, but I’m not very interested in riding around on a bicycle. He does not own a car, & he is currently commuting to work on an econo-import bicycle.

5609B655-90E1-4E6F-B5D1-E750230A1EB8.png
 
Last edited:
Update: 1” plate back side penetration of root weld is a fail. It was tacked with a 1/16” gap which mysteriously closed up upon welding.

4EEE887C-6A13-4468-BD8D-81600D35771B.png

This is what the back side looks like when you fail to keyhole.
 
Espresso machine lever was rough... I have taken it apart several times to polish the main lever cam shaft... replaced all valves... and it would be smooth for a few shots and get rough again...

View attachment 390454

Well, today I decided to figure out what the problem was. Turns out it was a simple fix. This stud, that the lever rides against, had some raised areas around the slot for the screwdriver... seems the previous owner was not careful when installing.

Removed it, filed down the raised areas... placed it on the lathe and use some fine sandpaper to smooth it out. Finished with a 3000 grit then to the polishing wheel... Also took the time to polished the lever cam shaft again...

View attachment 390455

All working fine now... I will be able to confirm if I found the culprit if it continues to work smoothly for the rest of the week...

View attachment 390456

View attachment 390460
Looks and sounds familiar. Don't neglect to do occasional citric acid flush. I was reluctant in doing it because I read somewhere that it can "destroy the espresso machine..." I went through replacing almost all the brass and rubber parts in the group head and it was just marginally better. Flushing the machine several times as described below brought it back to like new condition. My machine is a dual boiler with a rotary pump.


Ariel
 
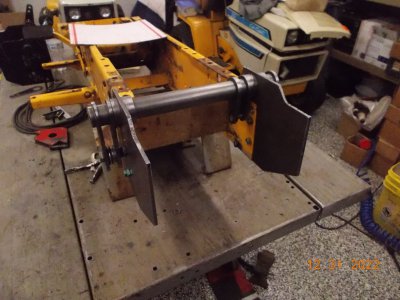
Mock up of parts for a #383 cat 0 setup on a 2072 Cub Cadet Super.
Making several of these.
LOL , I just scoped a 2072 out on CL . ;) I had to make a trip over for diesel for the Kubota and the truck . $100 don't go to far at the diesel pump any more . :eek:
 
Back
Top