-
Welcome back Guest! Did you know you can mentor other members here at H-M? If not, please check out our Relaunch of Hobby Machinist Mentoring Program!
You are using an out of date browser. It may not display this or other websites correctly.
You should upgrade or use an alternative browser.
You should upgrade or use an alternative browser.
NEW ACRA 1640TE
- Thread starter Firestopper
- Start date
- Joined
- Nov 7, 2018
- Messages
- 186
Thank you but my work pales compared to Mark's (mksj) electronic's wizardry. This man has taught me so much over the past couple of years. I try hard to find answers to questions without bothering him but when I can't find the answer, he's always willing to help me. He's defiantly a mentor and older brother I never had.Wow! Watching you guys create these works of art is really enjoyable. And loving those plates on your truck.
Funny story on the front license plate "GAS HOG". Back in the early 90's,I had a ford F250 4x4 with a 460. My brother-in-law (BIL) and I would go camping with our families. That truck had two fuel tanks for a total of 38 gallons. He would get annoyed at the frequent fuel stops I required durning our travels and him being a State Prison Deputy Warden at the time instructed an inmate to press out an official plate and gave it to me that following Christmas. Funniest gift yet! Anyway, AZ only requires one registered plate on the rear so its handy to annoy those liberal Prius drivers Hahah! Back in 95 I took my family to White Sands Missile Range in that F250 and a Japanese tourist asked me in broken english if he could take a photo of the of the front view of the rig. I'm sure the truck was a topic of discussion on wasteful American resources. My BIL eventually retired as a Warden but the plate will never retire
True story...All of it.
Paco
- Joined
- Nov 7, 2018
- Messages
- 186
That's a really nice machine, and the upgrades just put it over the top. Enjoy my friend. Mike
Thanks Mike,
Its coming out nicely,
I gotta walk the kids and machine some scale mounts. I'll update tonight.
Paco
- Joined
- May 11, 2017
- Messages
- 232
Funny story on the front license plate "GAS HOG". Back in the early 90's,I had a ford F250 4x4 with a 460. My brother-in-law (BIL) and I would go camping with our families. That truck had two fuel tanks for a total of 38 gallons. He would get annoyed at the frequent fuel stops I required durning our travels and him being a State Prison Deputy Warden at the time instructed an inmate to press out an official plate and gave it to me that following Christmas. Funniest gift yet! Anyway, AZ only requires one registered plate on the rear so its handy to annoy those liberal Prius drivers Hahah! Back in 95 I took my family to White Sands Missile Range in that F250 and a Japanese tourist asked me in broken english if he could take a photo of the of the front view of the rig. I'm sure the truck was a topic of discussion on wasteful American resources. My BIL eventually retired as a Warden but the plate will never retire.
True story...All of it.
Paco
Awesome. My son had a Prius, but he also had a Mitt Romney for Prez sticker on it to confuse everyone!
- Joined
- Nov 7, 2018
- Messages
- 186
Good one!Awesome. My son had a Prius, but he also had a Mitt Romney for Prez sticker on it to confuse everyone!
- Joined
- Nov 7, 2018
- Messages
- 186
Got some time after repairing the washing machine. The wife was getting a "PE" code on the front loader. Turns out the water supply solenoid valves where plugged with what I call sand rubies. After flushing them out and blowing shop air the machine was back in service. Now onto some fun. I was able to get the X Axis scale mounted. The brackets required machining to center the reader head and bring it toward the magnetic scale.
I opted to use all SAE SS button head Allen screws. I don't care for the metric screws provided, beside I have a larger selection of standard drill and taps. On the reader head, I used 1/4-20 screws, the scales 8-32, cover 8-32 and cable clamp 8-32. I broke a tap on the second reader head hole
 . I must be living right because enough was sticking out to purchase with a needle nose mini vice grip. Sprayed some Free-All and it turned right out. Pulled a second starting tap and finished the read head. The read head bracket has four jackscrews for fine adjustment. The final adjustment is 0.020"clearance from the mag scale a plastic shim is supplied to help achieve this. The lathe has provisions machined into the carriage for the use of scales.
The tailstock was removed and the carriage was moved to the far left to drill/tap.
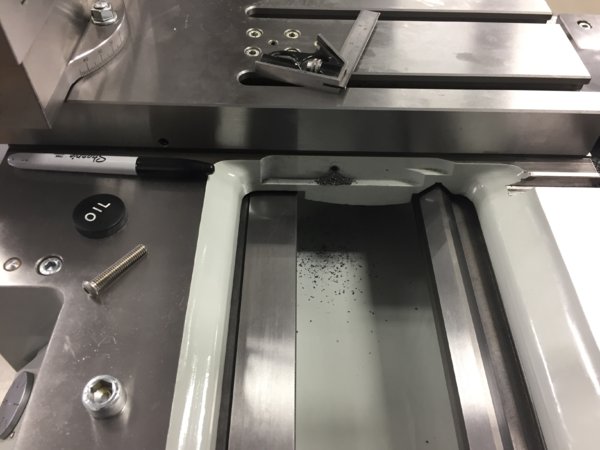
Two 2x4 stacked blocks provided a straight shot for tapping.
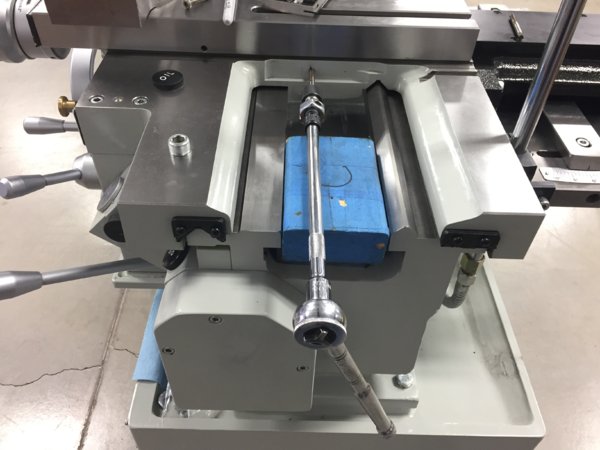
The 3/8" extension really helped reach the hole. The tap wrench is made by Irwin (Home Depot) and has a removable T handle and a 3/8" drive.
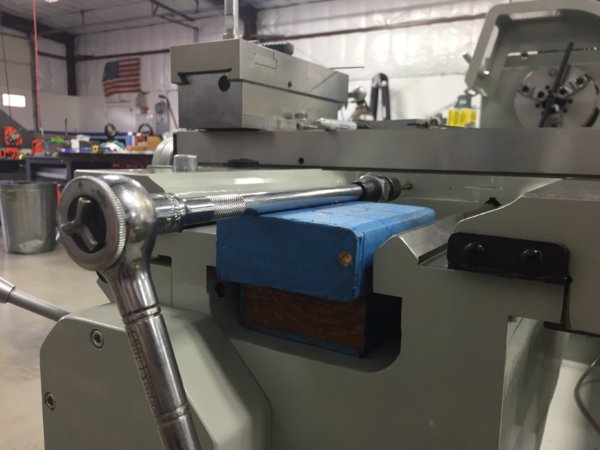
The magnetic scales can be cut to size unlike the glass counterpart.They are only 3/8" thick so very compact. 8-32 screws secured the scales to the cross feed. I had to be careful as this is the gib side so drill depth was a consideration.
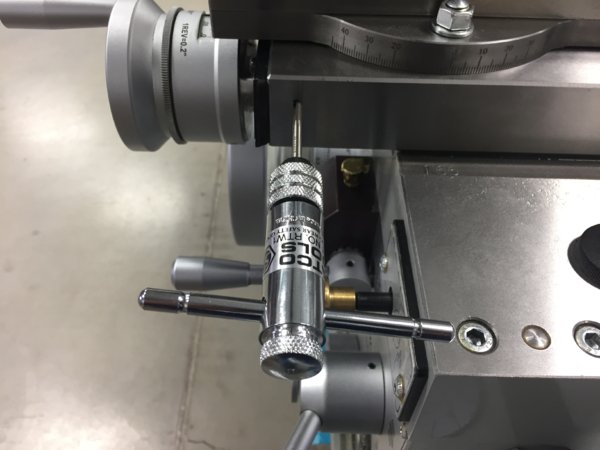
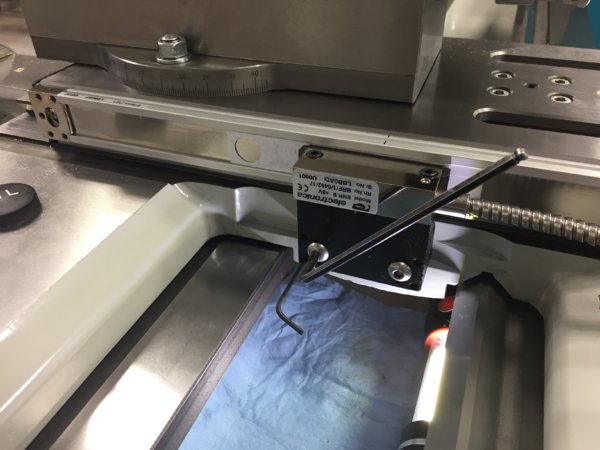
Adjusting the "air gap" using the shim. This scale is a 1 micron scale.
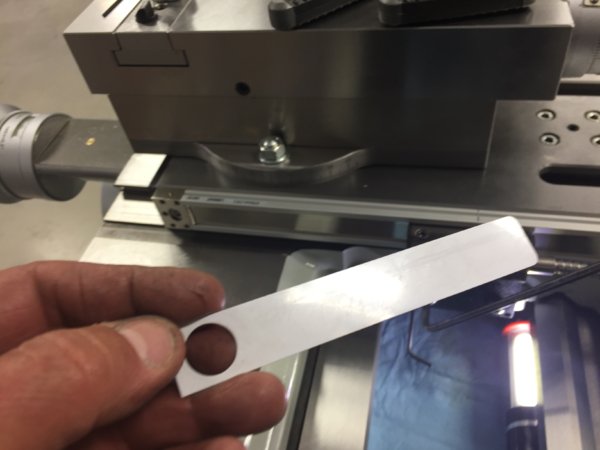
The plastic shim.
The taper attachment block was drilled for a 8-32 to secure the cable clamp. Here you can see the machined groove to nest the read head armored cable just to the left of the tap.
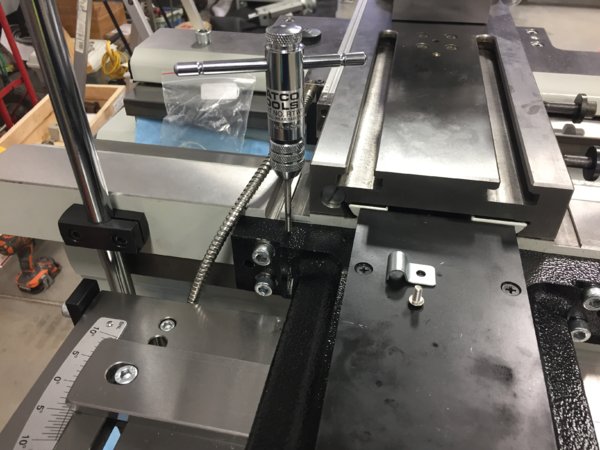
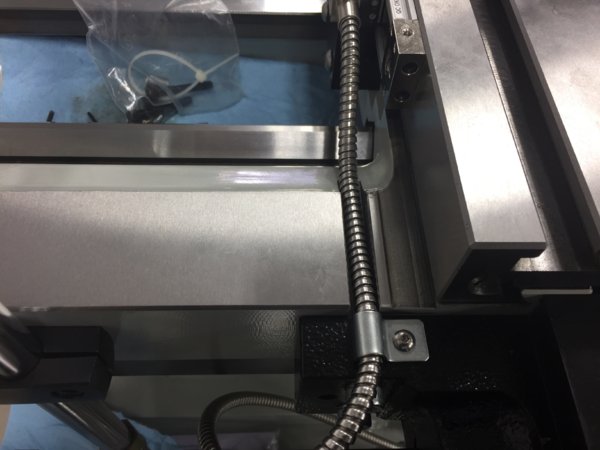
The groove really helps keep the cable secured.
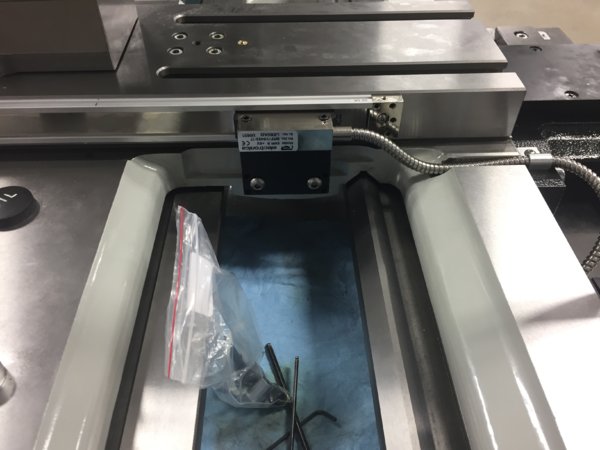
Next up was to drill the cover to screw onto the ends of the scale. These too where re-drilled and tapped to 8-32 for all hardware to match.
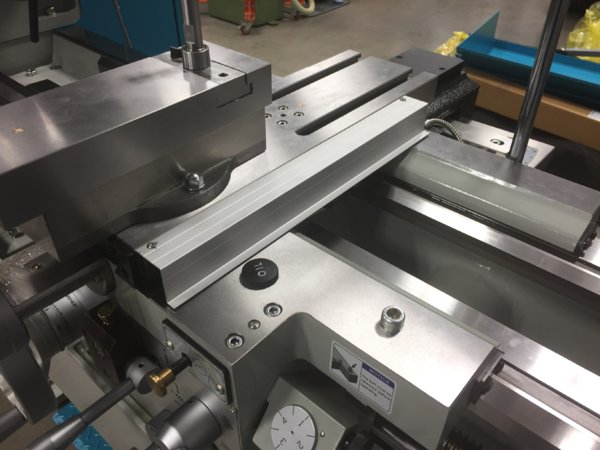
I still need to locate and drill a access hole of the cross feed lock set screw. I'll probably make a custom levered screw that fits tight though the cover to keep out swarf.
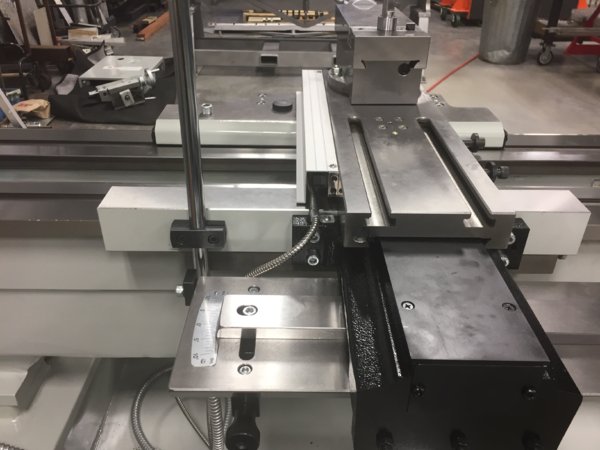
I think it turned out clean.
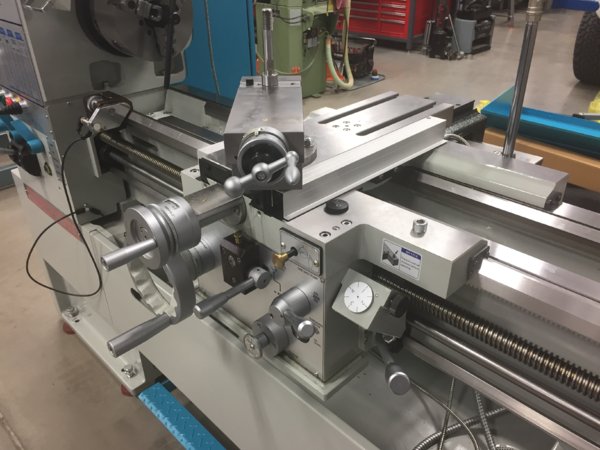
Powered up the DRO adjusted the scale resolution and selected to 1 micron and tested the operation. The numbers where very stable throughout the travel range. I really like the LCD touch screen, very easy on my eyeballs .
.
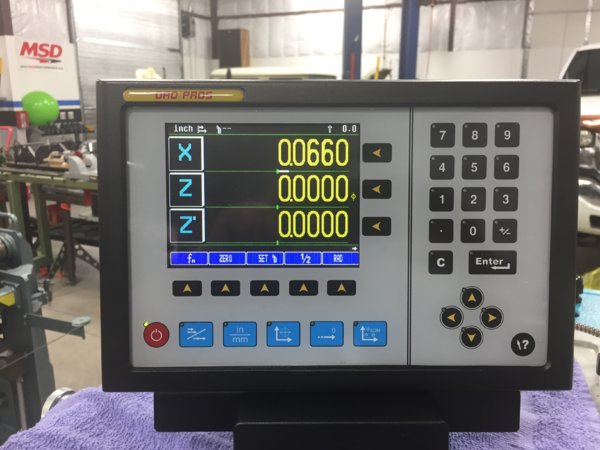
Back to work tomorrow so won't get to the other two scales until Tuesday.
Thanks for stopping by.
Good night fellas.
Paco
I opted to use all SAE SS button head Allen screws. I don't care for the metric screws provided, beside I have a larger selection of standard drill and taps. On the reader head, I used 1/4-20 screws, the scales 8-32, cover 8-32 and cable clamp 8-32. I broke a tap on the second reader head hole
The tailstock was removed and the carriage was moved to the far left to drill/tap.
Two 2x4 stacked blocks provided a straight shot for tapping.
The 3/8" extension really helped reach the hole. The tap wrench is made by Irwin (Home Depot) and has a removable T handle and a 3/8" drive.
The magnetic scales can be cut to size unlike the glass counterpart.They are only 3/8" thick so very compact. 8-32 screws secured the scales to the cross feed. I had to be careful as this is the gib side so drill depth was a consideration.
Adjusting the "air gap" using the shim. This scale is a 1 micron scale.
The plastic shim.
The taper attachment block was drilled for a 8-32 to secure the cable clamp. Here you can see the machined groove to nest the read head armored cable just to the left of the tap.
The groove really helps keep the cable secured.
Next up was to drill the cover to screw onto the ends of the scale. These too where re-drilled and tapped to 8-32 for all hardware to match.
I still need to locate and drill a access hole of the cross feed lock set screw. I'll probably make a custom levered screw that fits tight though the cover to keep out swarf.
I think it turned out clean.
Powered up the DRO adjusted the scale resolution and selected to 1 micron and tested the operation. The numbers where very stable throughout the travel range. I really like the LCD touch screen, very easy on my eyeballs
 .
.Back to work tomorrow so won't get to the other two scales until Tuesday.
Thanks for stopping by.
Good night fellas.
Paco
Last edited by a moderator:
- Joined
- Nov 7, 2018
- Messages
- 186
Yesterday, I had 1/2 day in the shop and was able to get the Y/Z axis 5 micron scale mounted and dialed in. Still need to mount the cover shield.
The machine has a nice machined flat surface on the rear bed that allows for a direct mount of the scale. Only three drill/taped holes (8-32) where required for the scale. The second pair of drilled/tapped (1/4-20) holes are located on the rear carriage for the reader head bracket. The read head bracket required shortening and slotted holes to keep it compact and close to the bed ways.
I laid-out the scale and used 3M double side tape to mock up the long 46" scale. Working alone, this was helpful. I watched a couple of DROPRO's videos last week and saw the 3M trick. The long scale kit also came with two support clamps that index into the middle groove of the extruded aluminum scale housing. Only one support clamp (bottom) was used to support the center as it had a .0015" sag found when sweeping using a test indicator. The scales end cap grub screws where not needed since the mounting surface was true. The magnetic scales are pretty forgiving considering the tolerances provided in the installation guide. I was able to get it within .0015" in 46" along the top and achieved .0005" along the face (probably the paint). The read head bracket was cut and two holes drilled. These holes where then transferred to the rear of the carriage drill/tapped. The bracket was then back on the mill for slotting .100" towards the top and .200" towards the bottom for final reader head centering.
The last step was to use the supplied .020" shim to set the gap between the read head and scale. Ran out of time for the cover shield. All armored cabling will be routed and secured with supplied clamp once the backsplash in in place and all travels are considered.
Initial scale lay-out. Here you can see the machined surface allowing for a direct mount.
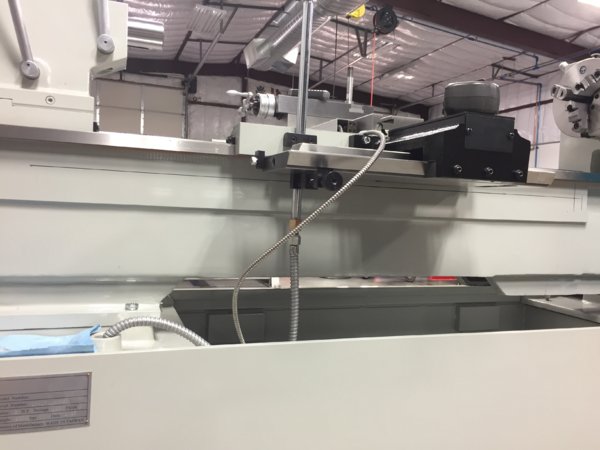
The 3M double side tape worked almost too good. I had to use dental floss to cut it loose prior to drilling.
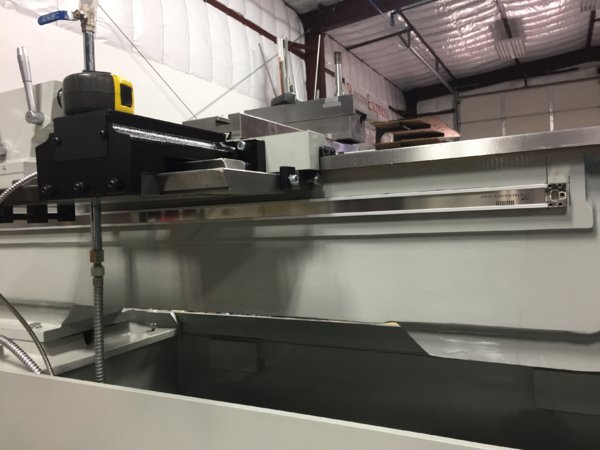
Transferring the hole location. I purposely transferred at the bottom of the slot. This allowed me to drop the scale down to make clearance for the cover shield. Unfortunately, I needed a little more clearance but wanted the scales as close to the bed ways as possible. Trimming the cover or adding spacers should work fine.
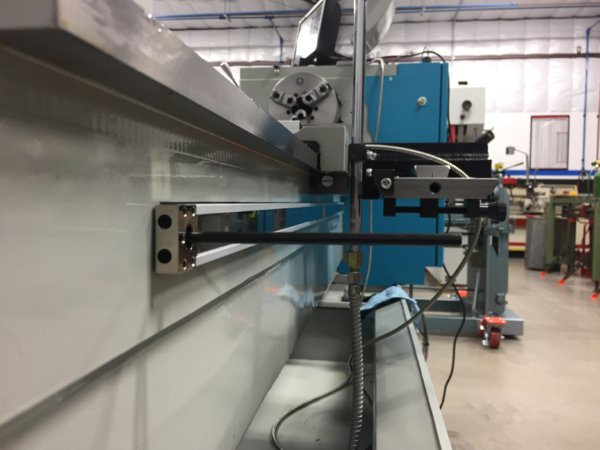
Used the Noga and test indicator to verify the top and face of the long scale.
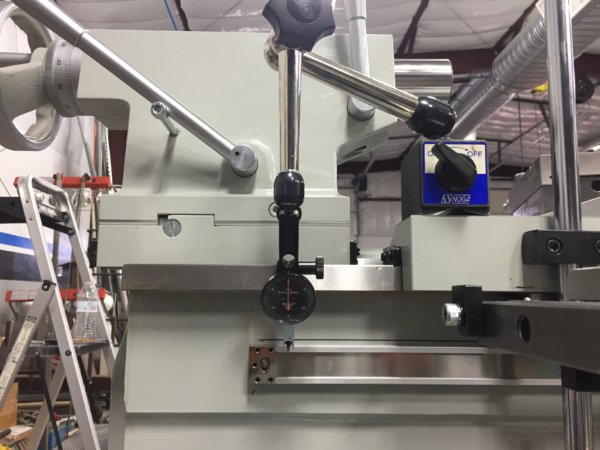
Sweeping the top and making adjustments. The test indicator was used to secure the slight sagging found at 22.5"(center) using the supplied center clamp.
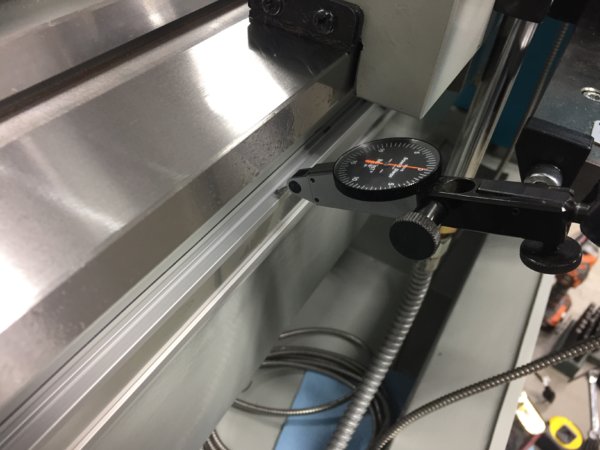
This took some time working alone as traversing the carriage is done from the opposing side.
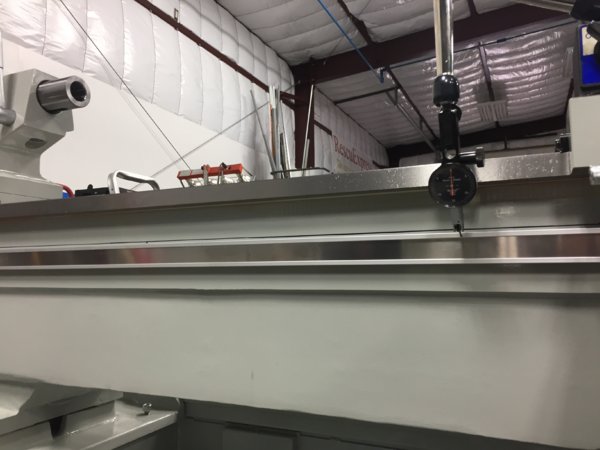
With the scale dialed in the reader bracket was was next. Here you can see the close proximity of the scale to the bed way, this improves accuracy by keeping the brackets short. You can also see the center support clamp on the scale (bottom). Not necessary to use a top clamp as the scale was held tight and a top clamp would hinder the cover shield fit.
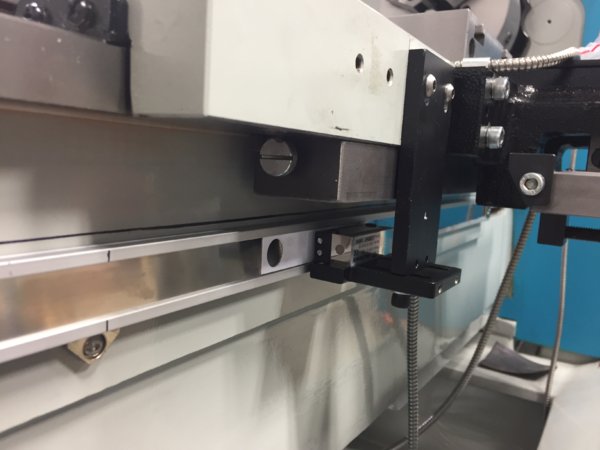
The full travel towards the head stock showed the read head wiper 3/16" from the end of the scale.
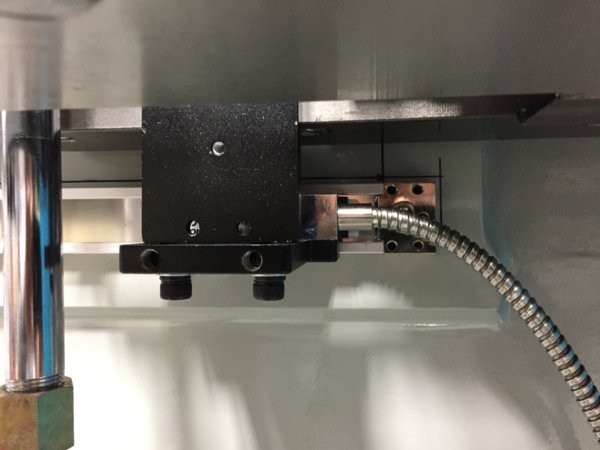
Full travel toward the tailstock also has 3/16" clearance from said wiper to end of scale.
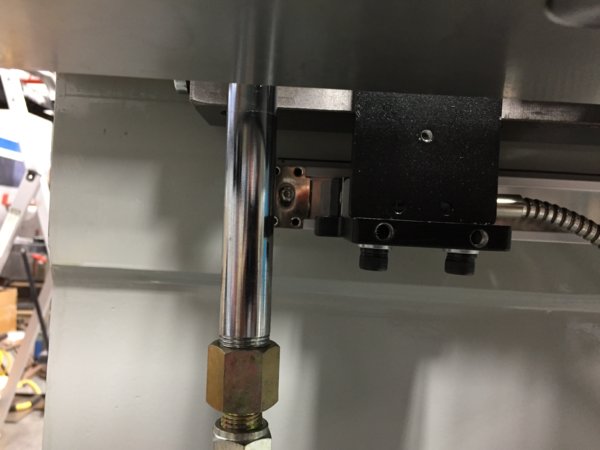
Overall view.
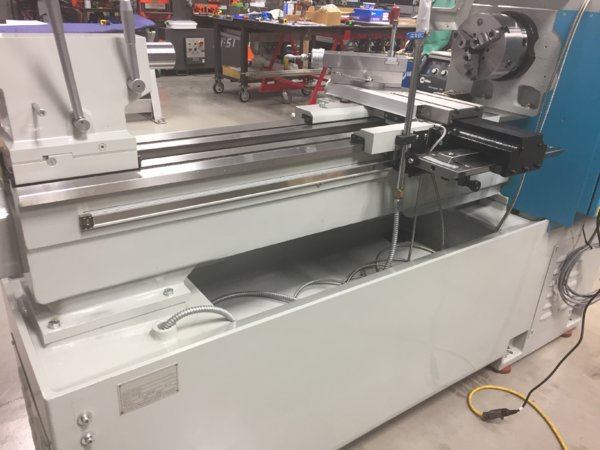
The display now responds to two of three axis .
.
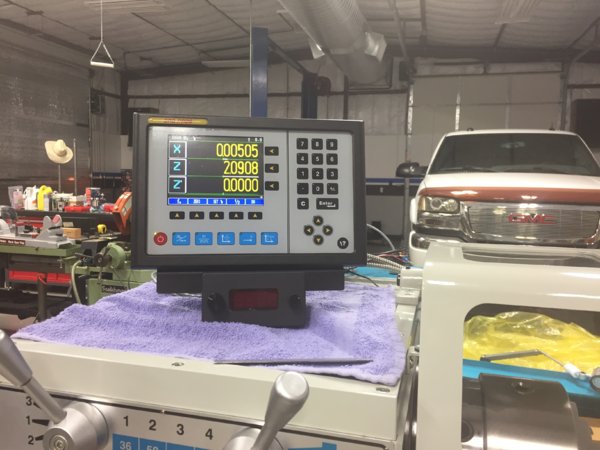
Compound scale is on deck. Any of you guys running a compound scale, please post up some photos. I this will be the most challenging part of the install and I need some ideas keeping thing compact.
Thanks for viewing and lets see some compounds
Paco
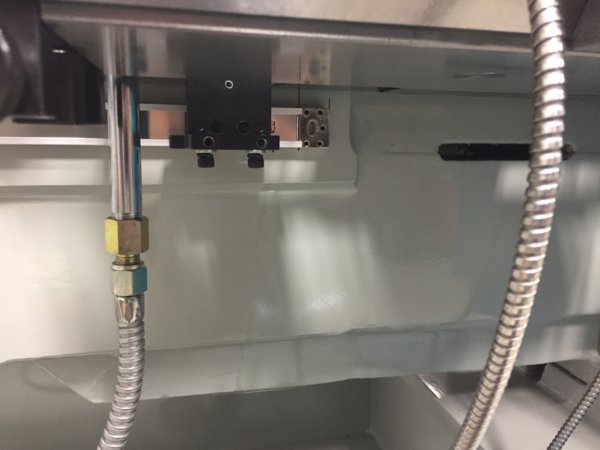
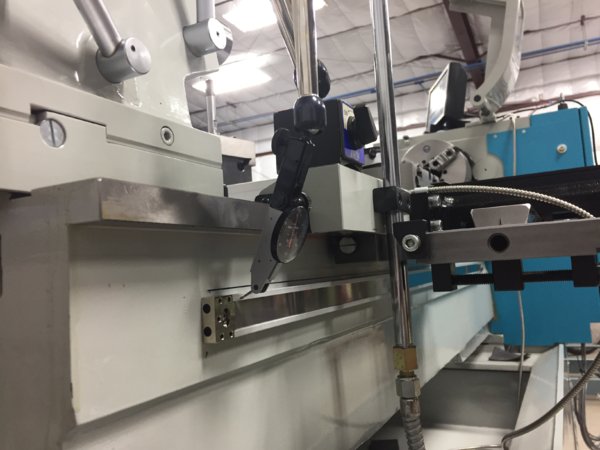
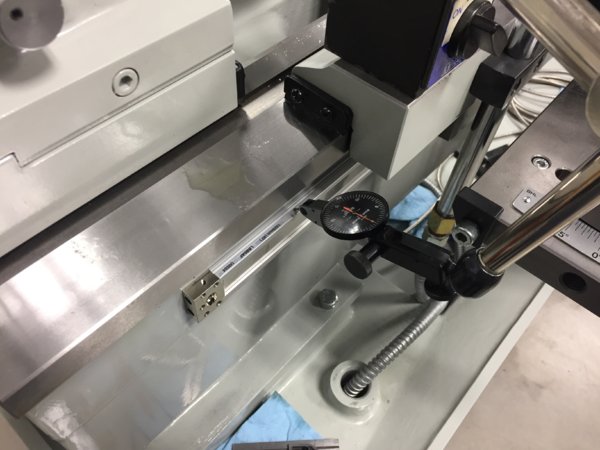
The machine has a nice machined flat surface on the rear bed that allows for a direct mount of the scale. Only three drill/taped holes (8-32) where required for the scale. The second pair of drilled/tapped (1/4-20) holes are located on the rear carriage for the reader head bracket. The read head bracket required shortening and slotted holes to keep it compact and close to the bed ways.
I laid-out the scale and used 3M double side tape to mock up the long 46" scale. Working alone, this was helpful. I watched a couple of DROPRO's videos last week and saw the 3M trick. The long scale kit also came with two support clamps that index into the middle groove of the extruded aluminum scale housing. Only one support clamp (bottom) was used to support the center as it had a .0015" sag found when sweeping using a test indicator. The scales end cap grub screws where not needed since the mounting surface was true. The magnetic scales are pretty forgiving considering the tolerances provided in the installation guide. I was able to get it within .0015" in 46" along the top and achieved .0005" along the face (probably the paint). The read head bracket was cut and two holes drilled. These holes where then transferred to the rear of the carriage drill/tapped. The bracket was then back on the mill for slotting .100" towards the top and .200" towards the bottom for final reader head centering.
The last step was to use the supplied .020" shim to set the gap between the read head and scale. Ran out of time for the cover shield. All armored cabling will be routed and secured with supplied clamp once the backsplash in in place and all travels are considered.
Initial scale lay-out. Here you can see the machined surface allowing for a direct mount.
The 3M double side tape worked almost too good. I had to use dental floss to cut it loose prior to drilling.
Transferring the hole location. I purposely transferred at the bottom of the slot. This allowed me to drop the scale down to make clearance for the cover shield. Unfortunately, I needed a little more clearance but wanted the scales as close to the bed ways as possible. Trimming the cover or adding spacers should work fine.
Used the Noga and test indicator to verify the top and face of the long scale.
Sweeping the top and making adjustments. The test indicator was used to secure the slight sagging found at 22.5"(center) using the supplied center clamp.
This took some time working alone as traversing the carriage is done from the opposing side.
With the scale dialed in the reader bracket was was next. Here you can see the close proximity of the scale to the bed way, this improves accuracy by keeping the brackets short. You can also see the center support clamp on the scale (bottom). Not necessary to use a top clamp as the scale was held tight and a top clamp would hinder the cover shield fit.
The full travel towards the head stock showed the read head wiper 3/16" from the end of the scale.
Full travel toward the tailstock also has 3/16" clearance from said wiper to end of scale.
Overall view.
The display now responds to two of three axis
Compound scale is on deck. Any of you guys running a compound scale, please post up some photos. I this will be the most challenging part of the install and I need some ideas keeping thing compact.
Thanks for viewing and lets see some compounds

Paco
Last edited by a moderator:
F
f350ca
Forum Guest
Register Today
Nice clean instal Paco (as expected)
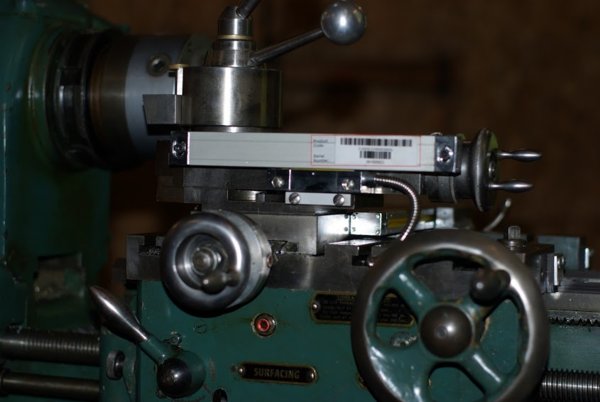
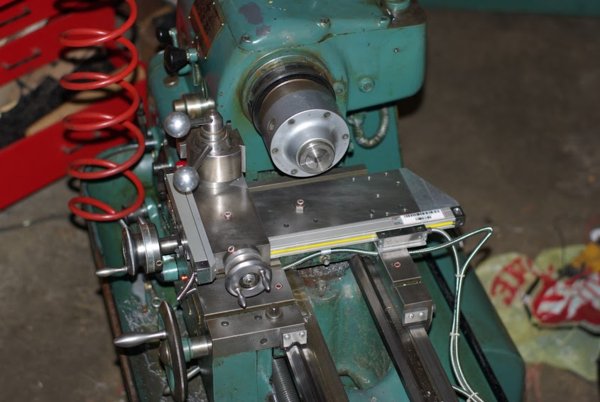
This is the one I installed on the Colchester. Mounted the scale on the chuck side because of the gib adjusters. Think this side is best. I keep the compound parallel to the bed all the time, on this side its away from the action and clears the tailstock.
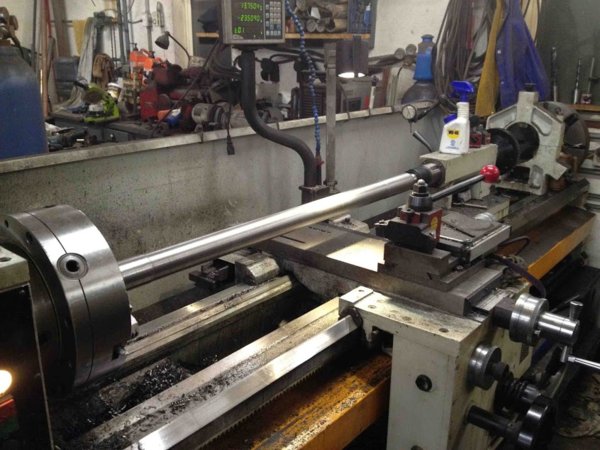
The one on the Summit was installed at the dealer, they put it on the same side.
Sorry this is the best picture I could find, can take more if you want.
Greg
This is the one I installed on the Colchester. Mounted the scale on the chuck side because of the gib adjusters. Think this side is best. I keep the compound parallel to the bed all the time, on this side its away from the action and clears the tailstock.
The one on the Summit was installed at the dealer, they put it on the same side.
Sorry this is the best picture I could find, can take more if you want.
Greg
- Joined
- Nov 7, 2018
- Messages
- 186
Thanks Greg,
I was hoping to see your setup. If you wouldn't mind a close up on the Summit would be helpful when you have time.
Those are two fine machine you have there, very nice.
I was hoping to see your setup. If you wouldn't mind a close up on the Summit would be helpful when you have time.
Those are two fine machine you have there, very nice.
