Mini lathe threading problems

I don't think your thread cutting problem is due to a fundamental limitation of the lathe. Certainly not when threading a 1/4" rod. Something else is going on. Excess stickout is a good candidate. It could cause something that could be classified as extreme chatter, where the work deflects until the tool load becomes high enough to cut a chunk, then it springs back and the cycle repeats. Try threading the work with much less stickout, or a scrap piece that is much larger in diameter (so it will deflect less when being cut). Another option would be to support the end with a live or dead center in your tailstock; but that will only get you so far, so to speak. If you really need to thread a long thin rod you will need either a travelling rest and/or use a die to thread it.

Other things that could cause cutting problems include directly plunging the cutting tool into the work, rather than advancing it at ~30 degrees. The 30 degree advance restricts the cutting load to just one edge, rather than _two_ when plunge cutting.

I know that a number of folks here just plunge cut to make threads but these little lathes are not all that rigid compared to "real" lathes. Once you figure out how to coax your lathe into doing what you want, you will find that a lot of their apparent limitations aren't so big a deal.
Thanks for the ideas.

I will never know if the motor shifted or it always was that way but I was able negotiate the primitive mounting arrangement and get it straight and tight. However, I am not clear on how much tension is proper for this type of belt.

I also checked to see if the belt was worn and it seems fine.

I am now able to cut a 20 tpi thread on a half inch bar without that thumping but still have problem on 1/4" stock.

The sound is more like crunching than cutting and is very erratic. I cut off the attempt and then chucked it up so that only 1 inch protruded from the chuck.

This helped some but still a lot of crunching. Within a few passes of finishing, it jammed and the next pass messed it all up. I assume the piece slipped in the chuck when it jammed.

Seems like it may be hopeless to thread 1/4" rod.

For the record, I am using hand ground HS bits that look more or less like the pics in the manual.

Is is likely just a tool bit problem? Should I invest in a commercial known entity? Any suggestions?

Jack


--
Astronomy, Beer, Cheese, Fiber, Gems,
Nature, Radio, Sheep, Sausage, Silver
http://schmidling.com
I know that a number of folks here just plunge cut to make threads but these little lathes are not all that rigid compared to "real" lathes. Once you figure out how to coax your lathe into doing what you want, you will find that a lot of their apparent limitations aren't so big a deal.
i understand and this mini is what I am stuck with after losing my total shop in a fire. I am as impressed with what it can do about as much as I am depressed with what I can no longer do.

I am now convinced that it's a tool problem and need some help with geometry.

My tool rest is set at 10 degs, my tool bit is 30 degs and I slide it back and forth across the wheel, changing sides as needed till both sides meet in the middle.

I now have a 60 deg tool in top view but the angle from nose to bottom is about 30 degs and wants to be about 10 degs.

What am I missing?

Jack
 
What am I missing?
A few pictures might help us help you. Pictures of the setup, close ups, and overall view.

As noted by others, smaller diameter pieces are very sensitive to tool height. The smaller the diameter, the worse it gets. Quickest, simple way to adjust your tool height, is to use a metal scale or other strip of steel in between the stock and the tool bit. It the strip is vertical, while being held in place by the tool bit (light pressure is all that is needed), then your tool height is correct. Adjust height of tool bit, using shims, or if you have a quick change tool post, by the adjuster nut on the tool holder.

This adjuster screw was made on my mini-lathe. The single pointed threads are 1/4"-40 thread. Material is 12L14. Knurls also made on this lathe, with a knurler I made from plans here on Hobby Machinist. First picture is prior to parting. Second the completed piece.
PXL_20220131_210800181.jpgPXL_20220131_215308849.jpg
 
I now have a 60 deg tool in top view but the angle from nose to bottom is about 30 degs and wants to be about 10 degs.
The actual angle is less important than the sharpness at the cutting edge. You want the ground facets to be flat or slightly concave.
Many folks have trouble keeping the ground surfaces from becoming slightly convex which causes the tool to rub below the actual cutting edge.
This is especially likely when using the side of the grinding wheel rather than the front.
Honing the tool can also cause a slight convexing if not done with a steady hand
It takes practice for sure
 
Thanks for the picture. It appears that your compound is set wrong. We say 30º, but we mean relative to the face of the chuck, not relative to the axis of the cut or the number on the dial. And we don't know the increment you are feeding the compound. Oops,, ignore this, picture not yours, but Wobbly's
 
Thanks for the picture. It appears that your compound is set wrong. We say 30º, but we mean relative to the face of the chuck, not relative to the axis of the cut or the number on the dial. And we don't know the increment you are feeding the compound. Oops,, ignore this, picture not yours, but Wobbly's
Correct, my photo. I wasn't threading in that picture. If threading, the compound would be 60 degrees from the spindle axis. In my picture, the compound was 30 degrees from the spindle axis. Sorry for any confusion my photo created. Was just attempting to show 1/4"-40 TPI threads that I had single point threaded.

Don't think the OP has attached any pictures yet. It is a shame, since posting photos usually is the quickest way to get effective help.
 
1. First of all thanks for all the help. I think I have a handle on things now but need to clarify an issue that keeps coming up.

People keep talking about cut depth but it is always without reference to the fact that the compound slide is at an angle (typically 30 degs) which complicates understanding what really is meant by "cut depth".

I have always understood it to mean compound slide travel which would be less than half of the actual depth of the cut.

For this particular threading, I have been using .005" as the "cut depth" as indicated by the slide travel indicator until I get close to the final depth.

2. Next I did the math on the pitch/8 for the width of the point and find that assuming drawings were to scale was a bad idea and my tip was much too wide when I actually measure it.

3. Using a scale to locate tool center is really clever and has been added to my bag of tricks. So happens that I was dead on by eyeball but that is not to denigrate the trick.

4. Turning between centers never occurred to me within an inch of the chuck but the bending of the part seems to have been the biggest part of the crunching problem.

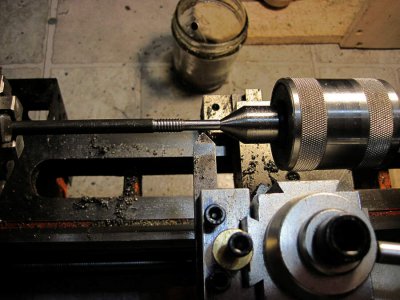
5. The pic shows an exaggerated setup that produced a nice clean chip and no crunching. I turned down a bit of the end to give me time to think about engaging the half nut at the right time. After a few more passes to clean it up, I went back to one inch from the chuck and had all sorts of problems again.

6. This all brings me back to my other thread on using a die to cut small threads because it is no much easier but still can figure out why I can do this in the lathe. Holding the die in the tail stock or hand stock doesn't work because the chuck will not hold the piece.

So anyway, thanks for all the help and as usual, I learned a lot from the exchange.

Jack

--
Astronomy, Beer, Cheese, Fiber, Gems,
Nature, Radio, Sheep, Sausage, Silver
http://schmidling.comthread 001.jpg
 

Attachments

  • thread 001.jpg
    thread 001.jpg
    86.8 KB · Views: 5
I would also mention that not all steel machines easily. You may be running against the fact your smaller rod is something different than your larger rod. I have seen some steels which "resisted my charms" when I machined them. They are often referred to as "free machining steel". I have also ran across steels with a bit of lead in them, which machine like a dream. With those steels, if your setup is marginal, you still get a good result.
 
Last edited:
I do silly things like this on an Atlas 6" all the time. Then I tried to repeat this on a 7 x 14 for a friend as an education for him.

Well that ended up being an education for both of us. I had to open up the entire box of tricks.

Assume nothing .
Twisted bed .
Awful bearings
All kinds of slop in cross and compound.
Whatever he had for a piston QCTP was garbage , he ended up with my used Phase Two hobby post. Still a piston type but better.
In the interest of time, mine not yours...
Mini lathe
Threading
I'll remind you that it is 30 degrees to halve the depth but for threading it's just short of 30 , trust me. 29 and something .
and tool grinding

I'll try to get this done in words instead of pictures. In your top down view of your ground tool realize that not only do you have to get the 60 degree angle right but you also have to make the left, chuck side of the cutter , a bit higher than the tail stock side. The angle is about 5 degrees or so but has to be there. You also have to angle the front of the tool to clear the threads. In your case , when viewed from the BACK of the tool the front has to go from upper left to lower right to provide clearance for the thread already cut. Sloping the tool back toward the tool post is semi-optional depending on whom you talk to.

Then it got interesting. The tail stock wouldn't consistently locate. That took two days of futzing about but finally all was running true. This only after all the usual process of taking the taper out of a lathe had crumbled into random results.
I'll refrain from details but essentially it was loose and wandered everywhere.From the ram to the base it needed tlc.
Then I had to eat some of my own words. Neither the taper to drill chuck adapter or the live center taper matched the taper in the tail stock ram. Assume nothing. Then of course the live center was junque and wandered everywhere.

Then the issue became two fold. First locating tool height. Then any time there was the least little mistake or "tool tuck" the entire procedure above had to be re checked. Assume nothing.

So now the lathe runs and actually runs well. There have been several interesting observations however.
The compound was not moving parallel to the ways. The further it was moved in the lower the point of the tool got.
These things will not tolerate overhang or stick out.
Tool grinding and honing is something this little spinning spawn from hell will teach you.
I hate that to change compound angles you have to back off the compound all the way.
Keep the lead screw clean. Just keeping a bit of cotton twine around is a good deal. Wrap the twine around the lead several times and run it up and down the length.

It takes some doing but you can get reliable parts off these things. Just don't expect them to be forgiving in any way.

Oh yeah , assume nothing ;-)
 
Regarding your comment on having threading issues next to the chuck. If you don't have one get a dial test indicator, DTI, and a magnetic holder for it. A DTI with 0.0005" marks on it is fine. You can find a reasonable one for not much money. I would check the runout of the rod next to the chuck. You should have ok runout, under 0.005", with less being obviously better. Please measure that and report the value here. Having worse problems near the chuck, needs to be fixed. Usually, close to the chuck operations are the best, so this is worth investigating.

Sometimes, mostly when I am in a hurry, I don't center the piece as well as I should. As you tighten the chuck, rotate the rod to ensure that the piece is centered. I occasionally have the issue when using a drill chuck and found a gentle rotation of the drill bit usually let's me know if the bit really is centered. If the bit drags too much, it may not be centered. But if you really want to know the real Total Indicated Runout, TIR, measure it. I suspect that you have too much runout at the chuck for some reason.

There's a simple fix for die threading on a mini lathe. Let me go find a picture for you. You need a die holder, a die, a drill chuck mounted on the appropriate taper, and your tailstock. Might take me a couple minutes to find my picture, but basically, you sandwich the die and holder between the rod and the drill chuck. You use your tailstock to apply sufficient pressure to keep the die perpendicular to the chuck jaws. Thread a little, then tighten the tailstock to keep the die perpendicular. It's tricky at first, but once you get the idea, it isn't hard to do. Of course, the rod has to be the right diameter and there should be a chamfer at the end of the rod to help start the thread. Hope this helps.
 
Back
Top