Making a cup in the end of a bar

David---if the size doesn't have to be super exact sized--then just look for a thin walled tube or a piece of conduit like 1" electrical conduit and cut out a large side opening and the pieces should come out real easy---make it long enough and try it out--you are only cutting foam so the side cutout can be large without strength being a factor---I would make it approx 6 inches long and a long side cutout----just use a file or emery paper to sharpen the tube on the outside edge--leave the ID alone unless you just want to buff it smooth--hope this helps---Dave
 
I didn't make it to the garage this afternoon as my disability flared up .

The foam I'm cutting into disks is 10 or so mm thick, of a similar density to the rubber foam , rubber thong between the toes " Flip Flop's" we used to wear down on the beach in the 1960's & 70's. (now we use " Croc's " which is also a similar density foam ).

It does indeed compress during cutting and expand to grip inside of the cutter once if is cut free of the sheet . Picking it out of the stopped drill press is fairly easy but not wanted as I take about 3 min to cut every 14 disks .

Plus , will my 30 odd year old drill press take another 4500 or so stop's and start's ? :lmao:

Yes size does matter :roflmao:

I'll get some pictures together and put them up with an explanation so you can see what the project is .
 
Last edited:
I'm doubly disabled , as I've got older I cannot do as much nor am I as able to move & lift many things . To keep on gardening for food , pleasure & gentle exercise I designed a plant pot system that will see me turn my toes up and still be going strong. The idea was to use minimum effort and as little material compost etc. as I could get a way with .

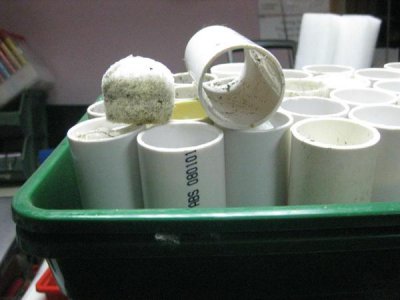
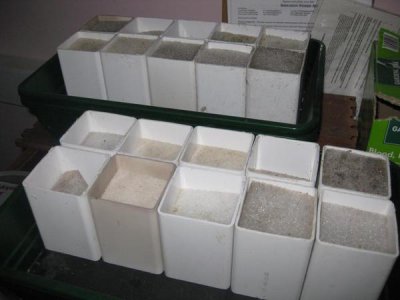
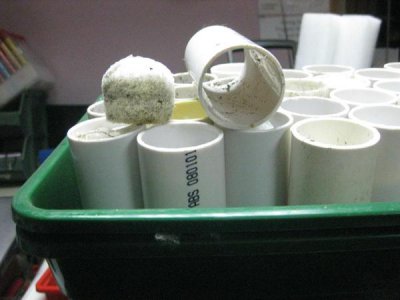
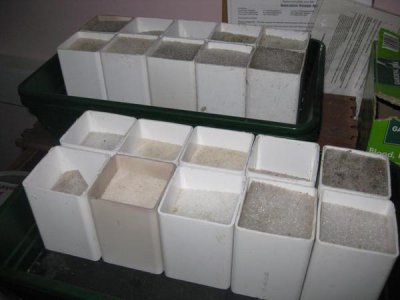
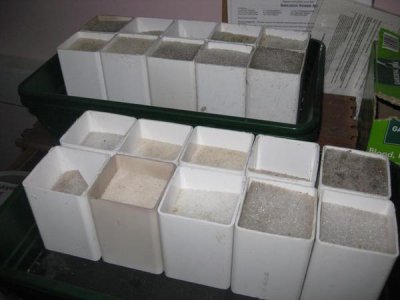
The first phase was plant pots made from spare 3 " square rainwater down pipes, cut in four inches in lengths and plugged with a 3/4 " thick open cell rigid foam plug
IMG_5844_zpsa0bbb62f.jpg

This worked well, for I can stand the compost filled seed growing pots in trays without them tipping over,so allowing me to carry a tray in my right hand whilst using my left crutch to get about .

A few years ago things went even more pear shaped , I found I could not carry the tray's when full . Moving around was becoming even more difficult so using smaller trays was not really an option for it would mean double the journey's from my second man cupboard ( A quality dwellable wooden log cabin ) to the glasshouse or around garden .

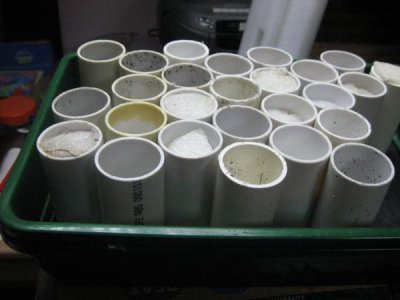
I came up with the idea of using smaller tubes but this time use round tubes so in the end things would be even lighter .
Initially I used square chunks of the open cell rigid foam for the plug but found that there was a tendency for the foam to die or the roots to grow deep into it . Tearing the roots free of the foam usually knocked the plants back by a couple of weeks or so .

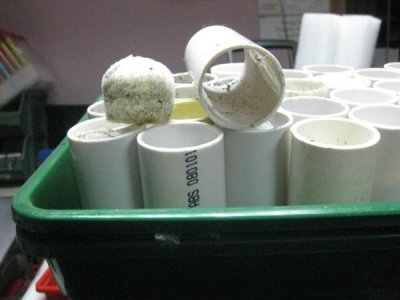
I experimented with some ( rigid closed cell foam ) unwanted caravan floor awning inter locking panels . It worked well, no root problems and no degradation of the foam . However cutting the foam in squares gave a pathway for the roots and was also not very satisfactory as it often popped out as well as being a bugger to insert correctly.
IMG_5848_zps48c3ee0d.jpg


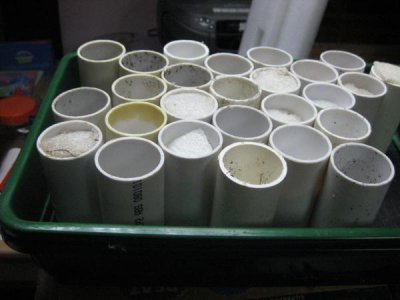
I can get 33 seed tubes in each standard seed tray against ten of the square pots ( I will still use the square pots for things like bean & curbit plants ).
IMG_5849_zpsfaef2e21.jpg

This is a part cut up sheet of the interlocking awning flooring


IMG_5850_zpsaac16219.jpg

I made my cutting tool and got a perfect fit in the tubes, not too easy nor to hard to insert , especially if I pushed the tube down over the insert when it is laid on a table top .. I have 350 of these tube pots ( made from fire damaged kitchen sink waste water pipes from off the local Freecycle scheme ) with another 400 or more planned ( I might have to buy this though ).

IMG_5851_zps7245aa05.jpg

A cut out disk showing a central line up /drain hole in the middle
IMG_5852_zpsbd53e541.jpg

This blurry picture shows the disk inserted in the end of a 40 mm ID tube that is 75 mm tall .


IMG_5855_zps0b66a473.jpg

The beauty of this set up is that the trays are now about 2/3 less in weight than the trays with square tubes . The plants don't suffer any retarding in their growth for I use a plunger peg set in a small board to push the now core of compost and plant roots up out the tube without disturbing the root ball .
Now that I cannot bend over much or kneel easily or get back up I have to do most things standing up as straight up as I can whilst using the left a crutch for support .
To this end I have a 50 mm ID tube that can be taped to my left crutch so that I slide the smaller plant & root ball plug down into a prepare hole in the ground level beds.
This now means that I can now consider having lots of tender annual plants/bulbs in the ground level beds as I can now easily plant them as individual plants .
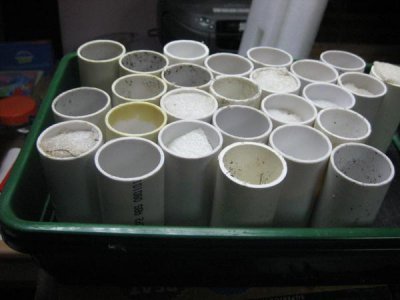
IMG_5844_zpsa0bbb62f.jpg

IMG_5848_zps48c3ee0d.jpg

IMG_5849_zpsfaef2e21.jpg

IMG_5850_zpsaac16219.jpg

IMG_5851_zps7245aa05.jpg

IMG_5852_zpsbd53e541.jpg

IMG_5855_zps0b66a473.jpg

IMG_5844_zpsa0bbb62f.jpg

IMG_5848_zps48c3ee0d.jpg

IMG_5849_zpsfaef2e21.jpg

IMG_5850_zpsaac16219.jpg

IMG_5851_zps7245aa05.jpg

IMG_5852_zpsbd53e541.jpg

IMG_5855_zps0b66a473.jpg
 
Last edited:
That looks pretty ingenious! I also makes sense that you'd be looking for a way to remove the foam automatically. I'd hate to be starting and stopping a motor each time for all those pieces. Hard to say which would give out first--the machine or you!

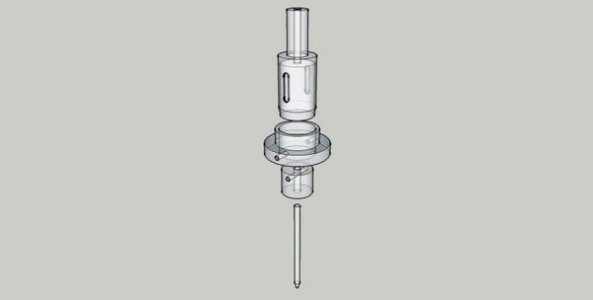
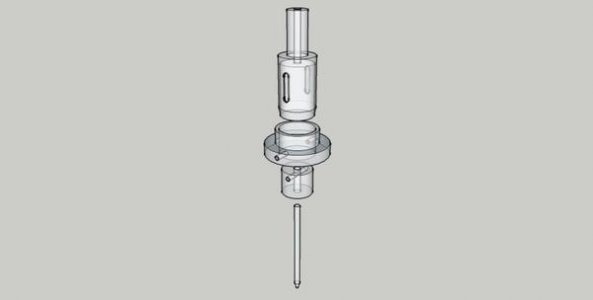
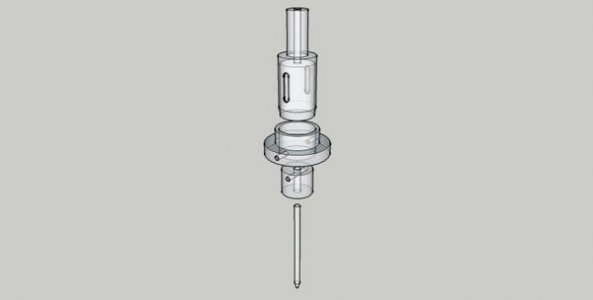
I was wondering if you could revise your cutter to have an inner plunger that is activated by an outer ring. The inner portion (plunger) would be connected to the outer ring by means of a couple of pins that pass through the main body of the cutter via a couple of slots. Here's a sketch

AutoWafer-001_zpsyk6g8sly.jpg

This is just a idea, and I know it's not fully fleshed out. There's still the matter of pushing down on the ring to activate the plunger while the cutter is in motion. . . . I hadn't really figured that part out. Still maybe something to get you started?

Jim

AutoWafer-001_zpsyk6g8sly.jpg

AutoWafer-001_zpsyk6g8sly.jpg
 
I just love your drawing Jim ,

I've not moved far enough from the Stoneage & my cave to be able to comprehend or do such marvelous CAD stuff .


I can see that an external spring pushing down in an inner plunger and an external collar above it to retain it would solve things fairly easily and also be adjustable to easily taken apart to put a different spring in place should the need arise.

OK next challenge .....the plunger and cutter body it would need slots cutting in them for movement over locating pins .
I have no mill , nor anything such as a milling attachment for the lathe .

Perhaps , I may be able to disk grind a ( killed by me :shush: ) dead centre to make a crotch pad for the lathe , I also I have a 2 " wide home made sort of half reasonable " Vee " block .... so use either of them to accurately drill a set of clean chain drilled holes through the middle of a bar .

So , perhaps I can chain drill in a section of the extraction piston stem ( may be very fiddly ) to make a movement slot and then use a real cheap ancient 24v modeling grinder i have with small stones , disks and rasps etc etc to see if I can take out the webs between the chain drilled holes , then slip in a very thin warding file to clean up the slots for a locating pin to slide through easily .

I had envisaged the extraction device to be internal above the extraction piston and a necked /shouldered cut out ( it would be the equivalent of the slot idea ) for movement with the extractor spring internal in the body & above the head of the extraction piston stem.

Seeing as it starting to snow , is freezing hard and will evidently be real " Brass monkey" weather tomorrow , I'll have a while to sleep /hibernate on things .
 
That's a SketchUp drawing. If you're not familiar, it's a free program from Google. I started using it 2 years ago. I'd never done anything in 3D before, and really had no CAD experience. There's lots of tutorials available online. I watched a few and started playing around with my own designs. Give it a try--too cold to work outside anyway, right?

Drills, grinders, and files--they'll do the same job as the mill. Will just take a little longer, but it's not really a terribly huge project. Persistence will win the day!

Jim
 
Her husband " Has to work his fingers to the bone all week & I stay at home living the life of Riley " according to one of her outbursts directed at me and my family .

Now that is what asbo's were created for :)

did i ever mention the time my neighbours called the noise pollution people about the arial mast on their house being lose and banging on the wall. Ahhhh ow well takes all sorts to make a human race :)

On topic, can the punches be used without turning the drill on if their sharp enough? I occasionally want some high density foam washers etc and i normally hack them out with craft knife or scissors. Your method seems better :)

Stuart
 
Dave Smith , do you have to stop the drill press to extract the cutout and or blow it out ?


An Eureeka moment ???
I've just had a thunk , if I turn up a cutter like yours but make it a bit longer in the body and in the elongated cut out insert & fix a round bar cut to a wedge to give an automatic ejection slope to eject through the cut slot it may work . I'd like to make about 24 x 14 x 14 of these foam washer inserts ( the amount of material I have)

use your moment thinking--- and before you cut the long slot out--use some fine emery cloth to finely polish the inside of the tube and only have the cutting section no more than half inch and the slotted about 2 or 3 inches---make sure the slotted out area is deeper than half the diameter---so the punch outs will spin out as you are cutting more------you won't get a hole in the center but you can use a little lubricant on the Id every so often to help them slide up and out easy---this will keep your press running without stopping for each piece---you can always solder a small angled piece on the inside to make sure they are forced out if necessary but if your slot is wide enough then they should eject with the spinning force---if your tube has a thicker wall--- then when you turn the id on the lathe turn the area just after the cutting edge a larger Id-----then cut out your long slot---they definitely will spin out easy then-------Dave
 
Round in Circles,

This is a little off topic from your question.

Last year I planted a vegetable garden, it was the first one I've done at this house and I've been here almost 18 years. This year, I want to germinate plants from seed so that I can try different varieties and also save some money.

When I first saw your PVC planting tubes I thought what a great idea!
I do have a question; why not plant your seeds in paper cups? You can slit the paper with a razor knife and plant the cup and all.


Mike

Mike ,
Plastic , polystyrene & paper drinking cups have small bases & fall over far too easily when I'm doddering around. They also use 2/3 more sowing mix.
Remember I said, " I can get 33 seed tubes in a seed tray against 12 squares " ... compared with 11 drinking cups . Last year I grew nearly 1,000 seeds of one kind or another into viable plants ..
I want to do more in the future . This is the reason I want to make my blue disks and make more tube pots . I've been gardening man and boy for 60 years .
I now run my gardening with the, " All New Square Foot Gardening" scheme designed and written about by an American guy called Mel Bartholomew having individual plants is small handy containers is ideal for me and my disabilities.

I have an 8 x 12 foot x 7 foot tall glass house with water and power for a fixed thermostatically & water misting controlled hot misting propagating bed , there is also 28 adjustable micro misting spray heads on the inside perimeter . I don't have the normal sort of fixed staging you'd expect in a glasshouse . I instead I have five stainless steel castor'd catering trolleys 2.5 x 3.5 foot at the platform, two shelves on each trolley . These make fantastic seed/ plant starting platforms due to light reflection etc. As soon as I'm able the trolleys are pushed around my raised beds , trays of germinated seeds / plants are deposited wherever I can find a place for them till they are big enough for planting out /transplanting and the next set of seed tubes are started off on the now emptied trolley .

I'm not allowed to play with sharp things .... a 1/2 wax crayon is about the smallest thing I'm allowed to draw /write with ..so long as the governor & wardens know I've got it .
Seriously ........ I'm on a high dose of Warfarin ( anticoagulant , also a rat poison ) , getting any deepish cuts will see me bleed like a pig & have to go in a blues and twos to hospital 15 miles away to get the bleeding stopped , so I've promised my lass I won't play with sharp knives etc if at all possible to give her a bit of peace of mind .
 
Last edited:
Back
Top