-
Welcome back Guest! Did you know you can mentor other members here at H-M? If not, please check out our Relaunch of Hobby Machinist Mentoring Program!
You are using an out of date browser. It may not display this or other websites correctly.
You should upgrade or use an alternative browser.
You should upgrade or use an alternative browser.
Making a Cheepo Import machine...better...hopefully
- Thread starter komatias
- Start date
A little update:
Today I finished the saddle. It is now parallel to 0.01mm which is the accuracy and resolution of my DTI.
The DTI is a pile of crap. I could not trust is so I had to keep measuring my zero every so often to ensure I was not deviating.
Following the discussion about the stone being concave, I have moved to a deburring file. makes clean up after deburring easier too, no more stone dust. Have spun it on the table and it seems flat enough.
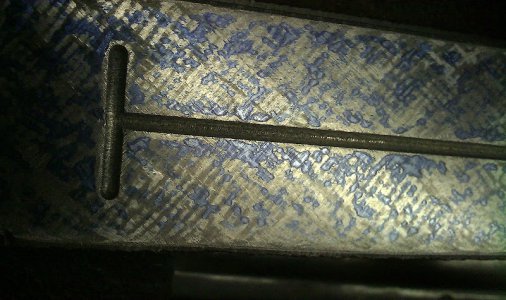
The results:
Richard, may I be added to your honorary students list now?
Decided to start on the base again. First order of business is to establish if datum A is actually worth using at all.
Put the 1 2 3 blocks at the edges of one side of the long axis of the base and used the surface gauge and DTI on the other. Seems there a dip of around 0.08mm in the middle of the ways and the extremes are out by 0.04mm.
Out came the 90mm jackhammer. but now I have the springy blade, I bolted the jack hammer onto the springy blade...Great Success! As the area is so large, I was able to increase the stroke and speed to maximum. The idea is to cut the surface of the datum so it can carry.
Blued up the camelback and did the union jack check. Each long side is flat (just) where blued but there is definitely some warpage going on. Not much but enough to **** me off, especially after I have learned so much and manage to get the saddle so good. This was also confirmed by putting the 1 2 3 block along the surface and placing the camelback on them. the left hand one was held flat and perfect while the right hand one would rotate about one corner.
So now I need a small cast iron surface plate to flatten Datum A.
I may have to attack the straight edge again next. Now the I am better at scraping and while waiting for this months paycheck.....
Thats it for this week folks, not going to be in the shop until Monday.
Have a good weekend!

Today I finished the saddle. It is now parallel to 0.01mm which is the accuracy and resolution of my DTI.
The DTI is a pile of crap. I could not trust is so I had to keep measuring my zero every so often to ensure I was not deviating.
Following the discussion about the stone being concave, I have moved to a deburring file. makes clean up after deburring easier too, no more stone dust. Have spun it on the table and it seems flat enough.
The results:

Richard, may I be added to your honorary students list now?
Decided to start on the base again. First order of business is to establish if datum A is actually worth using at all.
Put the 1 2 3 blocks at the edges of one side of the long axis of the base and used the surface gauge and DTI on the other. Seems there a dip of around 0.08mm in the middle of the ways and the extremes are out by 0.04mm.
Out came the 90mm jackhammer. but now I have the springy blade, I bolted the jack hammer onto the springy blade...Great Success! As the area is so large, I was able to increase the stroke and speed to maximum. The idea is to cut the surface of the datum so it can carry.
Blued up the camelback and did the union jack check. Each long side is flat (just) where blued but there is definitely some warpage going on. Not much but enough to **** me off, especially after I have learned so much and manage to get the saddle so good. This was also confirmed by putting the 1 2 3 block along the surface and placing the camelback on them. the left hand one was held flat and perfect while the right hand one would rotate about one corner.
So now I need a small cast iron surface plate to flatten Datum A.
I may have to attack the straight edge again next. Now the I am better at scraping and while waiting for this months paycheck.....
Thats it for this week folks, not going to be in the shop until Monday.
Have a good weekend!

Hello everyone,
I thought I would let you all know that I have had some some time to reflect on things.
Scraping is good and fun, however it is hard work. When a hobbyist undertakes scraping it is usually because grinding is so expensive or difficult. In my case, after starting and progressing with the machine, I have found that I would need to shift too much material. Having spoken to a number of people in the trade, the consensus seems to be "Buy a new one". The quotations for the bare minimum of grinding all seem to be around the same price as a new machine.
Now, considering that I want to convert the barsteward to cnc, and have already got all the goods I was faced with 3 options.
1) Bite the bullet: Grind and apply turcite (£2200)
2) Keep scraping and apply turcite (4 months of evenings, figure out how to fix the dovetails, make a dovetail prism etc etc....)
3) Mill the bugger to within scraping range, scrape it flat/parallel/square and apply linear rails ( 1 month of evening, £600 in rails, £100 in extra materials to increase the travels).
As you may have guessed, the last option is the one I am going for.
I have access to machine tools and a biax so as long as the machine tools can get me close, and I have 90deg angles, I can proceed with good speed. Added benefit is the elimination of any set warpage that came with the machine.
So today I have started eliminating the dove tails on the base. The datum faces will be the front of the base and the clearace plane that I have scraped flat to 20dpi already.
Here I am zeroing on the front face. I guess I could have clocked on the dovetail but knowing how out they are I would just be wasting mu time cranking the wheels. Only one clamp to get a pivot point. The base must weigh around 90kg with the extra ballast I put in it a while ago (epoxy sand and gravel)
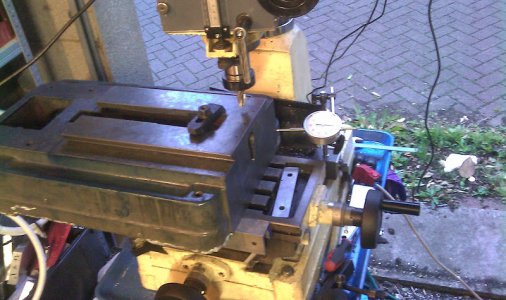
The milling machine I am currently using is my old trusty RF30 which give a surprisingly good accuracy when I make sure I account for slop/inaccuracy in the ways.
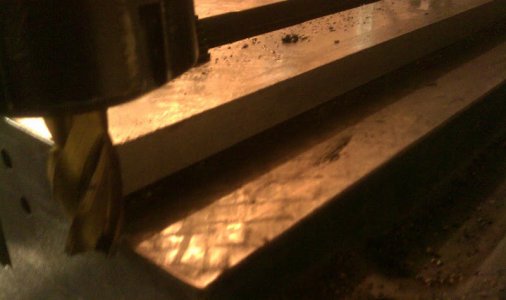
This is where I got to before curfew:
A preliminary model of what I am going to achieve
.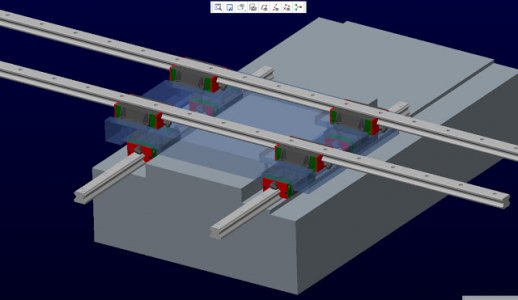
And before anybody says anything, the y-rails will be supported before I am done.
So the project is now a " Make a cheepo mill, into a machining centre" pigs ear to purse, Cinderella story.
Will keep updating as I go ahead.
Question for Richard, (as usual) since he has taught the Taiwanese to do exactly this: is 5DPI good enough or should I try and get 20-30dpi for the rail mounting surfaces?
Regards


I thought I would let you all know that I have had some some time to reflect on things.
Scraping is good and fun, however it is hard work. When a hobbyist undertakes scraping it is usually because grinding is so expensive or difficult. In my case, after starting and progressing with the machine, I have found that I would need to shift too much material. Having spoken to a number of people in the trade, the consensus seems to be "Buy a new one". The quotations for the bare minimum of grinding all seem to be around the same price as a new machine.
Now, considering that I want to convert the barsteward to cnc, and have already got all the goods I was faced with 3 options.
1) Bite the bullet: Grind and apply turcite (£2200)
2) Keep scraping and apply turcite (4 months of evenings, figure out how to fix the dovetails, make a dovetail prism etc etc....)
3) Mill the bugger to within scraping range, scrape it flat/parallel/square and apply linear rails ( 1 month of evening, £600 in rails, £100 in extra materials to increase the travels).
As you may have guessed, the last option is the one I am going for.
I have access to machine tools and a biax so as long as the machine tools can get me close, and I have 90deg angles, I can proceed with good speed. Added benefit is the elimination of any set warpage that came with the machine.
So today I have started eliminating the dove tails on the base. The datum faces will be the front of the base and the clearace plane that I have scraped flat to 20dpi already.
Here I am zeroing on the front face. I guess I could have clocked on the dovetail but knowing how out they are I would just be wasting mu time cranking the wheels. Only one clamp to get a pivot point. The base must weigh around 90kg with the extra ballast I put in it a while ago (epoxy sand and gravel)

The milling machine I am currently using is my old trusty RF30 which give a surprisingly good accuracy when I make sure I account for slop/inaccuracy in the ways.
This is where I got to before curfew:

A preliminary model of what I am going to achieve
.

And before anybody says anything, the y-rails will be supported before I am done.
So the project is now a " Make a cheepo mill, into a machining centre" pigs ear to purse, Cinderella story.
Will keep updating as I go ahead.
Question for Richard, (as usual) since he has taught the Taiwanese to do exactly this: is 5DPI good enough or should I try and get 20-30dpi for the rail mounting surfaces?
Regards


- Joined
- Jul 1, 2012
- Messages
- 1,356
The Linear ways I have installed had a Positive side that was straight and parallel to the base .00005"/12" as they were being installed at Quasar Machine who was at that time the OEM for Bridgeport and their CNC machines. Jig Bore spec's. We scrapped them to 10 to 15 PPI 80% static fit. The closer the base is the better the rails will machine. You need to decide how good you want your machine to cut. Plus check with the mfg of the rail how good they say their rails need to be. I teach for a static fit surface or now way surface we scrape them 2 to 5 PPI (points per 1 sq. inch) with 80% contact. I scrape normal but over stone the scrape to eliminate the 50% contact we try to get on lubricated ways. I sill see if I can attach some pictures of how we used a granite straight edge to align the positive side of the pair of rails. Those steel rails bend and need to be aligned straight, they are not straight and you bolt them on. I will add a couple of more after I find them in my laptop gallery. In Taiwan we made a miniature machine that had bolt on ground ways we would scrape turcite to, we had bolt on ways we scraped to bolt linear ways to and align to the granite square. That reminds me you will need to square your X and Y axis too. It's getting late and will add more tomorrow night. Rich
Rich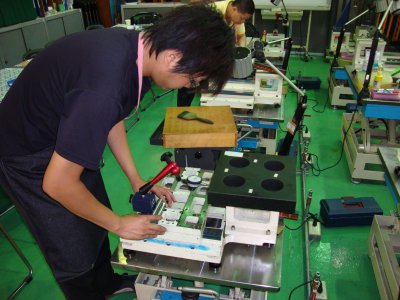
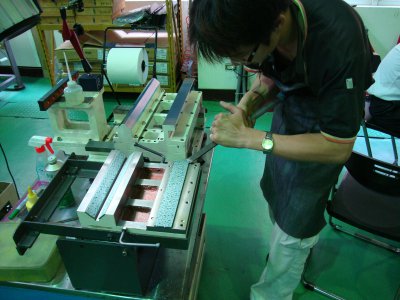


Rich


4
4GSR
Forum Guest
Register Today
Richard,
I have to ask, Is the floor in that factory painted that "green" color? That's almost the color I've painted my lathe to. Is that suppose to be easy on the eyes while working?
Ken
I have to ask, Is the floor in that factory painted that "green" color? That's almost the color I've painted my lathe to. Is that suppose to be easy on the eyes while working?
Ken
- Joined
- Jul 1, 2012
- Messages
- 1,356
That picture was taking in a research training center in Taichung Taiwan where I taught several classes. I have no clue about the color and how meaningful it is to your happiness of making it zen moment. Here is their web-site. The 3rd line link goes to the list of classes I taught there. I m in several of the pictures. PMC and I planned the format of the class. Take a look at the scissor tables they built so the height could be changed. Some pictures show using a granite straight-edge to indicate to check where the linear ways bolt to.
The translate say Name of Babe.. a real whopper of a tranlasation error.
http://scraping.pmc.org.tw/share.php?display_type=list
Rich
The translate say Name of Babe.. a real whopper of a tranlasation error.
http://scraping.pmc.org.tw/share.php?display_type=list
Rich
Last edited by a moderator:

