-
Welcome back Guest! Did you know you can mentor other members here at H-M? If not, please check out our Relaunch of Hobby Machinist Mentoring Program!
You are using an out of date browser. It may not display this or other websites correctly.
You should upgrade or use an alternative browser.
You should upgrade or use an alternative browser.
Making a Cheepo Import machine...better...hopefully
- Thread starter komatias
- Start date
- Joined
- Jul 1, 2012
- Messages
- 1,356
Yes I did....email me and I'll sell you a link to it. Richard@handscraping.com
Well in anticipation of the Biax turning up I thought I would give the parts another go using the manual method.
First off, Richard I gave the method you described in the previous post of:
0 0 0 0 0
0 0 0 0 0
0 0 0 0 0
some thought. I guess this way you do not end up digging a hole in the work, seem to remember you mentioned this about the Biax video on Youtube on another thread. So I gave it a try:
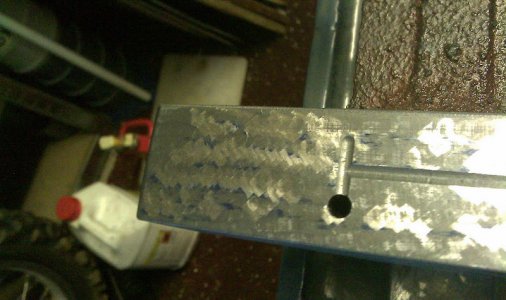
Any better?
I had also tried to see how out of parallel the saddle is to itself ( top x-axis ways to the bottom y-axis). Well I was getting a variation of up to 0.08mm. The needle of my DTI was BOUNCING....hardly surprising when I cut the surface lightly and spotted it:
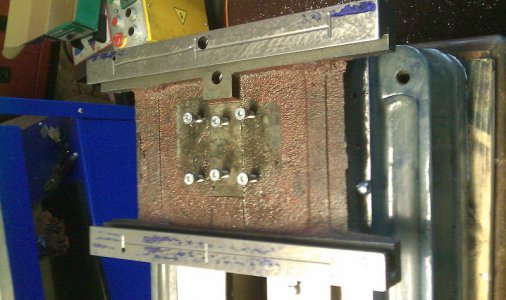
After two passes this evolved:
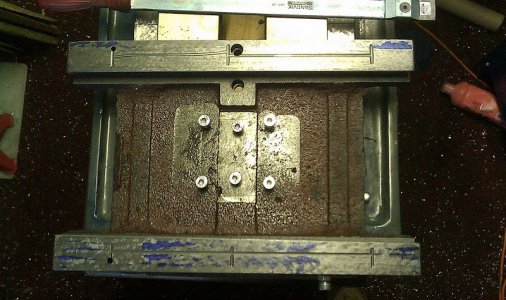
The high streaks are from the super flat grinding wheels used...:lmao::rofl:
Anyway, an RFQ has also been sent out to a couple of way grinders in the UK to see if it really is worth the effort in the end.


First off, Richard I gave the method you described in the previous post of:
0 0 0 0 0
0 0 0 0 0
0 0 0 0 0
some thought. I guess this way you do not end up digging a hole in the work, seem to remember you mentioned this about the Biax video on Youtube on another thread. So I gave it a try:

Any better?
I had also tried to see how out of parallel the saddle is to itself ( top x-axis ways to the bottom y-axis). Well I was getting a variation of up to 0.08mm. The needle of my DTI was BOUNCING....hardly surprising when I cut the surface lightly and spotted it:

After two passes this evolved:

The high streaks are from the super flat grinding wheels used...:lmao::rofl:
Anyway, an RFQ has also been sent out to a couple of way grinders in the UK to see if it really is worth the effort in the end.


- Joined
- Dec 23, 2012
- Messages
- 25
It looks like you are going in the right direction. It also looks like you have the consecutive scrapes nearly overlapping, but the rows are space apart by one scrape length. You want the individual scrapes to be spaced apart by an equal amount in any direction. I find this much easier to do when I scrape 45 degrees from the long axis of the way, so I am moving perpendicular to the scraping stroke when moving to the new scrape location.
- Joined
- Jul 1, 2012
- Messages
- 1,356
It looks like you are going in the right direction. It also looks like you have the consecutive scrapes nearly overlapping, but the rows are space apart by one scrape length. You want the individual scrapes to be spaced apart by an equal amount in any direction. I find this much easier to do when I scrape 45 degrees from the long axis of the way, so I am moving perpendicular to the scraping stroke when moving to the new scrape location.
Erik is correct the scrape marks should be spread out and not overlap when going gr a finish cut or 20 PPI. The ways now look like your in the "rouging" stage The rule f thumb is you rough scrape until you get 5 PPI per square inch over 100% of the part surface keeping in mind you want to finish with on average 20 PPI with 50% of each (per) square inch. I tell guys when you rough it is like scraping off paint, so long 3/4 to 1" strokes that overlap, then shorten your stroke as you get more PPI until your happy with the look. Just imagine how it looked before you started, it is 1000% better now. The one picture looks like the one way is high on the ends and the other side is high in the middle. This is why when using the straight-edge you hinge it to find the rotation of points, some call them the airy points 25 to 30% from each side when finished. Then your final couple of passes to relieve between those airy pints appox .0005" to .001" lower. When your done at 20 PPI and 50 % POP the stroke length will be aprx. 3/16 to 1/4" long.
Hi all,
I found a working Biax in Germany and promptly parted with my beer tokens for it. It worked wonders, surprised at how effortless it is to use, even badly.
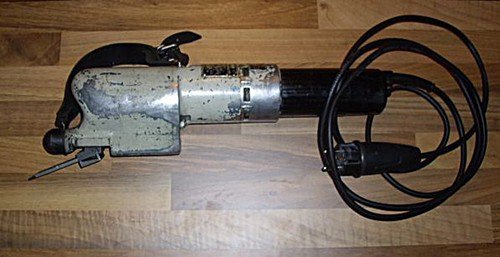
It has been painted white at some point in its life.
I can now get spots on the edges:lmao: Yes, I know I need to make sure I do not strip the phenolic gear
So I was working away at the saddle to get the two flats parallel and something inside went pop....bugger....
It seems that something electrical has happened. I have opened it up and seen that a repair has been done on the cables to the motor. One of them was loose and the other parted company with the power line pretty easily....bugger x 2. The brushes are still ok thankfully.
I can get the front end of easily and read on how to remove the wobbler. How doe one remover the motor though?
So the plan is to resolder the wires and give it a try. If the motor has given up the ghost then I may have to ghetto something together.
Photos of the biaxing progress to follow.
Added later: False alarm! Biax is working fine, it was the safety fuse that blew. The fuse was a 3amp one. Installed a 10amp fuse and fixed the cables to the motor windings and am back in business!

I found a working Biax in Germany and promptly parted with my beer tokens for it. It worked wonders, surprised at how effortless it is to use, even badly.

It has been painted white at some point in its life.
I can now get spots on the edges:lmao: Yes, I know I need to make sure I do not strip the phenolic gear
So I was working away at the saddle to get the two flats parallel and something inside went pop....bugger....
It seems that something electrical has happened. I have opened it up and seen that a repair has been done on the cables to the motor. One of them was loose and the other parted company with the power line pretty easily....bugger x 2. The brushes are still ok thankfully.
I can get the front end of easily and read on how to remove the wobbler. How doe one remover the motor though?
So the plan is to resolder the wires and give it a try. If the motor has given up the ghost then I may have to ghetto something together.
Photos of the biaxing progress to follow.
Added later: False alarm! Biax is working fine, it was the safety fuse that blew. The fuse was a 3amp one. Installed a 10amp fuse and fixed the cables to the motor windings and am back in business!

Last edited:
- Joined
- Dec 23, 2012
- Messages
- 25
A Biax sure makes life nicer. Don't forget to figure out some diamond sharpening system. Glendos work great. Here are two cheap substitutes:
http://www.hobby-machinist.com/showthread.php/14987-My-cheapo-Glendo-substitute
http://www.hobby-machinist.com/showthread.php/11032-Glendo-lapper-clone?highlight=glendo
You can sharpen by hand on a diamond stone, too - it's just more work and harder to hold the angles.
http://www.hobby-machinist.com/showthread.php/14987-My-cheapo-Glendo-substitute
http://www.hobby-machinist.com/showthread.php/11032-Glendo-lapper-clone?highlight=glendo
You can sharpen by hand on a diamond stone, too - it's just more work and harder to hold the angles.
- Joined
- Jul 1, 2012
- Messages
- 1,356
In the old days when the biax was used to rough parts and then finish scrape by hand those blades were designed. That insert holder is so stiff it will literally feel like your chipping weld or as I say in my classes feel like a jack hammer. You need to buy or make a 150 series blade as they flex and are forgiving and you can finish scrape using it . Can rough to finish with one blade.. The style has changed the way people scrape. I never recommend you use that blade unless your rough scraping a large scored casting that are scored. For your little mill you need a 3/4 x 5" long flexible blade that has "feel". Ground with 60 (r) radius and a neg 5 deg on both sides. I am now teaching a class in Oakland CA and 2 of the students have or should I say had those insert style holders as they came with the BIAX they bought on Ebay. I let them use a 150 series blade and the Paul said "You were right the other blade is a "jack Hammer". If you look at some of the other forums on my section...the GA glass or how to make a scraper...you can see that type blade. If all else fails mill or grind the blade holder thinner. no more then .062 at a time and then test it. Those holders were generally made out of cold rll steel as the 150 series were made from tools steel and flex and don't bend like the cold roll. Hopefully Paul, Mike or Mel well come on and tell you about the blades we are using here in Oakland. Erik, come on over Sunday and say HI.
PM me for directions. Rich
PS: I do not own a blade like the one you have. H one more thing one of the students (Mel) has a Chineses mill we are going to scrape in...the ways look like heck...will start to put pic on new thread tonight.
PM me for directions. Rich
PS: I do not own a blade like the one you have. H one more thing one of the students (Mel) has a Chineses mill we are going to scrape in...the ways look like heck...will start to put pic on new thread tonight.
- Joined
- Jul 1, 2012
- Messages
- 1,356
I was going to down load some pic's of day 1 and 2 the Oakland Class, but I was pooped out, will do it soon and today's class, I promise. The class is going great...The Chinese Mini mills base ways were out .012" and we are machining it parallel now. I would be careful buying one unless you want to plan on machining and scraping the ways after you buy it. Have a nice day. Rich....
Tonights project complete! I know am a proud owner of a 150 long scraper shank. Made it from 6mm gauge plate that I found in the scraps at work. 19mm wide, 150 long overall, thin section 2mm. The insert is the one that came on my sandvik scraper and so is the top of the clamp.
Tried a first cut on the base ways and am very very pleased! I don't have to worry about the blade kicking back, the cutting is more controlled and best of all, when I am not scared of the initial touch. Jack hammer be gone!!!! The other R60 stubby will be retired for use with the hand scraper, with the extra length I find I have better control.
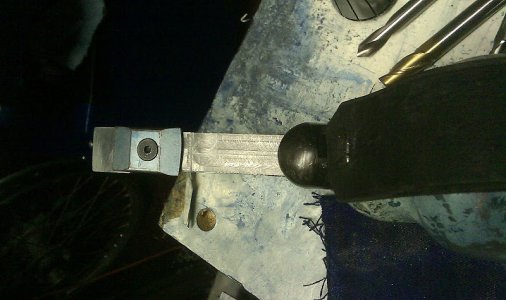
Well worth the effort....
Thanks Richard!

Tried a first cut on the base ways and am very very pleased! I don't have to worry about the blade kicking back, the cutting is more controlled and best of all, when I am not scared of the initial touch. Jack hammer be gone!!!! The other R60 stubby will be retired for use with the hand scraper, with the extra length I find I have better control.

Well worth the effort....
Thanks Richard!

