[Shaper] Little problem with shaper table

A little technical correction is due. I mentioned "P80" earlier. I was going by an obviously faulty memory. "L80" is a mechanical property requirement of an alloy steel that is a controlled yield, fairly soft steel (22 Rc max.) in the 4XXX series. I should have said "P110" in referencing the tubing I have I thought might work for you, Ron. It is P110 that I have, with a 3.00 OD and 1 1/2" ID. ID is a little rough, so if it's close to what you need, I'll measure it cloers. I used a yo-yo. It specs 30-36 Rc.

Sorry for any confusion.

Tony, many days I'm nothing but confusion. You, my good man, have nothing to apologize for. As long as the inner diameter is smaller than 1 5/8" I can make it work. What kind of lengths do you have and how much do you want to get rid of? I see large piles of chips in my future... :)

Peacock, I'll definitely be using your advice. I'll be setting up and doing a lot of practice, as well as grinding the proper tools, before I attempt this one.

Thanks,

-Ron
 
I don't run the parts I stocked it for anymore. I'd guess I have a piece about 80" long or so. How long a piece you want?
 
Good question. The sleeve I'd be replicating is roughly 9.5" long. That, and add a few inches for "something to hold on to". You'll know better than I how much that would be.

Now, my "normal" modus operandi is to get two or three times the material I will need for a particular job (at least one I've never done before and where there's a relatively good chance of me screwing it up). Left over material is always a bonus and can go towards other projects. Seeing as "three times" seems a little on the excessive side I am thinking that twice the length I need for this will suffice. I hope that won't be too much trouble but if it is let me know if that's out of line. I will, of course, be picking up the whole tab on this. It just wouldn't seem fair to not compensate you for time, materials and shipping as you've already done so much to help.

Thank you,

-Ron
 
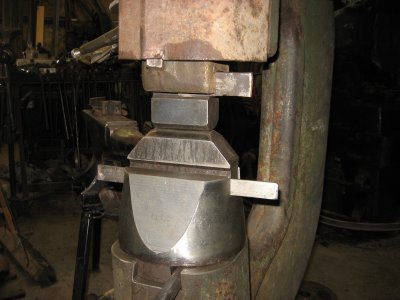
IMG_2499.JPG"what is that project you have on the shaper? There has got to be a story behind that one." :thumbzup:

That is the frame of a 100 yr old Little Giant power hammer. The biggest part of my machine work is rebuilding forging hammers this the 37th hammer I have built. The dovetail that holds the die was broken off and someone did a terrible job of trying to fix it. We took all the damaged section off with a bandsaw. What you see is recutting a new dovetail, & makeing a sow block to restore the frame to the correct height. I also made two sets of dies, made a new mainshaft & reworked several other items for this customer. If there is more interest I could show more but you can see it at IForgeIron.com then to the hammers section scroll down to new dovetail for 25# little Giant. I love fixing and useing those old forging machines. The pix is the finished frame, sow block, and dies as they are assembled when in use.

IMG_2499.JPG
 
Wow! I went over to IForgeiron.com and checked things out. :worship: Nice work on the hammer (I have an identical square to the one you're using in pic #5 :)) and that sow block is perfect. It's great to see a shaper being used that way (or at all). My hat's off to all the work with cast iron too. I'll bet the guys over here would love to see more of these kinds of "projects". Thanks for pointing me in the direction of IForgeiron.com as I think I'm going to be spending a lot of time ogling much of the stuff I just had a glimpse of.

For anyone reading this, it's definitely worth the time to go over there, you need to register to see the pics but it's painless and well worth the effort.

Thanks Peacock,

-Ron
 
Ron,
no go on the tubing. The actual ID is almost 1.70 in the largest places. I'll dig around some more. I'm bound to have something, even if it's a solid bar. If it fits, it ships right?
 
Tony, if you find something you think is appropriate. It ships. :)

Thanks once again,

-Ron

Oh, I forgot to add. Cutting the threads is going to be even more interesting than I originally thought. The threads are not "Acme" at all, they are actually what my SB manual refers to as "Square" threads. Going to be entering the bit grinding "wonderland". :confused: :biggrin:

Ron,

If you will be re-making both the nut and the screw, I would opt for an Acme thread instead of square. It will be nearly as strong and much easier to cut, especially in steel. Cutting square threads is like parting with the added level of difficulty of sideways movement. Not fun at all on an internal thread.

Tom
 
Tom,

I wasn't really thinking about replacing the nut, either of them, but only making a new threaded "sleeve". The thought of trying to do an inner "square" thread gives me the heebie-jeebies. :scared: If I am only replicating the outer sleeve I figure I can at least "see" what I'm doing. I've been studying my old SB "How to Run a Lathe" booklet as well as the "Machinery Handbook" to get a better idea of how I need to grind my cutting tool.

These parts look fine as far as I'm concerned:

"Bottom" nut.


"Top" nut and inner screw.

The "top" nut I can just pin to the outer sleeve by drilling it out on the other side. I believe whoever last assembled the inner screw left the "catch post" sticking out the wrong side as it doesn't properly engage the notch in the "top" nut but that should be simple to rectify.


Now that I look at the inner screw, and I'll have to go back and look at the thread definitions, I don't think it is a "square" thread anyway. Doesn't look deep enough.

The threads on the outer sleeve though appear to be "square" in that they are the same width as depth.


This poor, beat up thing is the only piece I think needs replacement.


If "worse came to worse", as Peacock has pointed out, it could still be put back in to use the way it is. I'm not sure if I would ever trust it though.

Oh, as I'm thinking of it, I did make a new drawing to show just how the final setup should go back together:


Thanks,

-Ron
 
Square threads are not really "square". They have to have some side clearence to run free. The channel will be wider than the rail of the thread. Now what I am about to say may cause some dissagreement but this is MY way of fixing these old square threads, not text book by any means but it has worked for me several times.
Of course you need to determine the threads per inch, Then I cut a regular thread 6o degrees very shallow you must leave the flat a little wider than the top of the finished thread will be Then I change to a square tool bit then set the compound to 0 degrees pick up my thread set the dial on the lead screw to 0 and cut out the corners of the v. feeding in with the compound. After you get so deep you may get some chatter due to too much tool contact. Now you need to move the the lead screw 2 or 3 thou. to your right on a left hand thread to give some side clearence.
once you make that pass I reverse the lathe direction run it back to the starting point return the lead screw to 0 and cut out the trailing corner. You may have to repeat this process a couple of times. It really doesn't hurt if you go a little too deep as you will not be reducing the OD. If you get the tool bit ground just right it will leave a tiny radius on the corners of the thread this is pretty hard for me to get done so I normaly do that with a file at the slowest spindle speed. This will have some backlash when in use because of the side clearence but will not be a problem
 
Last edited:
Back
Top