Little mods making things better. (And other Stuff!)

I have learned that asking too much from a small machine always ends in frustration. Go easy and let the machine work at a pace that IT is comfortable with. It will tell you when it's unhappy with what you are doing, you just have to listen.
 
Large drill bits may present a problem in any future use.

Right, MT1 is pretty small.
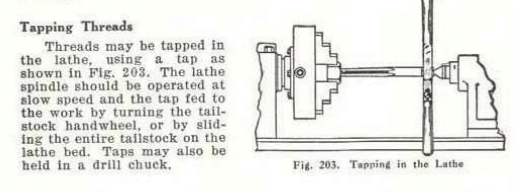
Somewhere I remember seeing someone using a straight-legged lathe dog that was fastened (via set-screw) to a drill bit just above the shank.
The drill shank was fully in the tailstock taper, and the lathe dog was run against a piece of wood to protect the ways.
The tailstock provided the centre, and the lathe dog helped with torque.

Below is a similar picture of machine tapping from the 1958 edition of SouthBend "How to Run a Lathe"

-brino

1637160209438.png
 
Last edited:
FYI: The tailstock "ram/piston/spindle" is what we usually call a quill
The term spindle is mostly reserved for the headstock
-Mark
 
The generally accepted term or name for the cylinder that can be moved or extended out of the front of the tailstock on an engine lathe is "ram".

"Quill" can have several meanings. But one applicable to machine tools is the rotating extendable part of a drill press or some vertical mills.. In the latter case, it usually applies only to the part or portion of the mill that can have a drill chuck mounted on it and that can be hand operated just like most drill presses. The operative difference in this case is that the tailstock ram must not rotate and the milling machine quill must rotate in order to perform their functions.

Also, FWIW, "ram" is the only part name used by Atlas from the 1932 9" to the 1977 Metric 6" and the 1978 12700 school 12".
 
The operative difference in this case is that the tailstock ram must not rotate and the milling machine quill must rotate in order to perform their functions.

I really don’t know what I’m talking about but I was under the impression that the quill is just the non rotating portion that carries a rotating spindle. I do have some old books that would probably address the issue.

The extension mechanisms for a quill and tailstock ram are quite different.
 
After some research the quill and ram are synonymously used. While the ram is more commonly used to describe the tailstock piston portion. Many references have also used "quill" as the same thing. For instance in drill presses "quill" describes the ram portion that goes up and down in the drill presses head. This is the vertical use of the same thing in a lathes horizontal orientation. Ram is he most commonly used wording when talking about lathe tailstocks. Probably has something to do with European and American terminology. Anyway I'll be calling it a "RAM" from now on to prevent any confusion.
 
My change gears arrived a couple of days ago. There were 9 gears "but" I didn't get a 40 tooth but did get a 48 tooth. Without the 40 tooth I wouldn't be able to cut threads smaller that 18tpi. I ordered a nylon 40 tooth gear. I will start training myself to cut threads maybe tomorrow. I do have the right gears for19tpi up to whatever. Gotta figure out how deep to cut the threads. I did see a YouBoob video where they were using "Pee Dee" steeI strands with a micrometer to get proper depth once the depth is known. Ordered a couple of woodruff keys 3/8" x 1-3/4" and they seem to work fine in the lantern tool holder that I will probably never use. Now I do have a good lantern post should I find I need it.

I also have asked for help in finding out what this extra change gear set fits should anyone know. You can follow this forum link to see the picture.
http://www.hobby-machinist.com/threads/help-id-change-gear-set.96347/
 
Couple more improvements. I've hated the compound and cross slide gib screw having to use a small screwdriver for adjustment. I ordered allen head SS screws for the cross slide and lathed a button, for lack of correct terminology, on the end where it contacts the gibb. There are three screws, on cross slide, and on the center screw I made it longer so I could add washers for ease of getting a wrench on the jam nut. I had to order allen grub screws for the compound otherwise the heads would hit the compound base.

Also, on the back gear shaft, I put an "O" ring between the engagement lever and housing to male the lever tight. Used some paper between the back gear and headstock engaging gear just like the change gears. I maked the housing, next to the lever, for proper adjusting of the back gear. You can see where I maked the housing with a permanent marker in the photo. This cut down on the "some" of the noise coming from the back gear when engaged.
 

Attachments

  • 20211127_080808.jpg
    20211127_080808.jpg
    3.7 MB · Views: 54
  • 20211127_080636.jpg
    20211127_080636.jpg
    3.9 MB · Views: 52
Mounted the new/old 1/2 hp motor this morning and everything runs fine. The belt does not rub on the motor but just the same I put some foil air-conditioning ductwork tape on top of the motor just in case. Don't know if anyone else does the same for a swarf pan as I did. Went to the auto parts store and bought a garage oil drip pan for $10 to mount everything on. I also found a cafeteria tray that I cut couple inches off one end to catch most all the chips that fall. Think I might paint the tailstock blue to counterbalance the blue motor color. Who knows, "One day I might actually try and make something!" It's kinda like getting all dressed up and nowhere to go if you know what I mean! Couple more pics just to keep it visually interesting.
Nice job!
What’s up with the elephant devil?
 
I'm a "Mad" republican, hinse elephant, who's against "The Socialist States of America" Administration!
 
Back
Top