Lapping valves the lazy man's way.

Lapping valves 'properly' will take considerably longer than a few seconds, how long is dependant on how bad the seats are. The more hours on a motor, the worse the seats will be. Lapping valves is a three stage process: Grinding with course compound, finishing with fine compound and finally testing for leaks.

There are different grits in valve lapping compounds, so, it's not just a single operation, start with course and finish off with fine. Before finishing with the fine grit, make sure you remove all the old course grit. If you just use course, the valves will leak. As you lap, some of the abrasive in the compound will break down into finer particles, so, you will have a mixture of fine and course particles, the course particles will form very fine grooves in the seats, so, you will have to lift the valve every now and then, wiping the seats clean to remove the lapping compound and replace with fresh compound, you also need to change the direction of rotation every now and then.

It is also a good idea to squirt a bit of oil into the valve guides before inserting the valves. This will lubricate the stems providing less friction as the valve is rotated.

When testing, invert the head, make sure the seats on valve and cylinder head are spotlessly clean, replace the valves and turn them by hand against the seats a few times to ensure they are seating properly. Then pour petrol into the combustion chamber, place a sheet of metal over the top to stop,the petrol evaporating and let it sit for a few hours to see if it leaks. Don't use water, water is denser than petrol so is less likely to show any leaks. Water reacts with steel and will form rust spots on valves and any steel it contacts, including the seats.
Some people will say that what you describe is a miss application of the lapping process. They will say that if the valve and seat don't clean up easily within a minute of lapping, then they should be cut, not lapped. My purest side fits into this belief camp.

That said, I know guys refurbishing old motorcycles they paid $500 for, and they don't want to spend money on machine work unless absolutely necessary. They use drill motors and hammer away at the lapping, sometimes creating a groove in the valve, but at the end of the day, they affect a seal between the parts, and the bike runs down the road. How long does the seal last? Who knows? Most of these guys aren't putting big miles on bikes rehabbed this way, so it's a moot point to them.
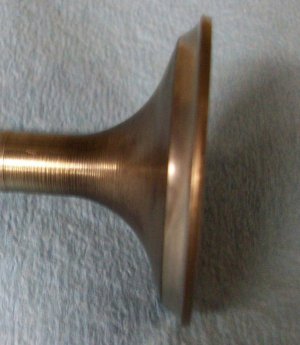
 
Nope, it's just doing it properly. Spend two seconds on lapping valves and you will get leaks. Consider this, tradesmen are trained to a do a job in a manner that makes money for their employer ,they are not trained to do a Job properly. I've been fixing tradesmen's work for 55 years, never had to fix any of my work, because I do it properly, not the most cost effective way of doing it.
 
Nope, it's just doing it properly. Spend two seconds on lapping valves and you will get leaks. Consider this, tradesmen are trained to a do a job in a manner that makes money for their employer ,they are not trained to do a Job properly. I've been fixing tradesmen's work for 55 years, never had to fix any of my work, because I do it properly, not the most cost effective way of doing it.
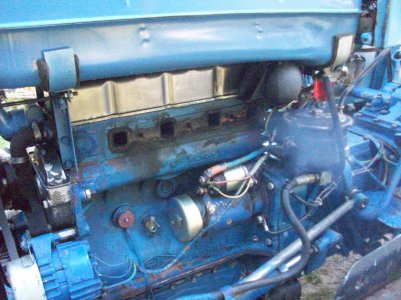
Here is a pic of one of the intake valves from the tractor head job before it was ground. This kind of wear cannot be lapped out... it has to be ground the same is true for a worn seat imo.
When the machinist re ground the valve which restored the correct angle to the face and then tried to lap that to the Unground seat it actually made the valve to seat seating seal worse than had he done nothing. I guess in that case just lapping might have been better than what was done by machining one but not the other.

It is obvious just how much face wear was present on the seating face of this valve
My point is both valve and seat need machined unless there is very little wear.
Second pic is the result of not grinding the seats. number 4 cylinder. Unburned diesel smoke. loss of combustion containment on power stroke.
At night, fire could be seen escaping at low idle "before" the exhaust valve even opened. Intake can be heard leaking combustion gasses back into the manifold and if in winter fluffy snow is placed around the air intake cap it will blow it away from the air intake again due to valve- seat seal leakage.
Been running like this for 8 years now, but it will get fixed and that will take pulling the head and grinding the seats.
 

Attachments

  • Rhino  Intake valve.jpg
    Rhino Intake valve.jpg
    264.3 KB · Views: 14
  • Rhino bad valve job  resulting in  incomplete diesel burn.jpg
    Rhino bad valve job resulting in incomplete diesel burn.jpg
    590.9 KB · Views: 15
Last edited:
Yep, had the same problem, the seats were so worn, the intake manifold was blackened, I trusted the valve seating/grinding to a 'tradesman'. When I picked it up he had installed the valves and springs and assured me it was right to go, Unfortunately, I never checked, just took him at his word.

Never trust a tradesman, trade trading is all about doing things the most cost effective way to maximise profits. If you want it done properly, do it yourself!

A few years ago, the switchgear on my lathe fell apart, along with the capacitor housing. I pulled it all apart, replaced the switchgear and capacitor housing then called in an industrial electrician to wire it up. The guy turned up and asked for a wiring diagram, I didn't have one, so he demurred. But, I couldn't find another industrial electrician who could wire it up without a diagram

I don't like messing with mains powered gear, but left with no choice, I pulled out my multimeter, identified start and run motor windings, identified start and run capacitors, drew up some schematics on how to wire up a reverse/forward and start switch, and hooked everything up.

So much for tradesman.
 
Last edited:
Lapping valves 'properly' will take considerably longer than a few seconds, how long is dependant on how bad the seats are. The more hours on a motor, the worse the seats will be. Lapping valves is a three stage process: Grinding with course compound, finishing with fine compound and finally testing for leaks.

There are different grits in valve lapping compounds, so, it's not just a single operation, start with course and finish off with fine. Before finishing with the fine grit, make sure you remove all the old course grit. If you just use course, the valves will leak. As you lap, some of the abrasive in the compound will break down into finer particles, so, you will have a mixture of fine and course particles, the course particles will form very fine grooves in the seats, so, you will have to lift the valve every now and then, wiping the seats clean to remove the lapping compound and replace with fresh compound, you also need to change the direction of rotation every now and then.

It is also a good idea to squirt a bit of oil into the valve guides before inserting the valves. This will lubricate the stems providing less friction as the valve is rotated.

When testing, invert the head, make sure the seats on valve and cylinder head are spotlessly clean, replace the valves and turn them by hand against the seats a few times to ensure they are seating properly. Then pour petrol into the combustion chamber, place a sheet of metal over the top to stop,the petrol evaporating and let it sit for a few hours to see if it leaks. Don't use water, water is denser than petrol so is less likely to show any leaks. Water reacts with steel and will form rust spots on valves and any steel it contacts, including the seats.
100% true!!!!!
 
Some people will say that what you describe is a miss application of the lapping process. They will say that if the valve and seat don't clean up easily within a minute of lapping, then they should be cut, not lapped. My purest side fits into this belief camp.
 
There are people who stick to the way they were taught to do things, by someone who was taught the same way, ad infitum. If we stick to this way of doing things, nothing will change, nothing will improve.

I can see nothing wrong with throwing old worn out ways of doing things in the rubbish, where they belong, and adopting new procedures.

Tradesmen are the worst culprits, refusing to evolve, refusing to change, refusing to find better ways of doing things. That's why you pay top dollar for sub standard jobs.
 
I will do the job myself next summer. Need the tractor to blow snow this winter, that is the thing with tractors- always seem to "need" them and hard to budget down time ...

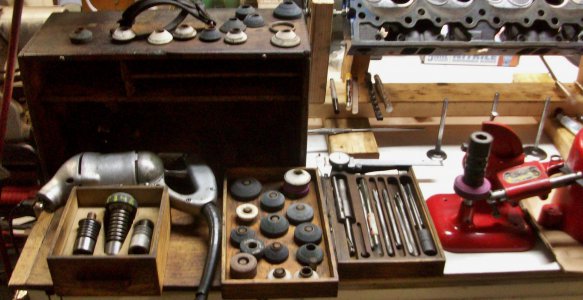
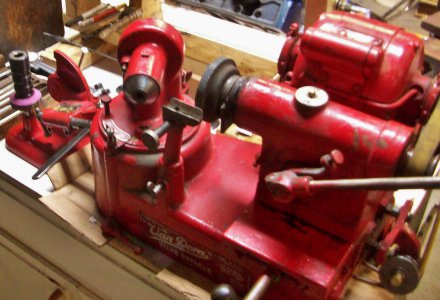
Here's some Pics of some of the old tools I sourced for the job after it was botched and I will lap in the valves to the seats but Only After I stone grind and re cut seats and valves, actually bought a few spare new valves as well just in case.
This Old equipment did great work and excellent results on a Buick V 6 and Pontiac V8 heads I did. Sourced all of the guides replacement seats ( if to far gone to grind) pilots and stones specific to the tractor as well since these pics
A tractor head should be about the same difficulty or less.

By diamond cutting and dressing the stones the seat angles and widths can be brought back to factory specs. Also had to source New stone holders since the bearings and guides were worn on the old ones in the kit.

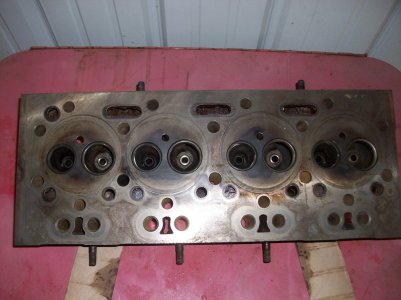
Pretty obvious even from the pic of the tractor head went to the "machine" shop TWICE
Actually after thinking about it ,that picture is at the machinest shop to "show" him that the valve and seat were Still leaking after the 1st job he did...
After the second time and another new head gasket and all the other fun for me of remounting the head bleeding the direct injection etc. I gave up. Until I tear it apart for the 3rd and hopefully final time .
If it isn't functional this time I can only blame myself. Some Good did come out of this, It prompted me to buy more TOOLS even if they are old. :)

ps I called the valve grinder a Van Norman, It is actually a Van Dorn and was surprised it only had 3-4 tenths run out when I checked the valve chucking with a new valve installed.
 

Attachments

  • Rhino Head before  shops Failed Valve job.jpg
    Rhino Head before shops Failed Valve job.jpg
    425.8 KB · Views: 14
  • Valve grinder 005.jpg
    Valve grinder 005.jpg
    514.5 KB · Views: 15
  • Valve grinder 004.jpg
    Valve grinder 004.jpg
    511.3 KB · Views: 15
Last edited:
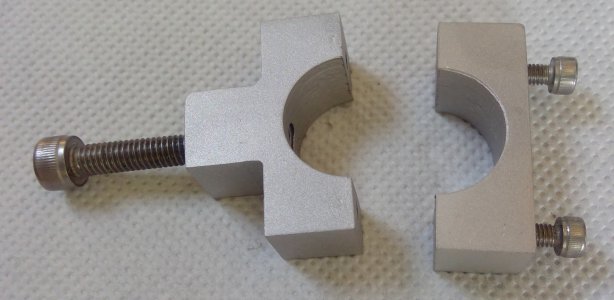
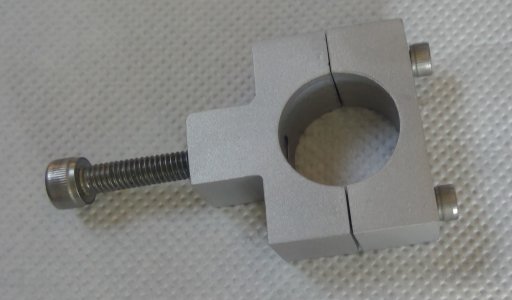
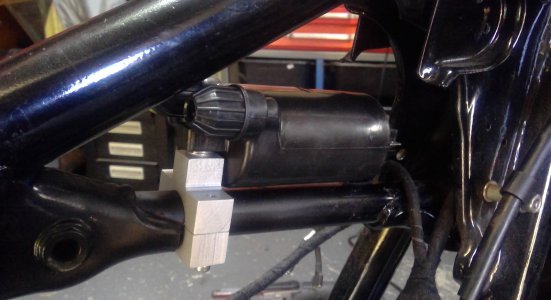
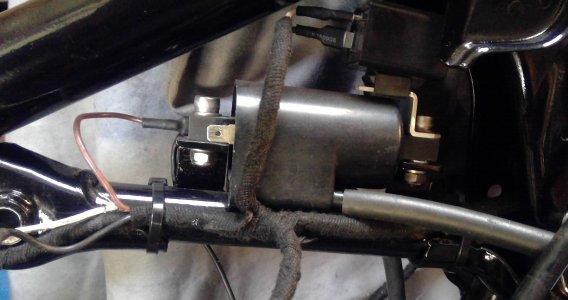
When I converted to a single,points system I had to install a dual output coil. I opted for a Honda 750 coil and welded tabs on the frame on which to mount it.

The coil lasted all of two weeks, so I ordered another the same and installed it. It's still ok, but I have heard this particular coil is known for a short life. With this in mind, I found another type, still for a Honda 750, and ordered one. When It turned up, I discovered it was about 20mm longer than the other, so, the tabs I welded on the frame were too close to allow fitment.

So, I cut the rearmost tab off the frame, jumped on the mill and machined this bracket. The bracket clamps around the short frame tube under the main top tube and can be slid forward or backward to fit either coil.
 

Attachments

  • WIN_20231107_09_58_35_Pro.jpg
    WIN_20231107_09_58_35_Pro.jpg
    349.9 KB · Views: 6
  • WIN_20231107_09_59_39_Pro.jpg
    WIN_20231107_09_59_39_Pro.jpg
    236.4 KB · Views: 6
  • WIN_20231109_15_48_27_Pro.jpg
    WIN_20231109_15_48_27_Pro.jpg
    333.1 KB · Views: 6
  • WIN_20231107_10_17_58_Pro.jpg
    WIN_20231107_10_17_58_Pro.jpg
    459.5 KB · Views: 6
Trying to do a good valve job with less than good guides is a waste of time and effort, and if done right as a three component system with the right tools lapping is unnecessary. Once the engine is started the valves will mate fully to the seats in short order. Mike
 
Back
Top