-
Welcome back Guest! Did you know you can mentor other members here at H-M? If not, please check out our Relaunch of Hobby Machinist Mentoring Program!
You are using an out of date browser. It may not display this or other websites correctly.
You should upgrade or use an alternative browser.
You should upgrade or use an alternative browser.
Knurled Tool
- Thread starter oskar
- Start date
- Joined
- Jul 20, 2012
- Messages
- 1,255
I own the Sherline knurler and it works. However, it is nowhere near as good as a scissors knurler. The problem is that nobody makes a good scissors knurler for the Sherline/Taig sized lathes so I made my own by looking at a single blurry picture of a knurler made by Chris Heapy of the UK. Maybe these pics will be enough to get your thinking going:
View attachment 267095View attachment 267094View attachment 267096
All mild steel, aluminum spacers, aluminum mounting block. Knurls are from FormRol, pins are drill blanks. There is zero play between the plates and arms but the arms move freely; it is extremely rigid. Capacity is 1/8" to 2-1/4" OD. It will knurl everything we commonly work with, from plastics to brass to steel to stainless steel. It mounts solidly to the Sherline cross slide with two T-nuts.
I do not have plans for it but can give you details if you have questions. I will tell you that there is no comparison between this knurler and the Sherline tool.
Would you consider taking this all apart, setting the parts altogether with a scale in the picture? A few different angles of the setup also. This way it would be easier for someone to see and replicate it.
As is sometimes said a picture (with a scale in the background) is worth 1000 words.
Current readers may not need it but years of future searchers would appreciate that. And this thread is good enough already to show up searching.
- Joined
- Dec 20, 2012
- Messages
- 9,422
Would you consider taking this all apart, setting the parts altogether with a scale in the picture? A few different angles of the setup also. This way it would be easier for someone to see and replicate it.
Yeah, breakdown pics would be useful. I'll try to do it as soon as I can.
- Joined
- Dec 20, 2012
- Messages
- 9,422
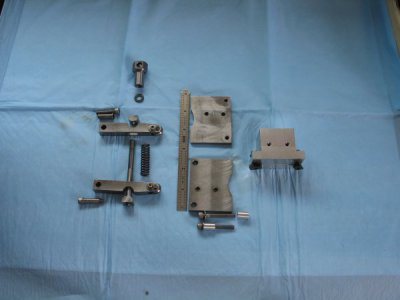
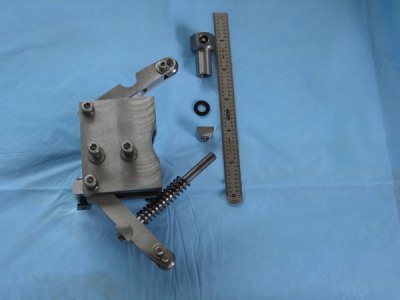
@Cadillac STS, here you go. Not sure how the picture quality will be. First pic shows all the parts in relative position. You can see that the arms hinge on a stainless steel bushing through which a 10-32 SHCS passes. The bushing is sized to just fit a reamed hole in the outer side plate and the end of the arm. Also visible are the aluminum spacers that are exactly the same width as the arms. You can also see some draw-file marks on the inside of the plate; since the spacers and arms are the same width, to allow the arms to move you must draw file just enough clearance on the side plates. This gives you movement but no discernible play. The screws that pass through the spacers simply thread into the aluminum mounting block that mounts to the cross slide of the lathe.
Disassembled:

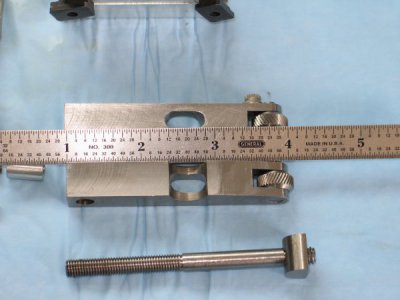
Arms: Here you can see that the holes for the half-moon pivoting inserts are round on one side of the arm and slotted on the other side to clear the threaded shaft. The half-moon is O-1 steel. The threaded shaft is 12L14, screw cut to 1/4-28 on top and 1/4-20 on the bottom and Loc-Tited into the lower half-moon insert. Note also that the half-moon cutout in the arms is about 1/8" forward of the center of the arms to provide a bit more leverage; you can crank down with just hand pressure to produce full depth knurls because of this. The plates constrain the arms laterally so this tool is much more rigid than other designs.

How they fit: You can see that there is a reduced diameter below the hex head of the tensioning knob. That diameter just passes between the plates to allow sufficient travel when knurling smaller diameters. Note also that the front of the plates is rounded to allow clearance for larger diameter work pieces.

Not too complicated. Dimensions are not critical in terms of size but you must work with care. By that, I mean all holes are reamed carefully, bushings and spacers are turned accurately, all parts are squared. None of this is difficult and it is a good opportunity to do work with precision.
The nice thing for me was that everything other than the knurls was already in my shop so I paid only for the knurls. This thing took the better part of a week to design and machine but it has served me well for over a decade. It has not mistracked or produced a single bad knurl so I'm satisfied with it.
Hope this clarifies things for you guys.
EDIT: I forgot to re-emphasize a really important lesson I learned. In order for any feature to be in the exact same location on two or more separate work pieces, you must clamp the pieces together and machine the feature in one operation. For example, if you want the holes at the ends of the arms in the exact same place you have to clamp the arms side by side and square to each other, then drill, then ream. OR, if you want the half-moon holes to be at the same point on the arms, you must clamp them together and drill between those arms. This is the only way to get things exactly the same, and I've already paid for the lesson.
Disassembled:

Arms: Here you can see that the holes for the half-moon pivoting inserts are round on one side of the arm and slotted on the other side to clear the threaded shaft. The half-moon is O-1 steel. The threaded shaft is 12L14, screw cut to 1/4-28 on top and 1/4-20 on the bottom and Loc-Tited into the lower half-moon insert. Note also that the half-moon cutout in the arms is about 1/8" forward of the center of the arms to provide a bit more leverage; you can crank down with just hand pressure to produce full depth knurls because of this. The plates constrain the arms laterally so this tool is much more rigid than other designs.

How they fit: You can see that there is a reduced diameter below the hex head of the tensioning knob. That diameter just passes between the plates to allow sufficient travel when knurling smaller diameters. Note also that the front of the plates is rounded to allow clearance for larger diameter work pieces.

Not too complicated. Dimensions are not critical in terms of size but you must work with care. By that, I mean all holes are reamed carefully, bushings and spacers are turned accurately, all parts are squared. None of this is difficult and it is a good opportunity to do work with precision.
The nice thing for me was that everything other than the knurls was already in my shop so I paid only for the knurls. This thing took the better part of a week to design and machine but it has served me well for over a decade. It has not mistracked or produced a single bad knurl so I'm satisfied with it.
Hope this clarifies things for you guys.
EDIT: I forgot to re-emphasize a really important lesson I learned. In order for any feature to be in the exact same location on two or more separate work pieces, you must clamp the pieces together and machine the feature in one operation. For example, if you want the holes at the ends of the arms in the exact same place you have to clamp the arms side by side and square to each other, then drill, then ream. OR, if you want the half-moon holes to be at the same point on the arms, you must clamp them together and drill between those arms. This is the only way to get things exactly the same, and I've already paid for the lesson.
Last edited:
- Joined
- Dec 20, 2012
- Messages
- 9,422
Very nice work Mike, thanks
Thanks, oskar.
- Joined
- Nov 24, 2013
- Messages
- 268
Nicolas, if you go with that Hemmingway kit, please do a review if you can. I am curious to see how much actual machining is required to assemble this knurler. Hopefully, most of it is done for you because their price is pretty high for some small bits of steel. If it can be done without the use of a milling machine then I think this is a really good option.
Just had a reply from the Hemingway Kits (Kirk Burwell) and he confirmed that all kits provided needs machining. So yes his price is very high
