How to thread stainless

What else needs to happen here?

The tool post needs to be rotated such that the tool is square to the work.
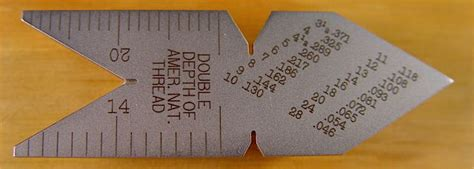
I use a "fish-tail" gauge:
1622943185246.png

put one long flat side against the workpiece and then rotate the tool post such that the 60 degree point fits well in notch on the other side.
Lock the tool post and leave it there for the duration of threading.
The top slide controls the infeed.
After a scratch-cut to double check gearing, advance it a couple thou. per pass to start. The infeed should decrease per pass as each additional cut has more of the cutting tool against the work.

-brino
 
@FTlatheworks Once you have figured out how to position the compound and the tool, here is an additional tip. If you have long thin stock, like in your recent picture, it's good to use a center drill to make a 60 degree cone in the end of the workpiece so you can use your tailstock (with a live or dead center) to support the end. If the workpiece sticks out more than 4 x the diameter, it tends to deflect under the pressure of cutting. That means your threads will not be uniform depth, and your workpiece may not be uniform diameter. For very long thin stock you may need to use a follow rest.

If you try to cheat the 4x number, like I did recently, you will find your threads will be tighter on one end than the other. In my case, the only way I could fix it was to chase it with a die.

Good luck single point threading. It's pretty enjoyable once you get the hang of it. I struggled with it initially, but finally got it sorted. You will figure it out soon.
I use a dead center as often as I can. I will be sure to do that with threads too. thank you!
 
The tool post needs to be rotated such that the tool is square to the work.
I use a "fish-tail" gauge:
View attachment 368271

put one long flat side against the workpiece and then rotate the tool post such that the 60 degree point fits well in notch on the other side.
Lock the tool post and leave it there for the duration of threading.
The top slide controls the infeed.
After a scratch-cut to double check gearing, advance it a couple thou. per pass to start. The infeed should decrease per pass as each additional cut has more of the cutting tool against the work.

-brino
I thought I should be locking the carriage and using power feed. Man, I am confused. I was cutting threads in softer materials before this that looked normal.
 
instead of moving compound for depth move the top slide for finer depth control is all your saying. I still don’t understand why it wouldn’t be easier to leave the tool post where it is and just achieve the angle you need with the compound angle adjustment.
 
I have not read this whole thread but looking at that pic you seem squared up well enough with your tool but I would recommend pulling it into the tool holder some. It is sticking out further than needed which could introduce chatter.
Ok, I will do that. I was only running that way because when I was setup the wrong way the tool holder would get to close to things.
 
@FTlatheworks

Congratulations!
It looks like your persistence got you there. Well Done.

Just a couple things:

First, as @BladesIIB said reduce that tool hang-out for less vibration.


instead of moving compound for depth move the top slide for finer depth control is all your saying. I still don’t understand why it wouldn’t be easier to leave the tool post where it is and just achieve the angle you need with the compound angle adjustment.

First some terminology. Compound = top-slide. They are the same thing.

We are using the compound (top-slide) angle adjustment to set the angle we want to feed the tool into the cut.
In this case by feeding in with the compound the tool kind of slides in at an angle rather than straight in.
This allows it to only cut on the left-hand leading edge (when feeding towards the headstock, tool at front, top of the work rotating towards you).

I find on my light and kinda loose Southbend 9" lathe this works much better than feeding straight in using the cross-slide.
When I try infeed with the cross slide the cutting forces are higher due to both side faces of the tool contacting the work-piece.

I thought I should be locking the carriage and using power feed.

Yes absolutely we do lock the half-nuts to the lead-screw and use the lathe gearing to move the tool precisely for every rotation of the spindle.

This maybe confusion between terms again; longitudinal "carriage" feed vs. tool infeed.
The lathe will power feed the tool (indeed the entire carriage) left and right.
Our tool infeed really controls the depth of each cut. For threading we can start with larger infeeds , but as the cutting progresses the tool bit gets deeper into the work-piece and does more work, so we can relieve a little of the stress my feeding the tool bit in less.

I often start threading with 2-5 thou. infeed but it can be different for each lathe, tool bit and work-piece material.
I might try up to 10 thou. to start if I know the tools and material.
Threading often ends at 1 thou. infeed when you are getting close to final size.
Then one or two "spring passes" are done with no additional infeed. This helps to clean up the threads.

In normal outside diameter turning we usually infeed with the cross-slide....but here too you could use the compound set an an angle for infeed. Just beware that the numbers on the cross-slide dial will no longer indicate the true infeed. But it can be calculated using trig and the angle of the compound. This is sometimes used when you want very fine infeeds, like when trying to remove sub-thou. of material with a shear tool.

For threading either the compound (top-slide) or cross slide can be used for infeed.
I just find the cross-slide gives me better results on my lathe.

I'd recommend that as you get more comfortable with single-point threading you give both a try and see what works best for you.

-brino
 
Back
Top