How much is too much mini lathe spindle run out?

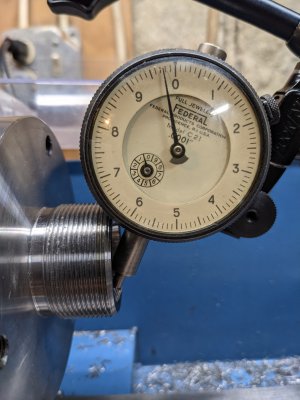
Ok, did it again. The dial indicator had a little stiction, and would drag a little at the start of rotation. I added a drop of oil to the surface and remeasured. The oil helps. So it's not 0.00001". It's just under 0.0001". Wish the Noga was slightly bigger (in this case) but I was able to take the measurement.
PXL_20210128_201107411.jpgPXL_20210128_201238543.jpgPXL_20210128_201510842.jpg
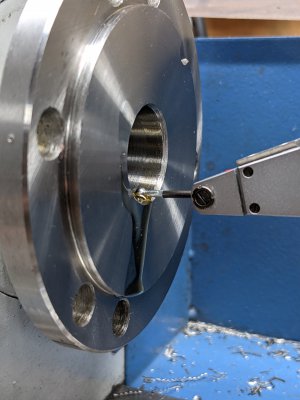
Even though it looks like it, the body of the indicator is not touching the chuck. As you can see, (third picture) the indicator is pushed in 0.010". (1|0 line) When it's at full extension, the small indicator is on the 0|9 line. When I rotate the chuck 360 degrees, the big needle only varies between two minor divisions, which is under 0.0001".

I have a DTI, but it only has 0.0005" marks. It sure would be easier to use, however. I might have cosine error with the dial indicator, as I'm not normal to the surface. If I extended the plunger on the dial indicator, maybe I could get closer to normal.

But this second measurement seems to tell me, stuff isn't too bad. Not sure about fixturing repeatability, but at least this measurement is ok. Comments? Did I do this right? What would you do different? (Besides not buying a mini lathe...)
 
Ok, did it again. The dial indicator had a little stiction, and would drag a little at the start of rotation. I added a drop of oil to the surface and remeasured. The oil helps. So it's not 0.00001". It's just under 0.0001". Wish the Noga was slightly bigger (in this case) but I was able to take the measurement.
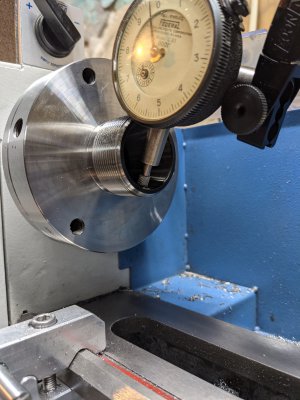
View attachment 353039View attachment 353040View attachment 353041
Even though it looks like it, the body of the indicator is not touching the chuck. As you can see, (third picture) the indicator is pushed in 0.010". (1|0 line) When it's at full extension, the small indicator is on the 0|9 line. When I rotate the chuck 360 degrees, the big needle only varies between two minor divisions, which is under 0.0001".

I have a DTI, but it only has 0.0005" marks. It sure would be easier to use, however. I might have cosine error with the dial indicator, as I'm not normal to the surface. If I extended the plunger on the dial indicator, maybe I could get closer to normal.

But this second measurement seems to tell me, stuff isn't too bad. Not sure about fixturing repeatability, but at least this measurement is ok. Comments? Did I do this right? What would you do different? (Besides not buying a mini lathe...)

I mean, dang, thats awesome.
 
The best method would be to use a 0.0001" Dial test indicator and test at 3 locations along the taper (lip, center, bottom). This would verify radial and angular runout and well as taper form if you indicated the traverse direction as well, but your method is plenty good for the home shop.

I'd be extremely happy with that, and probably would never remove that chuck until the end of days :p
 
I have a couple of comments that may or may not be of any use:
  • A dial indicator is the wrong tool to use for this kind of measurement. Even a 0.0005" DTI would be better. You not only have cosine errors but are adding in hysteresis in the indicator when used in this fashion.
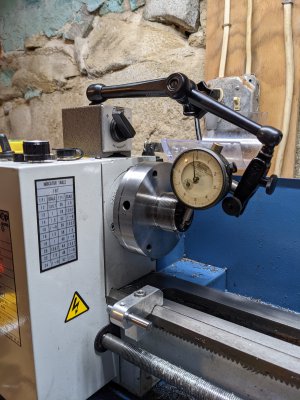
  • An articulating arm indicator holder can flex excessively, especially when extended out as you're doing. It makes accurate readings very difficult. I've been measuring concentricity on lathes for a very long time and know that measuring from the cross slide with a solid indicator holder is more than solid enough to overcome the spring tension of a DTI. If you must use that holder then use the right kind of indicator and choke up on the extension to the bare minimum.
  • Can you tell us what your spindle run out is? I mean when measured properly with the right set up? This has nothing to do with the chuck evaluation; mostly, I'm just curious.
This is just an opinion but while using good collets and nuts are critical on the mill, the same is not necessarily true on the lathe unless you are doing ultra-precision work to very, very tight tolerances. Because of the wide range of work piece diameters, collets get compressed with regularity and that will affect their long term accuracy so using ultra-precision collets in a lathe collet chuck may not be the wisest choice. My personal approach is to use a good nut and import collets on my lathe and this has been accurate enough for the work I do.
 
Yes, I'm reluctant to take it apart!

Too bad the rest of the lathe is a bit wiggly. Going to have to figure out how to clean up the dovetails and gibs. It's a bit over my head, at the moment. I've adjusted the gibs everywhere, but that isn't seemingly enough. Somethings not flat, or there's some bolt head with an issue, or who knows what.

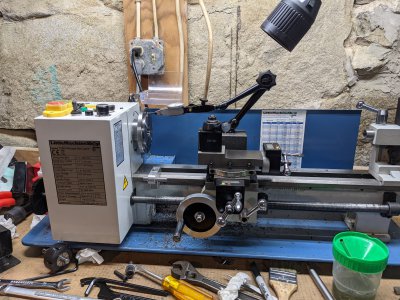
@mikey, this is why I posted the pictures. Words only get you so far. Previously I had mounted the dial indicator on the QCTP and saw terrible runout at a chucked rod. @macardoso suggested attaching the indicator to the headstock to eliminate QCTP/compound/cross-slide issues. The arrangement I used for the dial indicator measurement posted above is awkward at best. It's extended way out, and it was difficult to get it to stay in position. Also the angle of the dial indicator. That's why I mentioned cosine error. I will try your suggestion of a DTI on the cross slide.

As for spindle runout, (either radial or axial) I've never measured it directly. But I suppose I can measure it now, after I measure the collet chuck. The reason I even thought about it because it can limit one's TIR. Bad spindles make it hard to have low runout. Originally, I was just checking if the collet chuck was good, or if I had to return it. That's why I started this whole thread - apparently because I don't know how to measure this stuff very well yet.

My ER32 collets are a cheap set. I remembered your writing about that. I'm not hoping for ultra precision here, just good enough so that >98% of the time, if it fits in the collet, I don't even have to think about it.

I think I have 6 or 7 Noga indicator holders and several from Mitutoyo. Of all of them, the two-arm Noga PH2040 is the most quick to use and rigid and I really like them, so much so that I recently ordered a second one as a back up. If you're interested, here it is on Amazon. I much prefer this holder to check run out on machine spindles and chucks because it will not move. Lock the magnet on the cross slide, choke up on the extension and you will have as rigid a set up as I've seen. And this matters because we're measuring run out in the tenths so even a tiny bit of flexion in your set up makes a difference in the readings.

I discussed checking the spindle run out in another thread in the past. Maybe review it to refresh you thoughts on the subject because I agree with you that you really need to know your spindle's baseline readings. I also agree that checking your chuck's run out is an important bit of information. I did the same thing and it helped me decide to keep it.

Use your cheap collets on the lathe and save your money for good collets for the mill. I found that a good nut can reduce run out significantly, even with import collets. However, don't take my word for it. Check your spindle, then check your chuck, and then use a precision pin and check the run out of your import collets with a good nut and see for yourself. It is educational.
 
Well, for now, I have what I have. Not that things can't change, but what I have, is what I will measure with. Put the Noga on the cross-slide and locked the carriage. Installed my DTI. On the chuck I got about 0.0013" didn't seem to matter where I measured, out near the edge, or more inside the taper. Silly me doesn't like that answer as much. Since my measurements have gone from 0.004 on the QCTP, to 0.00001 and 0.0001 using the dial indicator, and 0.0013 with the DTI, I'll just leave the measurements as they are. Before removing the chuck I marked the relative position.

Next I measured the spindle itself. For the inside bore of the spindle I got, just estimating here, about 0.0001" runout with the DTI. Then I measured the register which came out at maybe a few tenths larger. The register was a lot less smooth than the inner bore, so there were some pops, but the runout in the radial dimension is well under 0.0005", probably closer to 0.0002". I could not make the DTI move more than 0.00005 by really pushing or pulling the gear end of the spindle. You could tell it slightly moved, but I couldn't measure it at all.
PXL_20210128_222206508.jpgPXL_20210128_223008013.jpg
Unfortunately the register surface is interrupted, (you can see it at 2 o'clock on the first picture,) but there really wasn't all that much runout, save for some rough surface edges. I hope I am using the DTI correctly. If not, would someone let me know. For the collet chuck I attempted to make the DTI arm nearly parallel with the taper and only preloaded the DTI by about 0.010", same with the spindle measurements. I oiled the surfaces to make it smoother sliding. Trying to reduce friction on the little ball. Hope that's ok.

I will read the linked thread, just haven't yet as of this posting.

Edit: changed locked the cross-slide to locked the carriage
 
Last edited:
I did clean things, but apparently I missed the do not oil admonition. Not positive that the measurements were as repeatable as @mikey would like, but then again, it's all I have right now. I have the Noga DG61003 and an ancient Enco 0.0005" DTI. The Noga is tons better than the POS HF one.
 
Your DTI positioning is fine, as is the indicator holder. As anal as it might seem, these things make a difference.

0.0001" TIR on a spindle is damned good. Actual run out is 0.00005", and on a lathe that is essentially zero. Typically, the spindle register should be very close to the same run out and since there is not much you can do about it anyway, I would accept it for whatever it is.

To most accurately measure the taper of your collet chuck you need to clean everything again, then apply a very light coat of oil in the spindle taper and install the chuck. Take your readings at the inside taper of the chuck near the opening, midway and near the end of the taper. Record all of it, then take the chuck off the spindle, rotate it to the next possible mounting position and repeat your readings, then do it again at the last possible mounting position. This will tell you which mounting position is the most accurate and how much run out you can expect. Place a witness mark on the chuck that is aligned with the witness mark on the spindle and mount it that way every time you use it.
 
Last edited:
To close this out, I was able to find the least TIR position on the collet chuck, which turned out to be about 0.00075 - 0.0008. Then I measured the TIR of the same 3/8" rod in a 0.375 ER32 collet. The runout was just under 0.001". I'm calling that good. Especially since I don't really know that the rod is that tightly toleranced. (And if the collet was as advertised.) Put a witness mark on the chuck (and spindle).

This exercise makes me want a better DTI. It wasn't that easy guesstimating the values.
 
Back
Top