How extract a broken #49 drill bit in Aluminum

How would you hit a .073" drill from the other side dead on? Even with a DRO this would be a hard trick.
This is one reason I like to use quality drill bits. Small number drills especially. Small holes, I start them with stub drills
or aircraft drills with cutting flutes only on a short part of the length. A broken drill in aluminum is a tough one. I don't see
any way of getting it out without ruining the hole. Carbide is brittle and the hole too small to evacuate chips. Good luck and let us know
how it works out for you.
 
I'm not sure if this is 'the' calculation, but maybe indicative of significantly higher rpm's required by small diameter drills than what typical mills & drill presses are set up for. http://www.carbidedepot.com/formulas-drilling.htm

I suspect chuck/arbour runout can start to be a bugger too. If your jaws are gripping say +0.002" out & the arbor is another 0.001" out, that 0.003" translates into 1.2%D relative to a 0.250" drill, but 4.1%D on the little #49.

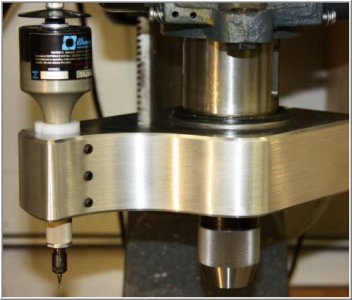
I found this pic of a cool high speed quill side attachment somewhere in my travels & there are similar ideas out there. I believe its sitting at Project #124 in my queue :)

SNAG-12-2-2017 0002.jpg

SNAG-12-2-2017 0003.jpg

12-22-2015 0000.jpg
 
Was this going to be a through hole? If so, you can try drilling from the back side. When you hit the broken drill, you may just pop it loose. if not, take a piece of piano wire slightly smaller than your drill size and gently try to tap it out. If the exit hole size isn't critical, you can use a larger drill which will improve your chances of properly hitting the broken drill.

I have done this trick except with a smaller diameter drill from the back side, used a pin punch to knock out the broken drill, then completed the hole from the front.
If it cannot be a through hole, the back hole could be plugged closed.
 
How would you hit a .073" drill from the other side dead on? Even with a DRO this would be a hard trick.
It is difficult to hit dead on. But we are talking about how to salvage an otherwise ruined part. I have done this on a number of occasions with success. I will drill a smaller diameter hole from the backside to allow me to clean up the final hole like Eddy said.

One way to center the hole would be to drill a hole in a piece of stock and insert a pin in the hole and into the partially drilled hole in the work. Clamp the work in place and you should be fairly close to centered.
 
Could you drill a larger hole, press in an aluminum rod then mill flush??? Don't know how pretty it needs to be or if this would even work. Just a thought.
That's a good idea. I don't know how strong the part needs to be, but a pressed in aluminum plug may just be the answer.
Once it's sanded, you won't even see any lines. You can even add epoxy to the pressed in "plug", and if it's a tapered plug, you can mill off the top flush. Aluminum is very forgiving in many ways.
 
Could you drill a larger hole, press in an aluminum rod then mill flush??? Don't know how pretty it needs to be or if this would even work. Just a thought.

I just want to comment that the above comment should help me with a similar problem, albeit smaller. I often work with an alloy known as "zamak", which is Zi, Al & Cu. (the castings are for model building).. I have to drill a hole on the order of 0.047 to install a brass square piece of 0.047 rod. This is a high mortality operation on a die casting that is no longer available. Since aluminium is so tenacious and is a large part of the alloy, I purchase the bits in quantity. And the parts cannot be soldered, of course, they must be press fit.....The castings are not thrown away (not in my shop!) and this offers a system of recovery without heat.

I appreciate it, greatly. The aluminium is close enough to zamak that with proper dressing will be unnoticable under paint. When I ever get around to painting, of course. Mostly I just use chemical blacking and go on.
 
Hello. I am the OP. Thank you everyone for all the ideas. I have now tried them all.

  1. Shake/tap to see if it would fall out. Didn't work.
  2. Drill in from the otherside. I have a DRO and had it all well jigged. No problem to be just about perfectly on target. Came in from the other side. Being careful. Hit the old bit. Bounced around there for a minute pecking at it. And snap. I now have two drill bits stuck. So, didn't work.
  3. With the arbor press and a pin, just push hard. Got it all lined up. And 1 ton of pressure. Nothing. Didn't work.
  4. Line up the pin carefully again and hit it with a hammer. Hit harder. Didn't work.
  5. Heat it up--20 minutes full blast with a heat gun. Do the above again. Didn't work.
  6. Buy 32 ounces of Alum (food grade even). Equal volume of powder and water. Seriously saturated solution. In wife's oven, double boiler style, for 3 continuous days. 200F. Adding water to solution and bath as needed (2ice a day). Didn't seem to me the solution was circulating very well down in the tiny hole. Still plugged up solid. Aluminum has a different surface finish now. (I was going to do a final skim pass anyway, so, np). But, still plugged. So, didn't work.
  7. Carbide drill bits came. ($6+ each). Seemed like it was slowly grinding away the stuck bit. Then, something clicked deep in the hole. I am guessing the carbide got stuck between the old bit and the eroding aluminum wall. And, as little bits do, particularly carbide, snap. The hole has been so worked by now the carbide bit did not stick. So, didn't work.
  8. As hole is no longer usable anyhow, first suggestion has risen to the top. Start over.
I think I am going to practice drilling small holes in aluminum before botching up another piece I have 8 hours in.

Thank you for all the ideas.

-Bill
 
Back
Top