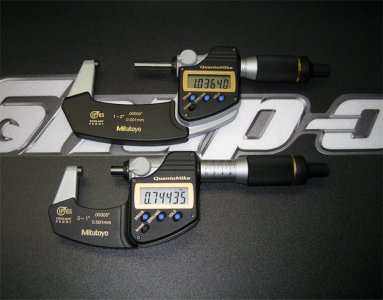
heres how to get 0.0001" precision on your ancient hobby lathe

Status
Not open for further replies.
If you never get there, I'm enjoying you giving it a go. Lotta good info gets drug out in a post like this
Okay I really want to make sure I understand you here...maybe this is the answer!

I set the compound angle very imprecisely, just turned it until it was around 84 and clamped it down.

Then, I figured out the actual relationship between handwheel and tool feed by measuring it. By turning the stock true, then feeding the compound by 100 thou, cutting and then measuring the result. Which came out to about 0.0001065" feed for every 0.001" of compound handwheel. And then I did the tests based on that.

So when I was trying to hit 0.0071", I rotated the handwheel by 0.0071 / 0.0001065 = 66.7 thou.

But I want to make sure that explains what you are saying..it does right?

Im actually pretty comfortable if I can maintain 3 tenths. It definitely is tantalizing to see if I can get down to 1 tenth but I have a feeling that may be impossible.

However, when I get my ER32 chuck, I'm going to repeat these tests and do everything as close as possible to the chuck and see if that helps. It will be several inches closer to the spindle bearings than the 4 jaw chuck setup I'm doing now. I have to think there is a tenth or so to be had by the reduced runout!
 
My point about a ground surface vs. a turned surface with peaks and valleys is this: You cannot use a surface with peaks and valleys for anything because the peaks will wear off readily. If the shaft is inserted into the hole in a bearing,the peaks will soon be mashed flat(we are talking about a VERY small amount of metal here). The tolerance of the shaft will change. The surface will become worn if used for any purpose other than to look at.

So,what have you really accomplished other than entertaining yourself making a piece of metal to supposedly close tolerance?

If you grind the surface,your shaft will be smoother,and the surface will not be burnished by use as much by far as a turned surface. If the surface is hardened and ground,then you have a truly durable,useful surface that has practical use.

I have said this a number of times in previous posts. I hope you get the point.

Now that you have discovered the old trick of setting the compound to an angle,and being able to work to closer tolerances,the next thing to do is get a better lathe and a toolpost grinder. Then,use your knowledge to make something wherein you can APPLY close tolerances usefully. Perhaps a small engine,for example.

When you get to be an experienced machinist(I assume you are not since this is in the beginner's section,forgive me if I am wrong),you will discover that working to .0001" in a practical application is not as easy as it might seem.
 
Last edited:
All my measurements for these tests are relative so checking it against an absolute standard wouldn't mean anything, only when I actually try to hit a specific diameter will the mic accuracy come into play. At that point, it will almost certainly be a spindle surface meant to fit inside a bearing race, so I will use the bearing race itself as the "standard" and shoot for a relative change for that. Never knowing the actual diameter of anything lol

Repeated measurements on a standard (or the same spot on a piece of hardened and ground shaft of unknown diameter, for that matter) could give you a handle on the repeatability of your instrument.
 
Repeated measurements on a standard (or the same spot on a piece of hardened and ground shaft of unknown diameter, for that matter) could give you a handle on the repeatability of your instrument.

Thats what I'm doing when I'm measuring the stock after I cut and zeroing the mic on it. I really doubt the stock is changing in diameter from the pressure of mic anvil, especially with torque limiting thimble.
 
You need to handle your mike with gloves if you really want to work to tenths.
 
Last edited:
So,what have you really accomplished other than entertaining yourself making a piece of metal to supposedly close tolerance?

Achieving tenths precision on a worn 1944 Atlas lathe for the purposes of spindle creation and bearing fitting is a task that needs to be broken up into smaller pieces rather than approached simultaneously. First I need to achieve tenths in the best case scenario I can create, which will, in a few days, be cutting as close to the spindle as possible in an ER collet. Once I have achieved +/- 2 or 3 tenths at that location in steel and at a few important diameters and with 100% reliability over say a dozen attempt, then I'll try further out from the spindle with tailstock support. And then probably achieving the concentricity required to have two surfaces at tenths precision so they can fit through two bearings in a spindle head.

Once I can reliably do all that, I can justify trying to improve the finish quality so its longer lasting, as required. If I can get the finish needed to do without grinding or hardening, thats what I'd prefer, because its simpler, but if it proves necessary I'll deal with it when the timing makes sense.

If you grind the surface,your shaft will be smoother,and the surface will not be burnished as much by far as a turned surface. If the surface is hardened and ground,then you have a truly durable,useful surface that has practical use.

Yes correct. But not related to the idea of achieving higher cutting precision.

I have said this a number of times in previous posts. I hope you get the point.

And I you.

Now that you have discovered the old trick of setting the compound to an angle,and being able to work to closer tolerances,the next thing to do is get a better lathe and a toolpost grinder. Then,use your knowledge to make something wherein you can APPLY close tolerances usefully. Perhaps a small engine,for example.

I have quite a bit of work left to say I can reliably control diameters in tenths over a reasonable range of carriage travel. This is just the beginning.

When you get to be an experienced machinist(I assume you are not since this is in the beginner's section,forgive me if I am wrong),you will discover that working to .0001" in a practical application is not as easy as it might seem.

When did I say I thought it would be easy?
 
You have missed the point of my questions. Just because your display reads to tenths, or hundredths, does not make the tool accurate to that. Resolution is no indication of accuracy.
You cannot check the accuracy of a tool on something that is only accurate to the same level you are shooting for. A master must be better than what you are checking it with.
Repeatability is another, as well as accuracy across the range. You alluded to some unexplainable errors in your measurements.

Cheers Phil

The micrometer is accurate to 0.0001".
 
You need to handle your mike with gloves if you really want to work to tenths.

As well as being in a proper climate controlled environment, without that making comparison measurements to the tenths is not really accurate.

There's a reason why Mitu puts covers like this on their mics.

Img_7190_zps4b091092.jpg


I'm not a machinist by trade, although I have mics that have 1 tenth resolution as well the DRO scale on my lathe's X axis, I don't try to hold a tolerance to a tenth, I just use the extra resolution for reference.

Img_7190_zps4b091092.jpg

Img_7190_zps4b091092.jpg
 
You have missed the point of my questions. Just because your display reads to tenths, or hundredths, does not make the tool accurate to that. Resolution is no indication of accuracy.
You cannot check the accuracy of a tool on something that is only accurate to the same level you are shooting for. A master must be better than what you are checking it with.
Repeatability is another, as well as accuracy across the range. You alluded to some unexplainable errors in your measurements.

Cheers Phil


For this application the mike only needs to have “precision”. The mike does not need to be “accurate”. And it’s 59 replies and counting!...Good Luck, Dave
 
Status
Not open for further replies.
Back
Top