-
Welcome back Guest! Did you know you can mentor other members here at H-M? If not, please check out our Relaunch of Hobby Machinist Mentoring Program!
You are using an out of date browser. It may not display this or other websites correctly.
You should upgrade or use an alternative browser.
You should upgrade or use an alternative browser.
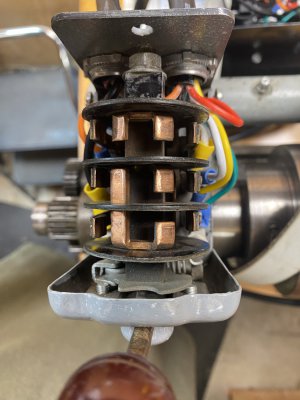
Furnas Switch Wiring on SB9
- Thread starter Danx931
- Start date
- Joined
- Apr 30, 2015
- Messages
- 12,572
Look at the sketch in post #5 again: with the handle up, terminal #1 is the upper leftmost one
Remove any extra jumpers on the switch
Remove any extra jumpers on the switch
Last edited:
- Joined
- Apr 30, 2015
- Messages
- 12,572
You took the jumper off and.... did you double-check the wiring? The switch is numbered with respect to the handle.
I think you may have mis-counted the terminals- I saw two white wires on terminal #3; ... they should be on #4.
Look at the sketch, you'll see. Draw it out on paper then turn the paper upside down if that helps.
Recheck each wire

I think you may have mis-counted the terminals- I saw two white wires on terminal #3; ... they should be on #4.
Look at the sketch, you'll see. Draw it out on paper then turn the paper upside down if that helps.
Recheck each wire

Last edited:
You are correct, it should be like your last drawing. I have wired the switch like the #5 post. However, My OFF-switch is positioned 180 degree out from your drawing. Look at the picture in post #21. I think I have it wired it ass-backwards. Im away from my shop and computer so I cant send pictures now. I’ll send them tomorrow afternoon and would like to confirm all with you before I rework it.
- Joined
- Apr 30, 2015
- Messages
- 12,572
I believe you did wire it backwards or partially backwards. Once you straighten that out it should work fine.
If the switch handle is pointing down, the terminal numbers transpose (swap) left to right, top to bottom
The six terminal pattern seems to throw people- Don't know why but I have seen it before
If the switch handle is pointing down, the terminal numbers transpose (swap) left to right, top to bottom
The six terminal pattern seems to throw people- Don't know why but I have seen it before
Last edited:
Thanks for all your support! I realized the problem a few days ago when I put your drawing upside down, and it hit me; then I got busy with work projects… Sorry, I should have realized the issue much sooner ☹.
Please review the attached drawing. I think I have the 110v and Motor wires going to the correct switch studs.
Please review the attached drawing. I think I have the 110v and Motor wires going to the correct switch studs.
Attachments
- Joined
- Apr 30, 2015
- Messages
- 12,572
There you go- that's how it should look
If the motor rotation is opposite from the switch handle then just swap T6 and T8
Transposition of 2D images is an ability that some people find easier than others- probably inherited
If the motor rotation is opposite from the switch handle then just swap T6 and T8
Transposition of 2D images is an ability that some people find easier than others- probably inherited
Last edited:
IT WORKS!!!
The only issue was it ran backward. F runs it backward. I switched the T8 and T6 wires... and all fixed
Protecting and placing all the wires on the Furnas cover and the motor box was challenging.
BUT it's Done! The final wiring diagram is attached for your reference.
I can't thank you enough for your help with this project! I really appreciate your helpful and very responsive replies.
They led me through the installation, and I learned from my mistakes
Dan
Attachments
- Joined
- Apr 30, 2015
- Messages
- 12,572
You're very welcome- my pleasure. We're all here to learn that's what it's all about
They don't give you much room in those switches I agree
Enjoy the site
They don't give you much room in those switches I agree
Enjoy the site
Last edited:

