Furnas Switch Wiring on SB9

Danx931

Registered
Registered
Joined
Nov 7, 2023
Messages
25
Hi All,
I have another wiring issue with my Furnas Switch problem/question and am looking for a solution.
It's off a 1947 SB9B. The front OFF tag says it's a Style RSB4, and it's made for South Bend Lathe Works.
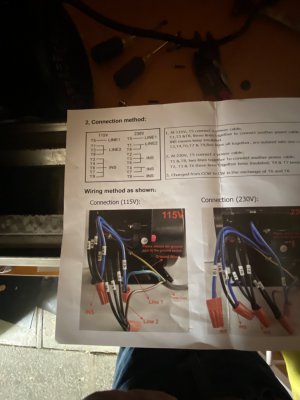
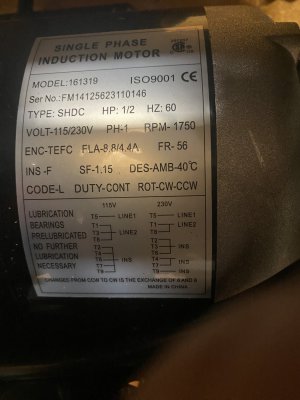
I just installed a new .5HP motor and am setting it up for 110 for now.

The new motor runs in Forward only in the configuration below (just like the very old 1/3 hp motor).

When I look through all the conversations about this subject, I find it hard to know what to try... The questions I have to start with are:
Do I have the L1 and L2 coming in on the right side of the switch? Should they come in on the Forward side?
And I'm wondering if there should be a jumper or a crossover wire involved.

Thanks for any ideas!

Dan
 

Attachments

  • Fwd only switch wiring.JPG
    Fwd only switch wiring.JPG
    374 KB · Views: 23
  • New Motor wiring diagram.JPG
    New Motor wiring diagram.JPG
    177.8 KB · Views: 24
Edit removed reply.


Cutting oil is my blood.
 
Edit removed reply.
I am unsure why your reply was removed, But I can see it on my mobile device.
As far as I can tell, the motor is reversible; see the attached motor tag.

There is a note on the wiring instructions that says to change the rotation to reverse T6 and T8.
Taking a wild guess -- Should I be running T6 to a Furnas switch stud?

Thanks, Dan

Cutting oil is my blood.
 

Attachments

  • New Motor Tag.JPG
    New Motor Tag.JPG
    235.5 KB · Views: 14
My phone was not showing the pictures. However when I went on my iPad they showed up. I had posted from my phone that pics of the motor would be helpful.
That is why I removed my post. As it was not correct for asking to post pictures.


Cutting oil is my blood.
 
No you need minimum 4 wires from the switch to the motor- I'll be back
Try this:
120RSB405.jpeg
 
Last edited:
Thanks for your reply!

I'm starting to wire it, but I have some questions.

I have a jumper plate between studies 2 and 4. Is this correct?
My power cord and the cord to the motor are both No 12 - 3 wire cords. Do I need a 4-wire cord to the motor?
And do I need to use the ground wire on the 120 vac and the motor side, or can I use the green wire to connect a motor wire to the switch?

This is really helpful!!!

Dan
 
First answer: T2 , 4, 7 and 9 can be a metal jumper or jumper wires
Second answer: Actually I think you need a 5 wire cord but you could use separate conductors or a cord + some conductors
Whatever it takes to make the connection
Third answer: Green should only be used for ground, not power (I didn't show ground on the sketch)
The switch case and motor both should be grounded

The wires on drum switch terminals 1,2 and 3 can be 1 or 2 gauges thinner than the wires on 4, 5 and 6-
4,5 and 6 should be at least 14 gauge- terminals 1,2, and 3 can be 16 or 18 ga.
 
Last edited:
Thanks again Mark! I think I am getting there...

Because all the wires coming out of the motor are No 14's, I assume it's OK to use No 14 wire from the motor to the switch?
I plan to run one No 14/3 ( with T6 + T1&3 + ground) cable from the motor to the switch and add a single strand to T6.
Should they be shrink-wrapped together?

Hopefully, my last question is... When I convert this to 220v... Will I use the same connections, or is there another schematic?

Thanks for all your help!!!!

Dan
 
Let's take the last question first- the 220 hookup will be different, and I'm not sure the 220 volt diagram on the motor is correct
There may be an error there by the factory
Besides, that's only a 1/2 HP motor- no real advantage running it on 220. only 1 HP and above

For the current 110 volt connection: The wires on drum switch 4, 5 and 6 should be at least 14 gauge. The others can be thinner like 16 or 18
Shrink wrap or cable ties or tape- your choice. I won't report you
 
Last edited:
Thank YOU...

I have No. 12 or 14 wires to all switch studs.

What would you have me test to ensure the motor tag is correct? I plan on making this switch in the next couple of months.
INS on the tag means keep insulated. I think that means put a wire nut on it...

Dan
 
Back
Top