- Joined
- May 22, 2015
- Messages
- 89
I am a relatively new member here. I joined because I saw some members rebuilding their Logan 200 lathes. After joining, I was reading through some of the older threads and replied to a thread about Anodizing. At the time I thought it was only a month old thread - but I had forgotten that this is 2015 already! So it is really over a year old....
Since I responded to that thread, there have been several questions asked. So instead of completely hijacking that thread, I am starting a new one here.
Background:
A few months ago I found a post on another forum where a guy (Tom) made a bench on wheels that contained his anodizing setup. He used some rectangular 5 gallon tubs for his tanks. This got me thinking, because this looked like something I wanted to be able to do.
My setup is uses 2 gallon tanks. The tanks I'm using are small (9 quart) Igloo brand coolers.
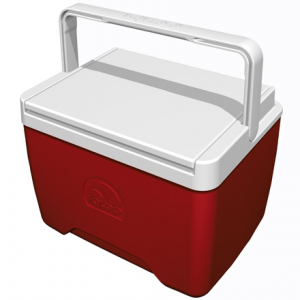
Years ago, a fellow named Ron Newman had a wonderful web site that spelled out how he did his anodizing. He started with 5 gallon coolers. Ron doesn't have his web site up anymore but there are remnants of it around.
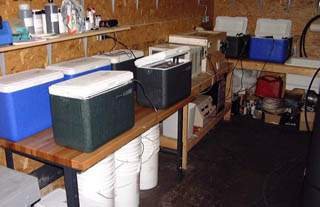
He used coolers because many of the tanks have hot solution in them and the insulated walls kept them warm.
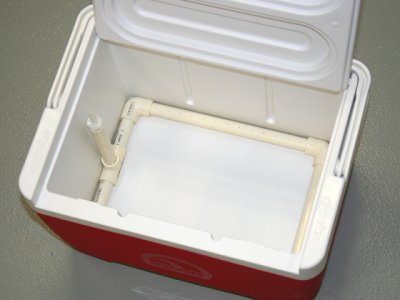
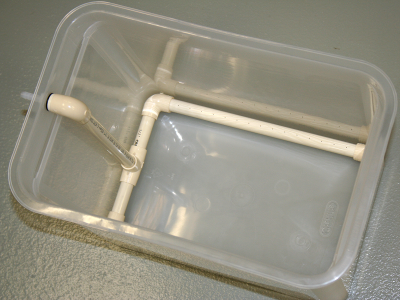
The solution in the tanks need to be agitated to keep it "stirred" up. Typically a manifold of CPVC pipe is used (with holes in it) to pump air bubbles into it. Here is a cooler with the manifold:
Since the acid tank for anodizing needs to be room temperature (65 - 70 deg), and it gets warmed during anodizing, I opted for a larger tank to raise its thermal mass so it didn't heat as fast. It's about 4 gallons.
The acid is battery acid (sulfuric acid) I got from the local auto parts store (O'Reilly's). I mixed it 50-50 with distilled water. ALWAYS ADD ACID to the water - NEVER the other way around! Some systems say to add one part acid to two parts water. I used one to one.
The power supply I used was a 65 watt 19 volt Laptop power supply/charger (I had lying around) and a Constant Current module I got from eBay. The parts I anodize are relatively small, so this works well.
To know how much current is needed, use the "Rule of 720". It states that it takes 720 amp-minutes / sq. ft. to build up .001" thickness of anodizing. In other words, 12 amps / sq.ft. for one hour will give you .001" thickness. You need to include all sides of the part when calculating area - the inside and outside of tubes, too. Since I usually model my parts in SolidWorks, I just ask it to tell me the area.
I found that, depending on surface area, the voltage needed was from 13 to 17 volts. So when using the Laptop charger of 19 volts, the Constant Current module needs to be a "Buck" converter, or step down.
Since the Laptop charger is only 65 watts, and I want a little more "headroom", I'm now "upgrading" to a PC power supply and using 12 volts. So this means I need to use a "Boost" converter to get constant current.
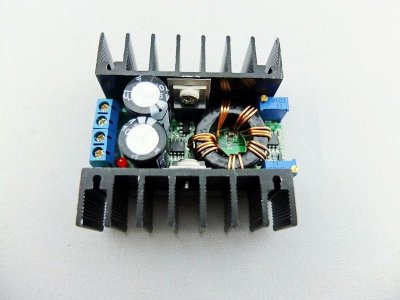
This is the "Boost" converter I'm using:
http://www.ebay.com/itm/300925643943?_trksid=p2060353.m1438.l2649&ssPageName=STRK:MEBIDX:IT
This is an overview of the anodizing process:
1. Submerse part in 140 degree cleaner for 5 min, rinse
2. Etch part in room temp caustic solution (lye) 10-30 seconds, rinse
3. Submerse part in 70-110 degree desmut solution for 1-3 min, rinse
4. Anodize part for 1 hour at room temp (70-75 degrees), rinse, rinse again
5. Dye part in 140 degree dye for 15 seconds to 15 min, rinse
6. Seal part in 180-200 degree Nickel Acetate Sealer for 20 min, rinse and hang part to dry
I've clear anodized over 25-30 parts with this setup - they were not dyed. I will be setting up my dye tanks soon.... I have dye for red, yellow, blue and black.
Here is a video of the process. It's from Tom, the guy that made the bench I mentioned above.
I'll keep you posted....
Since I responded to that thread, there have been several questions asked. So instead of completely hijacking that thread, I am starting a new one here.
Background:
A few months ago I found a post on another forum where a guy (Tom) made a bench on wheels that contained his anodizing setup. He used some rectangular 5 gallon tubs for his tanks. This got me thinking, because this looked like something I wanted to be able to do.
My setup is uses 2 gallon tanks. The tanks I'm using are small (9 quart) Igloo brand coolers.

Years ago, a fellow named Ron Newman had a wonderful web site that spelled out how he did his anodizing. He started with 5 gallon coolers. Ron doesn't have his web site up anymore but there are remnants of it around.

He used coolers because many of the tanks have hot solution in them and the insulated walls kept them warm.
The solution in the tanks need to be agitated to keep it "stirred" up. Typically a manifold of CPVC pipe is used (with holes in it) to pump air bubbles into it. Here is a cooler with the manifold:

Since the acid tank for anodizing needs to be room temperature (65 - 70 deg), and it gets warmed during anodizing, I opted for a larger tank to raise its thermal mass so it didn't heat as fast. It's about 4 gallons.

The acid is battery acid (sulfuric acid) I got from the local auto parts store (O'Reilly's). I mixed it 50-50 with distilled water. ALWAYS ADD ACID to the water - NEVER the other way around! Some systems say to add one part acid to two parts water. I used one to one.
The power supply I used was a 65 watt 19 volt Laptop power supply/charger (I had lying around) and a Constant Current module I got from eBay. The parts I anodize are relatively small, so this works well.
To know how much current is needed, use the "Rule of 720". It states that it takes 720 amp-minutes / sq. ft. to build up .001" thickness of anodizing. In other words, 12 amps / sq.ft. for one hour will give you .001" thickness. You need to include all sides of the part when calculating area - the inside and outside of tubes, too. Since I usually model my parts in SolidWorks, I just ask it to tell me the area.
I found that, depending on surface area, the voltage needed was from 13 to 17 volts. So when using the Laptop charger of 19 volts, the Constant Current module needs to be a "Buck" converter, or step down.
Since the Laptop charger is only 65 watts, and I want a little more "headroom", I'm now "upgrading" to a PC power supply and using 12 volts. So this means I need to use a "Boost" converter to get constant current.
This is the "Boost" converter I'm using:
http://www.ebay.com/itm/300925643943?_trksid=p2060353.m1438.l2649&ssPageName=STRK:MEBIDX:IT

This is an overview of the anodizing process:
1. Submerse part in 140 degree cleaner for 5 min, rinse
2. Etch part in room temp caustic solution (lye) 10-30 seconds, rinse
3. Submerse part in 70-110 degree desmut solution for 1-3 min, rinse
4. Anodize part for 1 hour at room temp (70-75 degrees), rinse, rinse again
5. Dye part in 140 degree dye for 15 seconds to 15 min, rinse
6. Seal part in 180-200 degree Nickel Acetate Sealer for 20 min, rinse and hang part to dry
I've clear anodized over 25-30 parts with this setup - they were not dyed. I will be setting up my dye tanks soon.... I have dye for red, yellow, blue and black.
Here is a video of the process. It's from Tom, the guy that made the bench I mentioned above.
I'll keep you posted....
Last edited:

