D1-4 Spindle & Chuck Measurement and Setup

Some obligatory statements of common sense and safety...

If you're taking your chucks apart, make sure you're tightening the bolts adequately when testing them on the lathe and work your speeds up slowly -even (especially) if you have new chucks.

Don't run your chucks with the jaws wide open. Make sure you have plenty of engagement with their acme screws or scrolls.

If you're not ready to make precision cuts on your backplates etc, wait until you've practiced enough to proceed. Maybe take some drops and do some trial runs and make a backplate first before chopping-up your originals.

EDIT: And if you're happy with your chuck the way it is, leave well-enough alone. You know what they say... if it ain't broke, don't fix it -or risk fixing it until it is.

-And don't mess with your spindle unless you're willing to suffer the consequences.


etc, etc, etc...

Sorry to be such a nit about this and I suspect you know where I'm coming from...

Ray
 
Last edited:
That's some great stuff Ray!

Now, if I could only get you down here to do all of my chucks!

I would really enjoy seeing you do your thing. :))
 
Thanks for the kind words, Gary...

You'd have more fun doing your own chucks rather than watching someone else do it. I admit that taking some of those measurements and making the cuts aren't easy. -And getting that disk flat and centered for the taper cut is critical. Very difficult geometries to work with because 2 things need to come together perfectly. Undercut is the way to go -hard to stick metal back on once it's been shaved off. Do this when your comfortable and ready for it. And I must admit, I screwed-up one of my plates doing this. How? Instead of cranking in the compound to make the taper cut, I cranked-in the carriage. -Happens! No biggie, I just made another one. Making them ground-up is easier than modifying one. Finding a piece of stock thick enough is the hard part :angry:.


That's some great stuff Ray!

Now, if I could only get you down here to do all of my chucks!

I would really enjoy seeing you do your thing. :))
 
Guys,

Sorry for not finishing the post yesterday about centering/balancing the 3 jaw. I was having an "off-day" and aside from that, needed the chuck to finish a job. I took pics of re-centering it and will post later today -probably early evening.

Later on, I think a thread on importance, detection and symptoms of out of balance chucks is in-order. I'll post my collective observations but don't have answers for some of my own questions... Anyhow, I don't want this thread about D1-x measurement to get "contaminated" with chuck centering and balancing.

Also, I will start-up a thread about how to inspect, calibrate and do calculations using the compound angle markings...

How's that sound?


Ray
 
OK Guys... The silence is deafening and I'm wondering if this is coming across and well received or if this procedure is being dismissed as lunacy...

Ray

I have been following along and have been taking measurements. Looks like my spindle is dead on and I am not going to touch that. The backing plates on the other hand are machined horrible. Easy fix when I get my stuff from QMT!
Oh well someday.
 
Ok guys, I'm going to make this quick and talk about an easy-case balancing and a few thoughts about body/shaft centering. Will start a thread later on specifically for balancing and centering issues.

Safety Issues: When working on your chucks, make sure the jaws are safe, snug-up the bolts well during tests, work speeds up slowly -And don't leave keys or allen wrenches in the chuck. Remember, if they're not in your hand, they're on the table -but not in the chuck.

Also, this involves modifying your stuff... Don't do it if you're not comfortable or willing to take the risks.

Part 7:

By this time, your backplate fits well and centers about dead-on. You've checked the static balance of the backplate and chuck body and the opposite heavy sides have been put back together. When testing chucks on the machine, I leave the balance rod locked in the jaws of the chuck. Note that jaw position impacts the balance. Obviously, the further they are open, the more it impacts balance. I have weighed-out jaws on balance scales and they're far from uniform. It causes noticeable differences in balance but only with an empty chuck. If you're cutting big diameter stock, chuck balance will be impacted anyhow in ways you cannot predict. I have had situations whereby rotating the workpiece a little made a vibration go away. This is not idel and woudn't fly for high-end production/CNC machines but, we can get-away with it on manual homeshop stuff.

With the opposite heavy sides put back together, with any luck, the chuck has a more neutral balance than it did before. If you haven't already, tighten the bolts and test it on the lathe working the speeds from slow to fast. If you have little to no vibration at all speeds, quit while you're ahead and take the afternoon off. In the absence of a dynamic balance machine there's not much more you should do. If the chuck is really out of whack, it can shake the machine pretty good. -That's what the emergency stop switches are for!

If you have vibrations which you know will show-up on the workpiece, a small amount of correction can be made in one of two ways. If there's a gentle settling toward the heavy side, you can either drill divots in the backplate on the heavy side or, if you have a chuck that has internal cavities, you can internally add weight to the light side. I've done both methods with good success. I won't be discussing in this thread how I added internal weight.

When finding how much the chuck is off, I've found it helpful to tape coins to the light side. This will give you a ballpark idea of how much drilling to do. You need to wrap tape all the way around because of the oily chucks...

One thing to note: A chuck that is perfectly statically balanced could shake like hell when spun at-speed. -Dynamic imbalance rears it's ugly head -and sometimes at one speed but not at others. The point is this: Don't keep drilling divots until the static balance is perfect. No, instead, drill a little divot that helps the static balance a little then, go back and test at all speeds on the machine. If you have a very heavy chuck -too bad! Do the tests anyhow. Proceed and make adjustments conservatively. If you get to the point that the chuck is statically balanced but still shakes, read the next paragraph.

It's entirely possible you have a no-good chuck no matter what you do. -It's never happened to me or anyone I know but, from a mathematical and physical point of view, it's entirely possible. Of course, someone with the abilty to do dynamic balancing could identify the problem area(s) [note the plural]. I have a technique to approximate this but, it's not tried & true.

That's about it for balancing (as far as this thread goes). Here's a picture of divots in one of my back plates. Note that I spread them out a little. A Word of Caution About Divots: -Not that you should not be putting your hand on the chuck when it's spinning at any time -But, if you happen to get your pinky in that divot hole, you're going to have one finger shorter than the other. Drill the divots shallow. BTW: the same injury could occur due to the bolt-hole recesses. -Get it? -Don't put your hand on the chuck. I did it once and ended-up with 7 stitches (fortunately, I know how to suture myself but my wife had to tie the knots).

Anyhow, this chuck now balances very well at most speeds when not loaded with a workpiece. BTW: One of the reasons, I'm switching my machines to 3 phase is so I can tweak-out vibrations with frequency control.
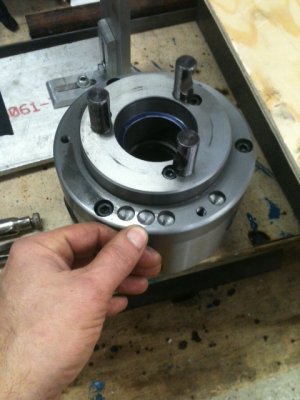
Balance Divots.JPG

Part 8 coming up -a quick thought about body vs shaft centering when mounting a chuck to a backplate.

Balance Divots.JPG
 
OK, here's the last of it...

Part 8:

The back now centers well and now the body needs centering. These are my own practices and I'm not claiming them to be the best or only way. And mind you, this is geared toward homeshop manual lathes and "average" chucks. The situation probably changes with high-end equipment and high-dollar chucks...

For a 3J chuck, I don't center the body perfectly with the backplate but rather, center the body based off a known shaft in it's jaws. Why? First, all jawed chucks have their issues. Swarf can throw them off and with 3J's the scroll and ring gear may not be perfect. Every one I've used may center well at some diameters but not others... With 4J chucks, I center the body reading with a DI on a smooth part of the body.

Standard Safety Issues Here: Watch the keys, allen wrenches, power switches etc...

Once the chuck is on the lathe, mount a good rod and if it's dead on, tighten the bolts and go buy a lottery ticket because it's your very lucky day. After that, loosen it's holding bolts just enough so a tap with a mallet can make an adjustment. Of course use a block of wood etc as a buffer. For 3J, hand spin the chuck and make body adjustments until it's centered while reading a TDI indicating off a test rod. Simple as that. If the shoulder on the backplate is cut very tight, you may have to tweak it to make body adjustments. Don't bang real hard on the body -the spindle bearings don't like that.

Again, for 4J, DI off the body, make adjustments with the mallet then tighten the bolts. After that, you can center a shaft and admire your work. Of course, it's possible that taking a reading 6" down from the shaft that everything is off again. Since we know everything else (spindle, backplate etc) is flat, the problem is due to jaws not holding square. -That's another issue to talk about later. One thing I will say, if you want a shaft perfect, most chucks won't get you there. You stand a chance with a good collet chuck and can only clinch it by turning between centers (if possible). Life isn't perfect...

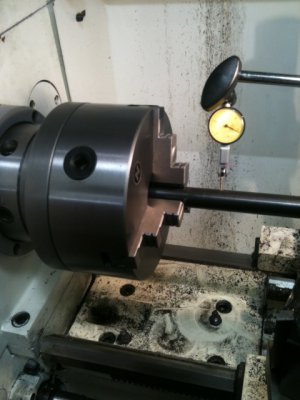
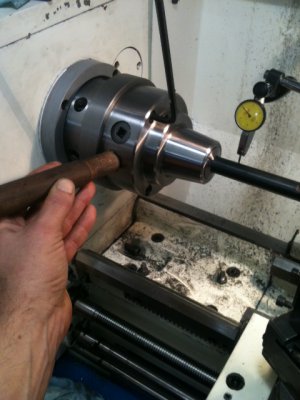
Here's some obligatory pictures. I'm showing a collet chuck because the 4J is on the mill at the moment. -and keep in mind that I broke the allen-wrench rule because nobody was around to take the picture -and I only have 2 arms. BTW: My collet chuck is so dead-on, I can center off the body or off the shaft and get pretty-much the same readings. Differences are due to the collets themselves. When I "body center" a collet chuck, I read off the taper the collet sits in -not the body. This $175 chuck was well made!

... That's pretty much it. This was intended to pass on some of my observations and techniques (for better or worse) and maybe to help set expectations for folks that are new to lathes. -And again, I am NOT a professional and all the above is worth what you paid me for it.

Ray

3J shaft centering.JPGBody Adjustment.JPG

3J shaft centering.JPG Body Adjustment.JPG
 
Outstanding info here Ray. I even understand most of what you are doing

Anyway, my lathe is a basic screw on Atlas spindle & I know it has dimensional issues, chuck related.

Now I think I can better locate the problem areas & have confidence to fix it. Every little bit helps

Keep up the good work & basic verbiage for us rookies
 
Glad it's helpful. If you encounter issues as you address your own problem, don't be afraid to post questions.


Outstanding info here Ray. I even understand most of what you are doing

Anyway, my lathe is a basic screw on Atlas spindle & I know it has dimensional issues, chuck related.

Now I think I can better locate the problem areas & have confidence to fix it. Every little bit helps

Keep up the good work & basic verbiage for us rookies
 
I've greatly enjoyed reading this thread Ray, and as I'm receiving a new lathe at the end of the month, it helps me to check up on things before it gets used. I'll need some practice before being brave enough to do any adjustments, but hopefully it won't be too far off out of the box. :)

I'm learning an amazing amount on this site. This is better than any book, although I always collect all sorts of books on my hobbies. :)
 
Back
Top