-
Welcome back Guest! Did you know you can mentor other members here at H-M? If not, please check out our Relaunch of Hobby Machinist Mentoring Program!
You are using an out of date browser. It may not display this or other websites correctly.
You should upgrade or use an alternative browser.
You should upgrade or use an alternative browser.
D1-4 Spindle & Chuck Measurement and Setup
- Thread starter Ray C
- Start date
- Joined
- Nov 16, 2012
- Messages
- 5,596
Since something went wrong with the last post, I'll cut/paste and break it into two posts denoted: Part 4 1, 2. Hopefully that fixes the problem.
Part 4-1:
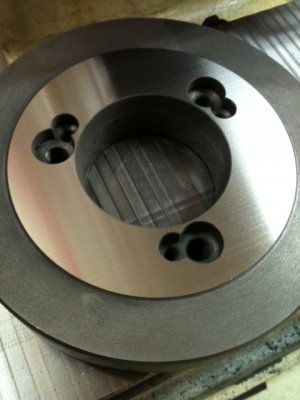
When I first checked the plate, it looked pretty crude overall -spun fast and dirty. Using a parallel, it was easy to see it was everything but flat. You could cut the back on the lathe but, I love using the surface grinder and happen to know that few things are prettier than surface ground cast iron. Turns-out, it was not flat by a good 7-8 thou as that's how much I recall taking off to to get even cuts across it. See the pics on how to check for flattness and the finished work (ain't that purdy?).


OK, now for the real work. It's tedious and you'll probably need to mount/unmount your chuck several times. The name of the game is to go light and not take off much. We're going to use the dimensions we calculated before as a starting point that we back off from.
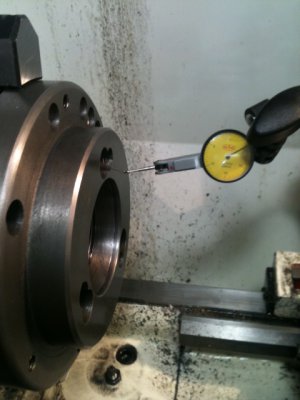
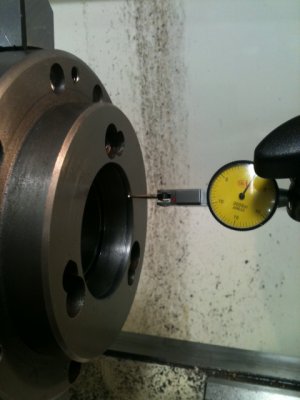
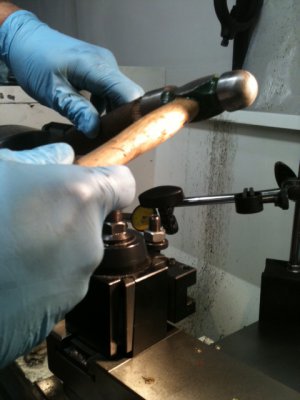
First, you need to mount the back (taper side out to make the cut) very, very precisely. It must be flat and centered. Of course, I used a 4J and had to thump it into position to achieve flattness. It's done in several steps. First, get it very close to center by reading off the inside of the taper, then read off the flattend surface to make it flat. Go back and forth until it's a perfect as you can get it. -Took me a good 5 minutes or more for each attempt and I had to re-do this 3 times to get it nailed. Note that since this is a staged stot, you'll see the TDI reading off the recess cut that was done earlier. The recess cut is actually coming up next.
Here's how I indicated. See Pics.
.... Continued ...


Part 4-1:
When I first checked the plate, it looked pretty crude overall -spun fast and dirty. Using a parallel, it was easy to see it was everything but flat. You could cut the back on the lathe but, I love using the surface grinder and happen to know that few things are prettier than surface ground cast iron. Turns-out, it was not flat by a good 7-8 thou as that's how much I recall taking off to to get even cuts across it. See the pics on how to check for flattness and the finished work (ain't that purdy?).


OK, now for the real work. It's tedious and you'll probably need to mount/unmount your chuck several times. The name of the game is to go light and not take off much. We're going to use the dimensions we calculated before as a starting point that we back off from.
First, you need to mount the back (taper side out to make the cut) very, very precisely. It must be flat and centered. Of course, I used a 4J and had to thump it into position to achieve flattness. It's done in several steps. First, get it very close to center by reading off the inside of the taper, then read off the flattend surface to make it flat. Go back and forth until it's a perfect as you can get it. -Took me a good 5 minutes or more for each attempt and I had to re-do this 3 times to get it nailed. Note that since this is a staged stot, you'll see the TDI reading off the recess cut that was done earlier. The recess cut is actually coming up next.
Here's how I indicated. See Pics.


.... Continued ...


- Joined
- Nov 16, 2012
- Messages
- 5,596
Part 4-2:
Now, remember that 0.100" shoulder recess we measured before, we'll cut that in now. Actually, I cut it a few thou less than 0.100 and the radial depth doesn't matter because, the nose taper doesn't contact that part of the back. The little edge that we're making will be the starting point of the back's taper and we'll turn that taper to about the diameter we read directly from the base of the nose spindle. Remember, don't use my numbers. Calculate your own off your equipment.
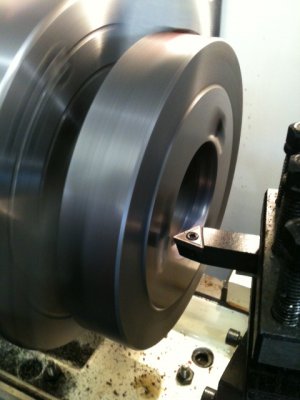
To make this cut, I moved the whole carriage to the left just a few thou shy of 0.100. Depth is controlled by pulling in the crossfeed. Go slow, take your time, measure carefully, work smart and keep your mind on your work. Here's the edge cut:
Now cut the taper. Go at it real light and keep making measurements at the very edge to just a few thou less than the diameter of the base of the spindle. In my case, that was 2.475 and I think I stopped cutting at 2.472 or so.
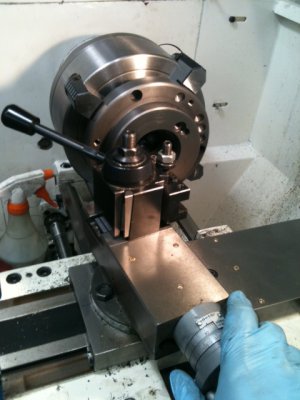
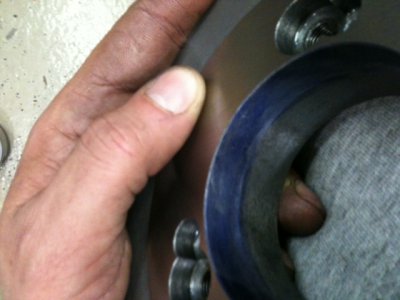
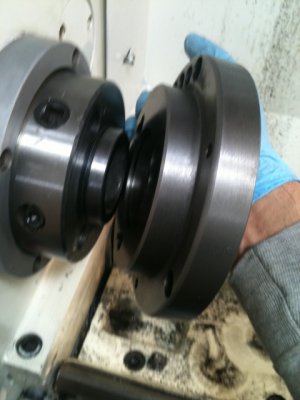
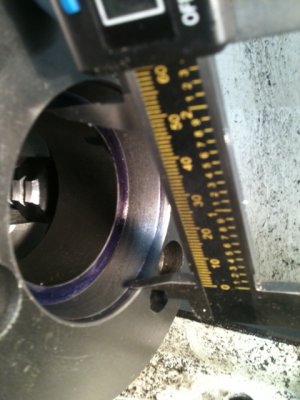
Here's the cut and a pic of where I read the diameter off of. It helps to slather a little layout fluid when you're ready for a test fit. The goal, it to adjust the diameter of the plate taper such that it's snug on the nose taper yet allows the flat backs to come into contact. Go cautiously and keep your head on your shoulders. You may have to break apart, do a test fit and re-center to take more off. See the pics:
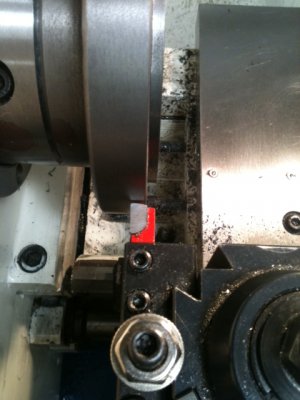
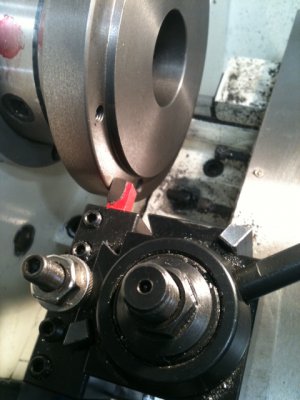
Once you get a perfect fit, install the lugs, mount your back, trim the shoulder flat to accept the the chuck, trim the side and break the edges. I like the side to be just a bit higher than the chuck body. Your call. (Edit: Don't strike witness marks now). Edit: It's a good idea to trim the side to the diameter you prefer now. Coming-up, we'll check the pieces for static balance so, excess material should be removed before balance checking or adjustments. See the pics:
OK, that's it for tonight... We still have much to do. You can mount the chuck now for grins but we still have more work to do like verify flattness, check for static balance and centering... I center different types of chucks differently... We'll get there. -And yes, I actually use those cheap HF carbides on CI because I hate ruining my $4.00 tips. They actually work OK.
Ray...


Now, remember that 0.100" shoulder recess we measured before, we'll cut that in now. Actually, I cut it a few thou less than 0.100 and the radial depth doesn't matter because, the nose taper doesn't contact that part of the back. The little edge that we're making will be the starting point of the back's taper and we'll turn that taper to about the diameter we read directly from the base of the nose spindle. Remember, don't use my numbers. Calculate your own off your equipment.
To make this cut, I moved the whole carriage to the left just a few thou shy of 0.100. Depth is controlled by pulling in the crossfeed. Go slow, take your time, measure carefully, work smart and keep your mind on your work. Here's the edge cut:

Now cut the taper. Go at it real light and keep making measurements at the very edge to just a few thou less than the diameter of the base of the spindle. In my case, that was 2.475 and I think I stopped cutting at 2.472 or so.
Here's the cut and a pic of where I read the diameter off of. It helps to slather a little layout fluid when you're ready for a test fit. The goal, it to adjust the diameter of the plate taper such that it's snug on the nose taper yet allows the flat backs to come into contact. Go cautiously and keep your head on your shoulders. You may have to break apart, do a test fit and re-center to take more off. See the pics:


Once you get a perfect fit, install the lugs, mount your back, trim the shoulder flat to accept the the chuck, trim the side and break the edges. I like the side to be just a bit higher than the chuck body. Your call. (Edit: Don't strike witness marks now). Edit: It's a good idea to trim the side to the diameter you prefer now. Coming-up, we'll check the pieces for static balance so, excess material should be removed before balance checking or adjustments. See the pics:


OK, that's it for tonight... We still have much to do. You can mount the chuck now for grins but we still have more work to do like verify flattness, check for static balance and centering... I center different types of chucks differently... We'll get there. -And yes, I actually use those cheap HF carbides on CI because I hate ruining my $4.00 tips. They actually work OK.
Ray...


- Joined
- Nov 16, 2012
- Messages
- 5,596
- Joined
- Nov 16, 2012
- Messages
- 5,596
OK Guys... The silence is deafening and I'm wondering if this is coming across and well received or if this procedure is being dismissed as lunacy...
In any event, I'll continue later this evening on how to verify the chuck and do basic static balancing checks and adjustments. The balancing part requires a reasonable balancing apparatus (easy enough to make) and carefully testing on the lathe at different RPMs.
Ray
In any event, I'll continue later this evening on how to verify the chuck and do basic static balancing checks and adjustments. The balancing part requires a reasonable balancing apparatus (easy enough to make) and carefully testing on the lathe at different RPMs.
Ray
4
4GSR
Forum Guest
Register Today
Thanks for showing a super job of "tuning up" the spindle nose and back plates for yor lathe. It's a shame that you have to chase problems and fix "junk" that is new, that should have been correct to begin with, from the factory of the far west.
- Joined
- Nov 16, 2012
- Messages
- 5,596
Wheew.... OK, at least you guys can see this. I was wondering because of all the weird problems posting the pictures if the posts weren't even reaching anyone...
As far as the quality issue... Wow, what to say... The whole world is in a fast-paced mode and people seem to accept quantity over quality. Everyone (US, China, etc) is in a hurry to finish the product with as few hours of labor as possible -and so the burden of fine detail is left onto the consumer. In this case, at least the problems can be corrected. Heck, some things we buy these days can't be fixed so if it doesn't work, you're out $$$. ... If all you have are lemons, make lemonaide. In this case, I'll choose to look at it as an opportunity to learn and do new things. These days, I've had to try to find the sunny side of things -because if I don't, I'll have too much to be sad about ).
).
Ray
PS: Writing up the last segment for tonight. Will post in an hour or so. -The dog is bored again and we both need a walk.
As far as the quality issue... Wow, what to say... The whole world is in a fast-paced mode and people seem to accept quantity over quality. Everyone (US, China, etc) is in a hurry to finish the product with as few hours of labor as possible -and so the burden of fine detail is left onto the consumer. In this case, at least the problems can be corrected. Heck, some things we buy these days can't be fixed so if it doesn't work, you're out $$$. ... If all you have are lemons, make lemonaide. In this case, I'll choose to look at it as an opportunity to learn and do new things. These days, I've had to try to find the sunny side of things -because if I don't, I'll have too much to be sad about
Ray
PS: Writing up the last segment for tonight. Will post in an hour or so. -The dog is bored again and we both need a walk.
Thanks for showing a super job of "tuning up" the spindle nose and back plates for yor lathe. It's a shame that you have to chase problems and fix "junk" that is new, that should have been correct to begin with, from the factory of the far west.
- Joined
- Nov 16, 2012
- Messages
- 5,596
Part 5:
Put your chuck together. No matter how you mount it, the rim of the back plate should center pretty well -provided you didn't cut the taper too big. If you did, you haven't damaged the structural integrity but, you'll need to use a DI to center the plate while tapping with a mallot while the D1 lugs are just firm but not tight. Also note that the D1 lugs should not be screwed-in too deep. Often times, the threaded holes are not straight and they stick out crooked. That can influence how the faces mate-up. All the ones I've seen have a line cut in them. That line should be 1 turn above flush with the backplate.
Once again, safety... disengage gears, apply safeties etc...
So far we've been working our way from the left to the right (spindle face, back/spindle interface, chuck shoulder...) etc... We continue...
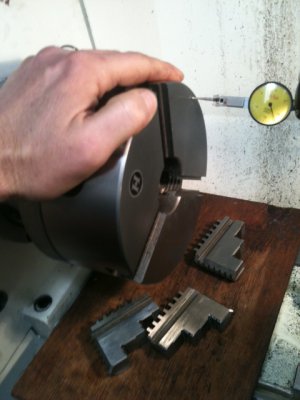
OK, wipe all swarf off all mating surfaces and reassemble the chuck and mount on lathe. Remove the jaws and put a TDI at the outter edge of the chuck face. Spin the chuck by hand and verify that each segment (in this case 3) is perfect. Over the years, of my 5 chucks, only one was dead on. All others were out a half thou or more -and that don't cut it for me. Now if your chuck face is all banged up, you need to set your expectations of how good a reading you can get... If you're happy with the readings, you can skip a little ahead. See the pic:
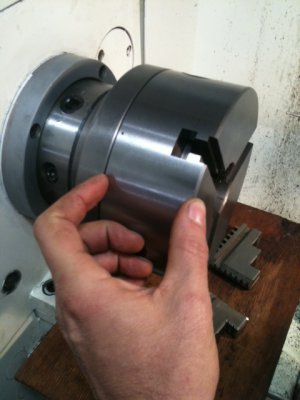
If you're not happy with the readings, most likely, the issue is with burrs, swarf somewhere, or either the backplate or, the width of the chuck body is cock-eyed around the diameter as shown:
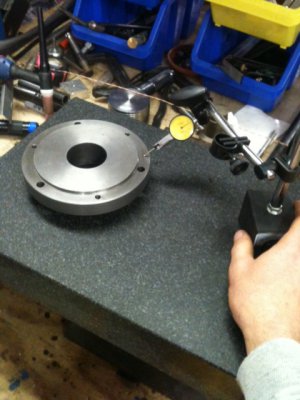
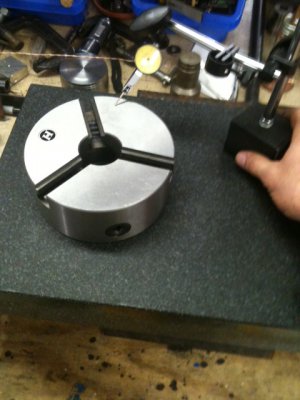
How to check who's the culprit... You really need a granite table for this. A piece of glass or something else that you think is flat -probably is not. I should be using a proper height gauge but I don't have one so I get by with a tenth's TDI and a standard mag fixture. Wipe all your surfaces very clean and first check for small burrs or swarf. Slide the "height gauge" around on both the body and back as shown and find-out who's the culprit. If the body is showing a problem, flip it over and check the rim side. Areas with drill holes are notorious for having a raised ridge. Take corrective actions. In one case, I had a body where the backside needed to go in the surface grinder. Most of the time, it's a burr or hole ridge. See pics:
You need to work on correcting the problem but before taking any drastic action, go back and check the basics like the spindle face, bearings etc... Proceed with caution and with your wits about you.
Once things are corrected we can go on to basic balance checking. Next part, coming up.


Put your chuck together. No matter how you mount it, the rim of the back plate should center pretty well -provided you didn't cut the taper too big. If you did, you haven't damaged the structural integrity but, you'll need to use a DI to center the plate while tapping with a mallot while the D1 lugs are just firm but not tight. Also note that the D1 lugs should not be screwed-in too deep. Often times, the threaded holes are not straight and they stick out crooked. That can influence how the faces mate-up. All the ones I've seen have a line cut in them. That line should be 1 turn above flush with the backplate.
Once again, safety... disengage gears, apply safeties etc...
So far we've been working our way from the left to the right (spindle face, back/spindle interface, chuck shoulder...) etc... We continue...
OK, wipe all swarf off all mating surfaces and reassemble the chuck and mount on lathe. Remove the jaws and put a TDI at the outter edge of the chuck face. Spin the chuck by hand and verify that each segment (in this case 3) is perfect. Over the years, of my 5 chucks, only one was dead on. All others were out a half thou or more -and that don't cut it for me. Now if your chuck face is all banged up, you need to set your expectations of how good a reading you can get... If you're happy with the readings, you can skip a little ahead. See the pic:

If you're not happy with the readings, most likely, the issue is with burrs, swarf somewhere, or either the backplate or, the width of the chuck body is cock-eyed around the diameter as shown:

How to check who's the culprit... You really need a granite table for this. A piece of glass or something else that you think is flat -probably is not. I should be using a proper height gauge but I don't have one so I get by with a tenth's TDI and a standard mag fixture. Wipe all your surfaces very clean and first check for small burrs or swarf. Slide the "height gauge" around on both the body and back as shown and find-out who's the culprit. If the body is showing a problem, flip it over and check the rim side. Areas with drill holes are notorious for having a raised ridge. Take corrective actions. In one case, I had a body where the backside needed to go in the surface grinder. Most of the time, it's a burr or hole ridge. See pics:


You need to work on correcting the problem but before taking any drastic action, go back and check the basics like the spindle face, bearings etc... Proceed with caution and with your wits about you.
Once things are corrected we can go on to basic balance checking. Next part, coming up.


- Joined
- Nov 16, 2012
- Messages
- 5,596
Part 6: Balance checking and improving the odds...
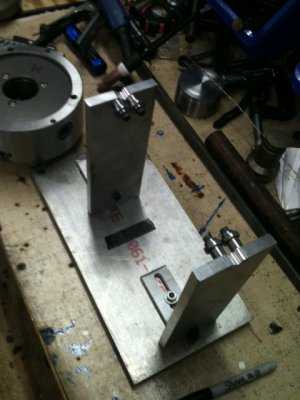
You need a simple balancing apparatus but it doesn't need to be ultra precision but, should be half-decent. Here's one I made and it gets used a lot. Nice feature is that the legs are adjustable for height when dealing with a shaft with different end-diameters. Also has a 3-point base for quick leveling. This one has nice roller bearings at the ends of those studs and it can detect as little as 1 gram on a 40lb chuck. I don't bother to balance to that level though because the jaws at different diameters always throw things off. That too could be corrected but it's never been enough of a problem for me to lose sleep over... Pic shown:
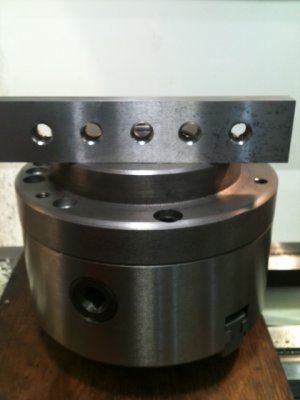
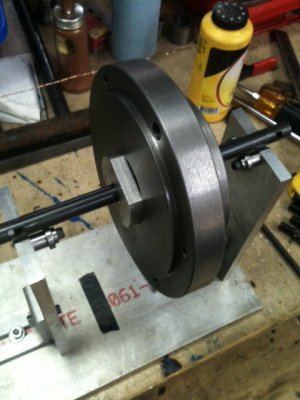
Now, get a half-decent shaft (doesn't need to be too special) like a good, unbent boring bar and make a plug with a centered hole that fits in your backplate. Check the backplate and mark the heavy end. Put the bar in the chuck by using the jaws (w/o backplate) and find/mark it's heavy side. After doing about a dozen of these things, I've never encountered either a chuck or backplate that balanced right off the bat. See pics:
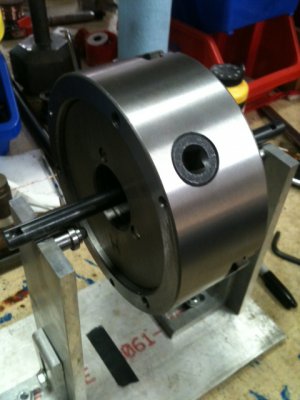
Clean all the surfaces again and put the the two pieces together with heavy sides opposite. This increases your odds of ending-up with a balanced unit. Of course, your holes may already be drilled and there's only so much you can do to get the heavy sides opposite. Try it a few different ways if needed and it's your call if you decide to re-drill holes in a different spot. See Pic:
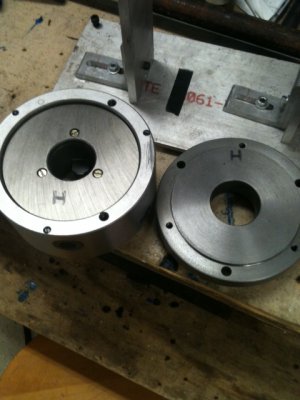
Once reassembled, remount the overall assembly on the bar using the jaws and check for overall balance. How'd it turn out?
We haven't finished centering things but, you can run it on the lathe and play around. Make sure your bolts are tight and jaws either removed or safely installed. Work your speeds up slow to fast even if your chuck is pretty balanced because dynamic balance could still be off. I have corrected those kinds of things based on my own theories. So far it's worked but I don't claim them to be bullet-proof. Also, the type of correction that's made depend if it's a universal, collett or independent chuck as well as how out-of-balance it is. -Not sure if that aspect is related to Metrology but, I will mention and show the kinds of corrections I have made with the understanding that this is a difficult area to deal with and your mileage may vary...
Going forward, all things related to balancing are your call if you decide to do it or not. I can't guarantee results and I'm only showing you what I personally did to my chucks, by buddie's chucks and the chucks at the prototype shop at work. I don't want to cause anyone grief or upset.
That's it for today.
Ray
PS:
... How are things going for everyone?


You need a simple balancing apparatus but it doesn't need to be ultra precision but, should be half-decent. Here's one I made and it gets used a lot. Nice feature is that the legs are adjustable for height when dealing with a shaft with different end-diameters. Also has a 3-point base for quick leveling. This one has nice roller bearings at the ends of those studs and it can detect as little as 1 gram on a 40lb chuck. I don't bother to balance to that level though because the jaws at different diameters always throw things off. That too could be corrected but it's never been enough of a problem for me to lose sleep over... Pic shown:

Now, get a half-decent shaft (doesn't need to be too special) like a good, unbent boring bar and make a plug with a centered hole that fits in your backplate. Check the backplate and mark the heavy end. Put the bar in the chuck by using the jaws (w/o backplate) and find/mark it's heavy side. After doing about a dozen of these things, I've never encountered either a chuck or backplate that balanced right off the bat. See pics:


Clean all the surfaces again and put the the two pieces together with heavy sides opposite. This increases your odds of ending-up with a balanced unit. Of course, your holes may already be drilled and there's only so much you can do to get the heavy sides opposite. Try it a few different ways if needed and it's your call if you decide to re-drill holes in a different spot. See Pic:

Once reassembled, remount the overall assembly on the bar using the jaws and check for overall balance. How'd it turn out?
We haven't finished centering things but, you can run it on the lathe and play around. Make sure your bolts are tight and jaws either removed or safely installed. Work your speeds up slow to fast even if your chuck is pretty balanced because dynamic balance could still be off. I have corrected those kinds of things based on my own theories. So far it's worked but I don't claim them to be bullet-proof. Also, the type of correction that's made depend if it's a universal, collett or independent chuck as well as how out-of-balance it is. -Not sure if that aspect is related to Metrology but, I will mention and show the kinds of corrections I have made with the understanding that this is a difficult area to deal with and your mileage may vary...
Going forward, all things related to balancing are your call if you decide to do it or not. I can't guarantee results and I'm only showing you what I personally did to my chucks, by buddie's chucks and the chucks at the prototype shop at work. I don't want to cause anyone grief or upset.
That's it for today.
Ray
PS:
... How are things going for everyone?


Last edited:

