- Joined
- May 3, 2017
- Messages
- 2,026
Hello, All.
I wonder if any experts out there could possibly give me some advice on how to improve on producing mitered joints in aluminum. Attached are some pix of a small tray that I made - mainly for practice on how to machine miter joints. Note: This project turned out far nicer than I anticipated for a 'practice' piece, but the finish is less than pristine. At this point, the plan is to either paint it or have it powder coated to cover up the machining marks.
Here's a picture of the finished product:
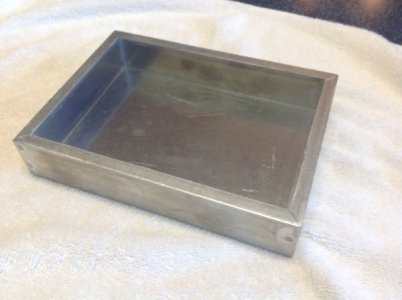
It's a rather simple tray, but my challenge and purpose was figuring out how to make sturdy mitered joints that will not easily come apart. (The next project will likely be a little more substantive.) Before beginning the project, I decided that each joint would be stable if I had pins going into it from each face of the 90 degree angles. Because of the relatively small size, I ended up putting two on one face of the angle and one on the other. Here are some photos (note that the pins are off-center to allow for the bottom plate):
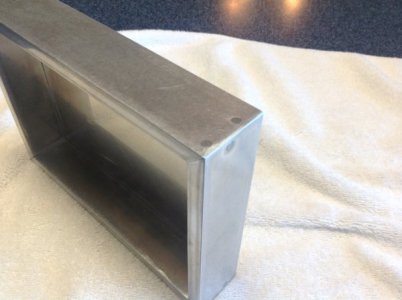
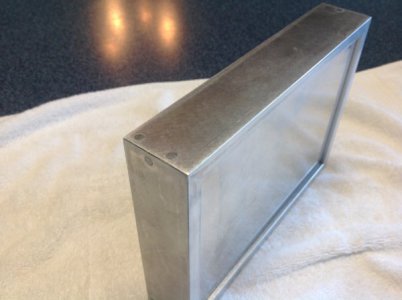
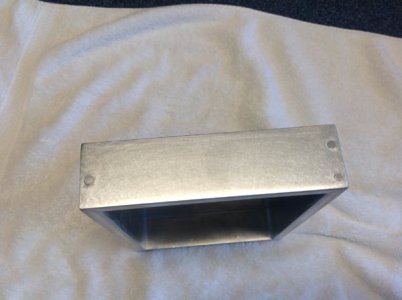
Calling these 'pins' is a bit of misnomer. It occurred to me that the most secure hold would be to drill, tap, and use screws - then cut off the heads. So they look like pressed pins, but they're actually screws.
Now on to my question:
I proceeded as follows (In retrospect, it occurs to me I should have taken pictures. Sorry):
1. I cut the sides to length and then mitered with a 45 degree end mill, making sure that the opposite pairs were exactly the same length.
2. I independently joined a long- and short- pair together as follows:
a. I bolted a 90 degree angle plate to a 2-4-6 block,
b. mounted that in the chuck on my mill,
c. securely mounted each piece to the angle plate,
d. then drilled, tapped and screwed the pieces together.
3. I did this for both pairs of long- and short- sides, resulting in two 'L;shaped' pieces.
4. I then rough-assembled the two pairs I made (along with the bottom), and used a 1-2-3 block and clamps to tightly secure one of the unconnected joints. I set this up in my mill chuck, and drilled/tapped/screwed.
5. Changing the 1-2-3 block to the diagonal corner, I repeated step 4, resulting in all four sides being secure and square.
6. All holes were drilled and tapped to 3/4", and I used 1" 10-32 machine screws. Throughout the process, I cut off the heads of the screws and ground them flat with a bench sander.
7. Did some final sanding to prepare it for painting.
Here's the question: The final 90 joints are VERY secure, but the method was extremely tedious. I found that regardless of how well I clamped them, when the drill bit AND the tap transitioned from the horizontal piece to the vertical piece along the 45 degree joint, it wanted to 'walk'. With much effort, I got the job done, but I wonder: Is there a better way to make these kinds of joints? I suspect I'll need to do several more, and if anyone has a tip on set-up or proper jigs to use, I'd love to hear it.
Regards,
Terry
I wonder if any experts out there could possibly give me some advice on how to improve on producing mitered joints in aluminum. Attached are some pix of a small tray that I made - mainly for practice on how to machine miter joints. Note: This project turned out far nicer than I anticipated for a 'practice' piece, but the finish is less than pristine. At this point, the plan is to either paint it or have it powder coated to cover up the machining marks.
Here's a picture of the finished product:

It's a rather simple tray, but my challenge and purpose was figuring out how to make sturdy mitered joints that will not easily come apart. (The next project will likely be a little more substantive.) Before beginning the project, I decided that each joint would be stable if I had pins going into it from each face of the 90 degree angles. Because of the relatively small size, I ended up putting two on one face of the angle and one on the other. Here are some photos (note that the pins are off-center to allow for the bottom plate):


Calling these 'pins' is a bit of misnomer. It occurred to me that the most secure hold would be to drill, tap, and use screws - then cut off the heads. So they look like pressed pins, but they're actually screws.
Now on to my question:
I proceeded as follows (In retrospect, it occurs to me I should have taken pictures. Sorry):
1. I cut the sides to length and then mitered with a 45 degree end mill, making sure that the opposite pairs were exactly the same length.
2. I independently joined a long- and short- pair together as follows:
a. I bolted a 90 degree angle plate to a 2-4-6 block,
b. mounted that in the chuck on my mill,
c. securely mounted each piece to the angle plate,
d. then drilled, tapped and screwed the pieces together.
3. I did this for both pairs of long- and short- sides, resulting in two 'L;shaped' pieces.
4. I then rough-assembled the two pairs I made (along with the bottom), and used a 1-2-3 block and clamps to tightly secure one of the unconnected joints. I set this up in my mill chuck, and drilled/tapped/screwed.
5. Changing the 1-2-3 block to the diagonal corner, I repeated step 4, resulting in all four sides being secure and square.
6. All holes were drilled and tapped to 3/4", and I used 1" 10-32 machine screws. Throughout the process, I cut off the heads of the screws and ground them flat with a bench sander.
7. Did some final sanding to prepare it for painting.
Here's the question: The final 90 joints are VERY secure, but the method was extremely tedious. I found that regardless of how well I clamped them, when the drill bit AND the tap transitioned from the horizontal piece to the vertical piece along the 45 degree joint, it wanted to 'walk'. With much effort, I got the job done, but I wonder: Is there a better way to make these kinds of joints? I suspect I'll need to do several more, and if anyone has a tip on set-up or proper jigs to use, I'd love to hear it.
Regards,
Terry

