2020 POTD Thread Archive

I ran out of tool holder nests and had to add a second story. I am trying to practice rapid setup, smooth flow, accurate assembly and thorough cleanup, and this project seemed to go well, took about three hours start to finish. So, here goes: Most woodworking equipment is on wheels, so I can remove the car and use one of the three bays to set up a production line as the project requires. For the tool holder, I used some excellent cherry ( I have a couple thousand board feet of mainly rough sawn 5/4 by 8‘ to 10’) so took a couple planks, I jointed two sides, 8” helical Powermatic, planed to thickness, Dewalt 12”, and sawed to width, Powermatic 2000. I beveled a 5’ stick on the table saw to fit the holder dovetails and chopped to length with a Skill 12” miter saw with a Freud crosscut blade. I made a sheet metal drill template on the mill for through drilling the screw holes in the horizontal support, bent up one edge as a guide, and slid that along the horizontal member and hand drilled two holes per holder position, using a bit that drills and counter sinks in one. Then I set up a fixture (fence and stop) on the drill press, (Powermatic 2800B) and predrilled two matching holes in each beveled piece. It didn’t take long to screw the dovetail pieces on the horizontal piece and with leftover pieces make two vertical brackets to position and support the top story. Cleanup was also quick because 1) the dust collector prevents too much of a mess and 2) everything has a place to live and a sequence to get it there. Then lunch and a beer.

i tell you frankly, this is uncharacteristic of how most previous projects in my life have gone. I feel I’m making progress. :)

CA1F4F80-0EF4-47CD-9529-250805ED0D34.jpeg
 
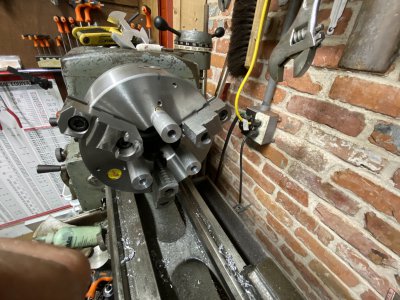
As mentioned in my earlier post on the chuck spacer plates, I finally finished my drilling of my 8” chuck with a series of 1/4-20 threads.
this is from one of Joe Pieczynski’s videos on YouTube. I thought I’d give it a try because it just looks foolproof once it’s done. Parallels work most of the time but I’ve had more than one project come out wrong because I thought the parallels were flush and the workpiece was sitting against the parallels but I’m guessing something was amiss because it came out bad.
Anyway here’s a few pictures of the finished project. I had to offset the outermost threads because it interfered with the Shars logo.

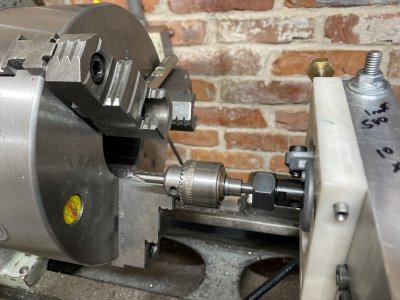
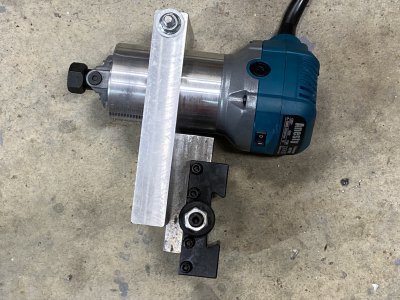
I used a drill bit in a Makita router thing I built which fits in a toolpost. I just used a level on the jaw to get it lined up. It would be great if I ever learn how to use all of the capabilities of my DRO on my mill. I still don’t know how to program it to get holes in a pattern. Anyway I got it done.

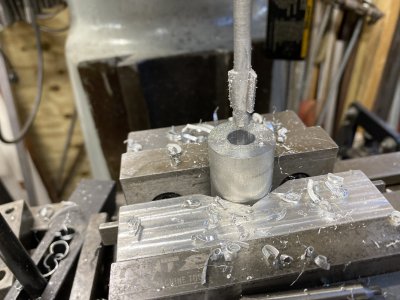
I made the spacers in the lathe and drilled 1/4” holes through all three. Then to the mill and countersunk drilled to accept the socket head

Joe Pie Video -Simple Chuck modification to increase parallelism
 

Attachments

  • F63DFE75-918A-4783-91BB-5D03B247FE1B.jpeg
    F63DFE75-918A-4783-91BB-5D03B247FE1B.jpeg
    626.5 KB · Views: 82
  • 88A7A681-894E-4C9F-9504-DDEA33EA332A.jpeg
    88A7A681-894E-4C9F-9504-DDEA33EA332A.jpeg
    663.7 KB · Views: 85
  • C642D4A3-AE29-4F05-95EA-2C6CCD9826C6.jpeg
    C642D4A3-AE29-4F05-95EA-2C6CCD9826C6.jpeg
    743.4 KB · Views: 79
  • 410A31BA-5BE9-4250-8631-9EA51BE28756.jpeg
    410A31BA-5BE9-4250-8631-9EA51BE28756.jpeg
    777.4 KB · Views: 79
Last edited:
After watching the video of the project , I guess Joe Pie must not have any soft jaws . :dunno: Sure that set up works , but soft jaws are a heck of alot easier or just make up a set of spiders .

Either way Tim , you got what you wanted accomplished and that's what matters . :encourage:

Looks like a 5900 series Clausing ?
 
Last edited:
I have soft jaws. Joe even mentioned soft jaws. The main point he conveys is deformation of thinner parts. His example is of a big thick piece which he’s machining in the demonstration but he talks about deflection. I’m pretty sure he even mentioned using soft jaws with these. The beauty of these is they are a consumable backing of the parts. So if you’re trying to machine a Delrin washer which is 1/8” thick but it’s 1-1/2” in diameter.....you could pull it off with these better than without these because when machining anything you’re better off with something backing up the parts.

and...you can even use your soft jaws with these and then you’re golden. Almost like a six jaw...but with backing double stick tape maybe even better. And like anything and everything we do....it’s just another tool in your toolbox. Once it’s drilled....it’s there if you need it. I think I’m going to do it on my smaller 6” Pratt Bernard next. But probably just one set of holes since I don’t have the outside jaws for that chuck. I really like this idea. It’s brilliant in my opinion.

soft jaws do the trick. But just takes longer to change out also.

plus...I’m just thinking and guessing I could even double tape these after truing them....double tape holding said Delrin washer.

and....I’m not sure about you, but I purchased some soft jaws and they weren’t exactly cheap. I save them for really important stuff. Whereas Aluminum round stock I buy in 8’ Lengths. Round stock is a consumable for me. Soft jaws....a little less so of a consumable.
It would be different if I was getting paid for my stuff...if I was a machine shop, but most of what I do is for me.
 
Last edited:
Slow going from apron into the shop. (4) HF 12x18 dollies.
With Honey at the controls of the skidsteer, lifted the plate and stand up off the trailer, and pulled out the trailer.
Set down on the apron. Didn't want to move the plate around with the skidsteer cause it is too 'jerky'.
Levering it from behind with a 70yo rough sawn 2x4 - about 1-2" at a time.
It kept wanting to drift to South, apron is slanted that direction.
Stopped after about 3', getting back to it today, if the heat doesn't get too tough.

0717202244a__R.jpg
 
Tim, if you want to turn large thin parts that have a hole in them, another approach is to make an arbor with an ID thread at the end and sandwich the thing you're trying to turn between 2 larger plates slightly less than the final diameter of the piece. You can even do multiples this way if you wish.

Got a honey do done. Wife bought a replacement hose for the above ground splash pool, but the tube ID was too large. Found some alu pipe of just the right diameter and thickness and made 2 sleeves. One has a 2deg partial ID taper to match the outlet on the pool. So far they're not leaking, fingers crossed!
IMG_9578.JPG
 
And this it why we have machinery in our shops!!! :beer:
Tim, if you want to turn large thin parts that have a hole in them, another approach is to make an arbor with an ID thread at the end and sandwich the thing you're trying to turn between 2 larger plates slightly less than the final diameter of the piece. You can even do multiples this way if you wish.

Got a honey do done. Wife bought a replacement hose for the above ground splash pool, but the tube ID was too large. Found some alu pipe of just the right diameter and thickness and made 2 sleeves. One has a 2deg partial ID taper to match the outlet on the pool. So far they're not leaking, fingers crossed!
View attachment 330776
 
Thanks Mat. I’ve got some arbors and have done that. And the spacers bolted to the chuck are just another thing to have for when the problem arises. I’m forever tooling up. I go to start something and spend a week building something to finish the project.
Just trying to have more options. I just got tired of parallels and spacers..... only to end up with marginal finished parts. Anyway, it’s done and now available for me if needed. And it’s a quick solution when needed.
 
I ran out of tool holder nests and had to add a second story. I am trying to practice rapid setup, smooth flow, accurate assembly and thorough cleanup, and this project seemed to go well, took about three hours start to finish. So, here goes: Most woodworking equipment is on wheels, so I can remove the car and use one of the three bays to set up a production line as the project requires. For the tool holder, I used some excellent cherry ( I have a couple thousand board feet of mainly rough sawn 5/4 by 8‘ to 10’) so took a couple planks, I jointed two sides, 8” helical Powermatic, planed to thickness, Dewalt 12”, and sawed to width, Powermatic 2000. I beveled a 5’ stick on the table saw to fit the holder dovetails and chopped to length with a Skill 12” miter saw with a Freud crosscut blade. I made a sheet metal drill template on the mill for through drilling the screw holes in the horizontal support, bent up one edge as a guide, and slid that along the horizontal member and hand drilled two holes per holder position, using a bit that drills and counter sinks in one. Then I set up a fixture (fence and stop) on the drill press, (Powermatic 2800B) and predrilled two matching holes in each beveled piece. It didn’t take long to screw the dovetail pieces on the horizontal piece and with leftover pieces make two vertical brackets to position and support the top story. Cleanup was also quick because 1) the dust collector prevents too much of a mess and 2) everything has a place to live and a sequence to get it there. Then lunch and a beer.

i tell you frankly, this is uncharacteristic of how most previous projects in my life have gone. I feel I’m making progress. :)

View attachment 330638
Excellent !! However, given the scope of beautiful tools you have, one would have thought you'd have taken the time to joint the tablesaw burn mark(s) off the edge of the Cherry. BTW, Cherry is one of my favorites, next to Black Walnut to work with.;)
 
Back
Top