2019 POTD Thread Archive

Needed a new welding table top. The 3/8" was warped and not cutting it. I have some 1" plate that I decided to make into a top, the pieces are 48x48". The first design was a 49 hole setup. The holes are 5/8" diameter so I can use most of the popular clamping systems if I want. I had to fill a couple holes in the tops as they were used for other things originally. I soaked them in vinegar for approximately 4 days to get rid of the hot roll and rust.
 

Attachments

  • 49 Hole Top -0.jpg
    49 Hole Top -0.jpg
    40.8 KB · Views: 44
  • 49 Hole Top -1.jpg
    49 Hole Top -1.jpg
    48.2 KB · Views: 42
  • 49 Hole Top -2.jpg
    49 Hole Top -2.jpg
    43.9 KB · Views: 43
  • 49 Hole Top -3.jpg
    49 Hole Top -3.jpg
    52.8 KB · Views: 47
Here is the 2nd design. It is a 112 hole design that I really prefer. I sold the first one to pay for the water jetting on both of them. I had them cut square with rounded corners.
 

Attachments

  • 112 Hole Top -1.jpg
    112 Hole Top -1.jpg
    43.8 KB · Views: 47
  • 112 Hole Top -2.jpg
    112 Hole Top -2.jpg
    42.6 KB · Views: 45
  • 112 Hole Top -3.jpg
    112 Hole Top -3.jpg
    41.1 KB · Views: 46
  • 112 Hole Top -4.jpg
    112 Hole Top -4.jpg
    49 KB · Views: 48
  • 112 Hole Top -5.jpg
    112 Hole Top -5.jpg
    36.8 KB · Views: 50
  • 112 Hole Top -6.jpg
    112 Hole Top -6.jpg
    36 KB · Views: 54
Customer called and wanted a flower windmill fixed. Wind had torn 2 leaves off it. He had tried to epoxy them on but it didn't hold. I was able to clean the epoxy and tig them back on. He was very happy. He wanted to repaint it so I didn't have to mess with that part.
 

Attachments

  • 20190804_063414.jpg
    20190804_063414.jpg
    54.5 KB · Views: 54
  • 20190804_063418.jpg
    20190804_063418.jpg
    44.3 KB · Views: 50
  • 20190804_063420.jpg
    20190804_063420.jpg
    40 KB · Views: 44
  • 20190804_063422.jpg
    20190804_063422.jpg
    48.8 KB · Views: 41
  • 20190804_071625.jpg
    20190804_071625.jpg
    57.3 KB · Views: 39
  • 20190804_071629.jpg
    20190804_071629.jpg
    56.1 KB · Views: 39
  • 20190804_071632.jpg
    20190804_071632.jpg
    55.5 KB · Views: 39
  • 20190804_072609.jpg
    20190804_072609.jpg
    54.3 KB · Views: 38
  • 20190804_072620.jpg
    20190804_072620.jpg
    53.5 KB · Views: 54
Found a pop up in the trash so I decided to see if it was worth fixing. Turns out the top and all the metal pieces were straight. It was missing 2 bolts and all the plastic joints for the top had broken. I had a piece of square aluminum stock that was the right size so I made new ones. I check the web and these plastic pieces are $12 each!
 

Attachments

  • 20190728_083830.jpg
    20190728_083830.jpg
    40.1 KB · Views: 54
  • 20190728_083837.jpg
    20190728_083837.jpg
    44.2 KB · Views: 53
  • 20190728_083843.jpg
    20190728_083843.jpg
    49 KB · Views: 53
  • 20190728_124328.jpg
    20190728_124328.jpg
    74.3 KB · Views: 56
  • 20190728_124636.jpg
    20190728_124636.jpg
    50.3 KB · Views: 55
  • 20190728_124656.jpg
    20190728_124656.jpg
    38.4 KB · Views: 57
  • 20190728_133103.jpg
    20190728_133103.jpg
    58 KB · Views: 63
  • 20190728_133124.jpg
    20190728_133124.jpg
    62.2 KB · Views: 63
Always good to see someone else recycling.
They won't be breaking anytime soon.
You should make more and see if there is a market for them.
Plastic $12, Alum $20 Could be a fair chunk of easy revenue.
 
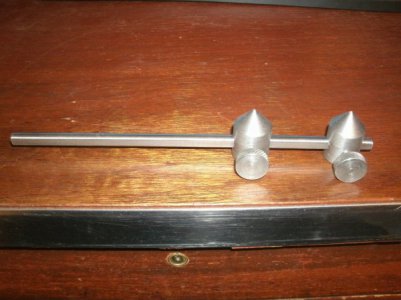
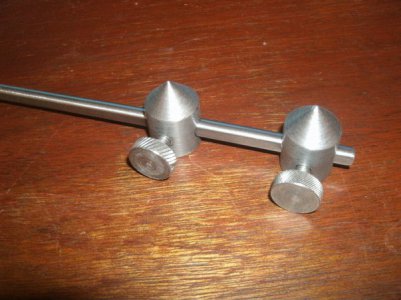
Last week "rwn" put up a fusion picture he made showing a set of trammel points. (I believe that is what they are called)
It looked like such a good idea I just had to make a set myself. I put a flat along one side of the rod so the points would remain in the same plane with each other. I also put the locking knobs on the side so you can tap the top of the point to make a mark on your work piece.
Why didn't I think of this years ago?

GEDC4061.JPG

GEDC4059.JPG

Thanks for looking
Ray
 
For the most part I made a big mess in the basement. I got rid of a work bench that was only really a horizontal surface to collect stuff. and replaced it with an 8 drawer rolling tool cabinet. of course the bench and the new location for the roller were at the diagonal opposite corner of the basement from the door, so all kinds of stuff had to get moved around to get everything where it needed to be. The basement was already a mess from the removing of the old chimney to get back that 4 square feet of floor space and tearing up a trench the length of the basement to replace a sewer line. So not it is officially a full blown disaster zone. Now I get to start finding places to put everything away in a manner that at least resembles organized.
 
Last week "rwn" put up a fusion picture he made showing a set of trammel points. (I believe that is what they are called)
It looked like such a good idea I just had to make a set myself. I put a flat along one side of the rod so the points would remain in the same plane with each other. I also put the locking knobs on the side so you can tap the top of the point to make a mark on your work piece.
Why didn't I think of this years ago?

I like it! Is that steel or aluminum? The knobs on the side are an excellent modification. How did you flat the shaft? Would a surface grinder be the most appropriate tool to use for this? My shaft is a precision ground SS rod.


Robert
 
Posted this video up today. Chris wanted to use this cabinets towel rack for decorative towels. So we needed a simple hand towel rack. I made this one up and posted the video this morning


Sent from my iPhone using Tapatalk
 
For the most part I made a big mess in the basement. I got rid of a work bench that was only really a horizontal surface to collect stuff. and replaced it with an 8 drawer rolling tool cabinet. of course the bench and the new location for the roller were at the diagonal opposite corner of the basement from the door, so all kinds of stuff had to get moved around to get everything where it needed to be.
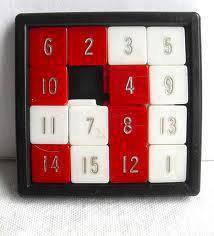
15 Puzzle.jpg
 
Back
Top