Welding or Brazing recommendations

So, I placed an order for a Primeweld 225X, and will do this myself. I figured I can pay someone else to do it (much) better, but where’s the fun in that! I’ll practice enough so that I’m comfortable and will then attempt it. As has been mentioned before, I also have a grinder and cans of paint…

I’ll post an update, but it’ll likely be a while!
A couple of my friends and coworkers have purchased a Primeweld 225X based upon my recommendation, and so far everyone is thrilled.

When I started to learn aluminum TIG I spent half an hour to an hour every night running beads and doing drills. It's good to have several coupons ready to go and alternate them so they don't get too hot...heat drastically changes how it reacts. I also kept a small bucket of water and would dip the coupons in after each bead, grab the next coupon, etc.

One drill I really, really like is this one:


Aluminum is very different from steel and needs to be approached differently to get good results. The short version is hit it with a lot of amperage up front to get a puddle started, back off as necessary and MOVE! If you try to creep up on it you put too much heat into the work and things start to melt ahead of where you're working. As with many things, what isn't obvious is that feeding wire is almost more important that torch manipulation and you can't really do a good job of welding aluminum if you can't feed wire smoothly/quickly...you can practice just that without welding and your results will get better.
 
Remember, a 200 amp welder is a 1/4" maximum capacity machine on aluminum- watch your duty cycle.
No argument, and I agree from a general rule standpoint, but a 200A machine can manage a bit thicker with good technique and/or adding preheat. It's certainly not a beginner thing, but can be done. A friend bought a Harbor Freight ProTIG 205 and asked me to help him weld some aluminum with it. I was able to weld 3/8" round to 3/8" plate but it was right at the limit without preheat. Preheat would have helped a lot, but another 50A would have been even better :)
 
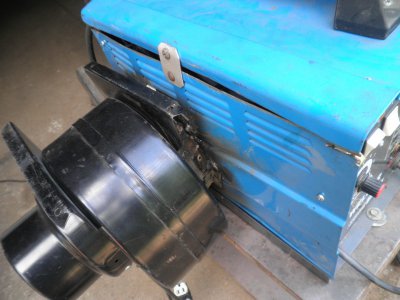
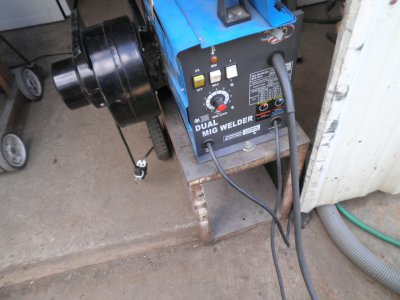
See, that's how you end up on youtube telling everyone what a great welder it is, but somehow the part of the video where the welder overheats and the owner sets up a box fan and opens up the welder's case wasn't considered unusual.


Fan mods!

04a018c9c78cec1fe617bf71d518831131a3987e.jpg9fb751d4de9429b45bf972e677d792fd71fe5268.jpg


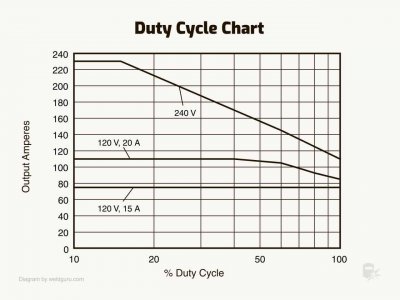
And don't forget your duty cycle chart! 15% at 230A... that's three quarters inch of capacity! As in, if you weld three quarters of an inch of aluminum can together, you will have to wait 45 minutes before continuing.
duty-cycle-chart.jpg

(This is a HF 250A tig. Miller would say this is an 80-amp machine based on this chart)
 
Hard to warn some folks. It's just not in their experience base to have a machine die on them in mid-weld. If you are welding bigger stuff, you need a decent machine. Otherwise you are waiting for the machine to recover every 5 or 10 minutes. In the end, that cheap welder costs less, because it does less.

You want duty factor, you will simply have to pay more. Simply can't BS duty factor, you either pay for it, or you won't have it.
Newbee's don't know how important it is. When asked, I explain to them that if you are going to do this don't waste your money on machines that are not capable be it stick or wire fed because you will out grow it very very fast.
 
And don't forget your duty cycle chart! 15% at 230A... that's three quarters inch of capacity! As in, if you weld three quarters of an inch of aluminum can together, you will have to wait 45 minutes before continuing.
View attachment 437550

(This is a HF 250A tig. Miller would say this is an 80-amp machine based on this chart)
Harbor Freight doesn't offer a 250A TIG now. I don't recall them selling one in recent years either, but I may be forgetting something. What model is that chart from?

I don't understand your description of duty cycle using inches, but it doesn't match anything I'm familiar with.

If the duty cycle is 15% at 230A output it means you can weld for 1.5 minutes out of every 10 minutes. Weld 1.5 minutes, wait 8.5 minutes, repeat.

Miller has changed how they quote duty cycle but it's not entirely consistent. With many of the new inverter machines they are now using a 60% duty cycle figure when for years they tended to use 40%. My Syncrowave 250DX is 310A max, but rated at 250A 40% duty cycle. A Dynasty 300 is 300A at 60%. Worst case, they would call the machine chart above a 145A machine since that's what it puts out at 60% duty cycle. I can't imagine that machine hitting the duty cycle with 120V input power....maybe the limit of the input power cord or adapter.

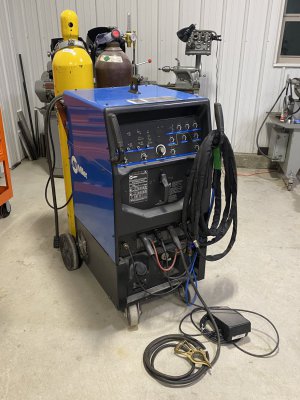
I'm not defending HF welders....I can't imagine buying one, and the one I tried didn't impress me. My primary TIG is a Syncrowave 250DX TIGRunner and my primary MIG is a Millermatic 350P that also has an XR-Aluma-Pro push/pull gun. I've had something like 50 blue welders...

250DX.jpg
 
I often balance “feed” against amps when working a puddle. I’ll often feed a little quicker if I find the puddle is getting a little too wide and more feed it will cool the puddle. If it gets a little too cool at my new feed rate, I’ll pedal down a bit more. Its a back and forth tyoe of technique, instead of just relying on pedal control to manipulate the puddle.

I don’t always use that technique, but it can be useful at times. I’m an amateur, so no idea if thats a process pro’s use or not. Works for me and gives me good results though.

I’m also not very profecient at the “finger shuffle” to feed filler, so I’ll often just lift on the pedal, let the rod freeze in the puddle, shift my grip and pedal down again. Its a “workaround”, but it works for me. Only thing I need to be careful of is when getting the puddle going again that I don’t “jerk” the filler rod and dab the tungsten. Thats a hard stop to re-profile the tungsten.

Ya do what ya gotta do…
 
Parts of this thread have degraded rather rapidly.

"My duty cycle is bigger than your duty cycle!"
 
Having a ankle problem, instead of a foot pedal how do the hand controls compare?
 
Having a ankle problem, instead of a foot pedal how do the hand controls compare?
The hand control on my torches are basically on/off switches. you could do aluminum with them, but it would be so much harder than using a pedal.
 
Back
Top