- Joined
- Dec 10, 2023
- Messages
- 67
Leapfrogging from an earlier thread where the Vevor drill bit sharpener came up, "Are Drill Bits Consumables?", I was intrigued and interested enough to get one. I was hoping for a nice complement to my Tormek drill bit sharpening system and interested in the split-pointing feature. I've had it for a couple days and have tried it out a bit. As could be expected, it is a mixed bag. In addition to and perhaps in its own right, I was interested in the possibility of the Vevor being able to produce an adequate relief grind that I could refine using the Tormek. Given that there are MANY general review videos out there, I'm not going to do that. Rather, get right to my areas of interest.
I am a little less than thrilled with the roughness of the grind pattern, but not at all surprised. It is definetely better than the Drill Doctors that I had tried years ago. Given that it is not going to be on the cutting lip, it really is just cosmetic/aesthetic, so...

My first attempt at split pointing seemed good, at first. As with the primary relief grind, it was fast and easy. But on closer examination, I could see that the split point wasn't complete, in that it did not reach the chisel point apex, the little shiny sliver to the left of the point.

There is a dedicated "port" or jig for doing the split point, that directs the drill point to the top and vertical side of the grinding wheel. Placement of the pins around the perimeter of the port regulate the extent of split point created. I found I liked the smallest setting best. BTW, the graduated dial in the upper left corner sets the depth of the split point, but there is no description of the purpose or use of this function in the user manual, only a pointer in the parts diagram. It matters.

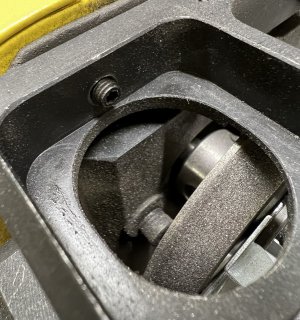
Looking things over, it is clear this port is a moveable insert held in place by set screws.

The insert has a flange that overhangs the left side of the receiving pocket, likely to prevent accumulation of grinding dust, of which there is A LOT. The problem I saw was that, while the set screws allowed repositioning of the insert, there was no good way to control or set the position as this flange covers the slot between the receiving pocket and the insert.

Clearly a relatively fine/sensitive what of locating the insert was going to be needed. I opted to install a set screw on the back wall of the pocket as an adjustable stand-off/spacer. It means removing the insert to make the adjustments, but the alternative seemed to take drilling holes in the insert to access the set screw and I didn't want little hole that would accumulated grinding dust.

My first attempt at setting the spit point lateral location was an improvement over how the original and probably would have worked. But I'd gone this far, I wanted to get it right.

Adjustments of the set screw were tiny, on the order of only a few degrees, as in 5-10 deg. Not more shiny sliver.

I am a little less than thrilled with the roughness of the grind pattern, but not at all surprised. It is definetely better than the Drill Doctors that I had tried years ago. Given that it is not going to be on the cutting lip, it really is just cosmetic/aesthetic, so...
My first attempt at split pointing seemed good, at first. As with the primary relief grind, it was fast and easy. But on closer examination, I could see that the split point wasn't complete, in that it did not reach the chisel point apex, the little shiny sliver to the left of the point.
There is a dedicated "port" or jig for doing the split point, that directs the drill point to the top and vertical side of the grinding wheel. Placement of the pins around the perimeter of the port regulate the extent of split point created. I found I liked the smallest setting best. BTW, the graduated dial in the upper left corner sets the depth of the split point, but there is no description of the purpose or use of this function in the user manual, only a pointer in the parts diagram. It matters.
Looking things over, it is clear this port is a moveable insert held in place by set screws.
The insert has a flange that overhangs the left side of the receiving pocket, likely to prevent accumulation of grinding dust, of which there is A LOT. The problem I saw was that, while the set screws allowed repositioning of the insert, there was no good way to control or set the position as this flange covers the slot between the receiving pocket and the insert.
Clearly a relatively fine/sensitive what of locating the insert was going to be needed. I opted to install a set screw on the back wall of the pocket as an adjustable stand-off/spacer. It means removing the insert to make the adjustments, but the alternative seemed to take drilling holes in the insert to access the set screw and I didn't want little hole that would accumulated grinding dust.
My first attempt at setting the spit point lateral location was an improvement over how the original and probably would have worked. But I'd gone this far, I wanted to get it right.
Adjustments of the set screw were tiny, on the order of only a few degrees, as in 5-10 deg. Not more shiny sliver.