Threading away from the chuck on my lathe...

Thanks for the explanation and thoughts on the carbide choices. The main reason I am trying to figure this out and test other methods is because I don't cut many threads in the first place although I would love to be really good at it, and because I am making an adapter for an important personal project. This requires a 2 1/4 - 8 tpi thread and that would be the largest thing I have ever threaded. I would think it would be easier but after 2 tries, the thread was looking pretty rough and not symmetrical. Of course it looked "ok" and it actually threaded into one of the 2 plates (back plate and face plate), but not the other. So I figured something was wrong with the threads on the ebay purchased faceplate although they looked great to me. I ordered a tap to clean up the threads and rechecked all my setting on the lathe to figure out why the threading looks so bad. I checked my compound angle which I have set at 60.5 which also checks out fine with a protractor and is actually 29.5 degrees. I counted the teeth on my thread dial as I read that Grizzly had been shipping the G4003 with the wrong gear (15t instead of the correct 16t) and that was fine. I checked for slop in the more than likely "like new" half nuts as they don't see a lot of action and that was fine. I was running at 70 RPM and the gearing and settings are all good too. So last night I went back out there to the shop and had a closer look at my threading tool and it looks like hell. So that is likely my main problem. The tool like mine is shown below. What is the best way to sharpen that style of tool? Just flat onto the face of the grinder and assume all other angles are built-in and correct? I will get and post a pic of my handy work on the adapter and post it here later.
View attachment 243555
I use that Aloris tool in all my threading (external); they are sharpened ONLY on top at an angle that is parallel to the centerline of the lathe; most come in a sharp vee style, and I usually stone a flat on the front face of the vee, and they hold up better; I keep one sharp for fine threads and others with varying width of flats to more or less match the national thread specs for truncation. The tool should be inclined in the holder to more or less match the spiral angle of the thread being cut, then ground flat on the top in line with the centerline of the lathe. Also, I always set the compound at 30 degrees, and have no problem with cleaning up the backside of the thread; this is as I was taught in school and in my apprenticeship also, and I am unaware of any journeymen in my apprenticeship shop that did otherwise.
 
The electronic stop in reality does not fail, it uses an electronic proximity sensor similar to what is used on CNC machines for homing and stops. If they fail the machine would brake to a stop, it is also backed up by a mechanical limit switch which engages within 0.05" after the P sensor triggers. The hard stop is at 0.07".

The depth of cut you are taking is quite large, relative to my experience. I take a scribe pass, and at most will take a 0.002" cut, then 0.001", then back down to 0.0005" as I get closer to target and then a spring pass in particular on a smaller less rigid lathe. Depends on the material, thread and diameter. With coolant and a bigger machine you can get away with deeper cuts. Some steels like 1018, at least for me seems to tear and chatter when cutting threads. Smaller thread cutters/inserts are easily damaged from too deep of cut, especially as you get deeper into the thread. If you need to do deeper threads on larger stock (over 1" diameter), you might consider a beefier threading tool, you will still run into problems with deep threads. The maximum depth for my threading inserts is ~0.07" and you are looking at twice this. Example below is the Carmex lay down inserts which I use for internal threads, and I am pushing them at 0.07" thread depth. I think most people would grind their own HSS thread cutter in this application.


View attachment 243567

I guess double redundancy on the safety is a great thing. Does your lathe have a clutch or can it coast after the motor is turned off?
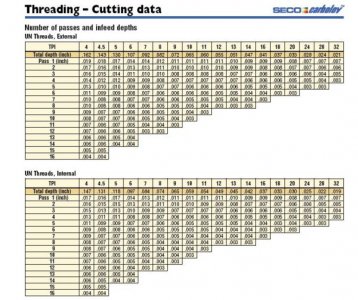
I think you are correct on me taking too large a cut. I found this chart on a forum (maybe this one, not sure)-see below, and I didn't follow it exactly but used it as a guide as I thought it may/may not apply to my situation. My hss cutter is capable of 6 tpi and above so I am thinking I am good there but I am glad you brought this up as I didn't buy any threading tool holders or inserts yet and will have to study the specs real close before I do.

threadcut.jpg
 
I use that Aloris tool in all my threading (external); they are sharpened ONLY on top at an angle that is parallel to the centerline of the lathe; most come in a sharp vee style, and I usually stone a flat on the front face of the vee, and they hold up better; I keep one sharp for fine threads and others with varying width of flats to more or less match the national thread specs for truncation. The tool should be inclined in the holder to more or less match the spiral angle of the thread being cut, then ground flat on the top in line with the centerline of the lathe. Also, I always set the compound at 30 degrees, and have no problem with cleaning up the backside of the thread; this is as I was taught in school and in my apprenticeship also, and I am unaware of any journeymen in my apprenticeship shop that did otherwise.

Thanks benmychree for the sharpening advice. I read on the Aloris site to "just grind the top" and they didn't mention a flat on the tip. I knew about the flat on the tip for other hss threading tools but I figure it is better to ask than to mess it up and then ask. I have many grinders and I assume the best wheel is still the white aluminum oxide for this?
 
All good points, in particular on the HSS cutter sharpening/profile. I agree with the depth of cut probably being too much, and the tables you mentioned are often based on larger cutters in more rigid lathes. I would think that HSS cutter would do well/better in this application, I use carbide thread cutting inserts because they work decently in most of my applications and if they break (which happened when cutting the M50 1.5 thread), I pop a new one in and maintain the same cutter position. They also make HSS inserts, that I may try but they are more expensive then carbide ones. There are also issues of rigidity/deflection with smaller stock and sometimes the stock may twist slightly if the cutter gets caught or chatters. I would think this would not be a issue with the larger stock/thread you are cutting, just need more smaller passes.

I guess double redundancy on the safety is a great thing. Does your lathe have a clutch or can it coast after the motor is turned off?
The lathe stop system uses electronic braking, with 1 second stopping time. In reality it stops the cutter at the same exact position on every pass, the proximity sensor is triggered by the carriage position, with the P sensor attached to the micrometer stop. So one can adjust it with a high degree of resolution. No worries. There are some variations as to threading with the cross slide vs. threading with the compound slide (there have been some recent posting on this). Internal/blind threads I only use the cross slide to maintain the same ending cutter position, I do not cut a relief, just a end grove with the my threading insert. The cutter will always finish in the grove. External threads, it varies. Usually just the cross slide, but there are some cases where using the compound slide produces better chip formation and finish. Since the P sensor is triggered by the carriage, changing the compound changes the cutter finish position and requires a wider landing relief. When threading with the cross slide, I just cut a relief groove and can thread to the shoulder (usually within 0.001"). The other significant advantage with this system is that the half-nut stays engaged through the whole process. Nice because my reflexes and eyesight suck as I get (am) older. I have also seen mechanical stop systems that disengage the half-nut, but this wouldn't help me when I do metric threads.

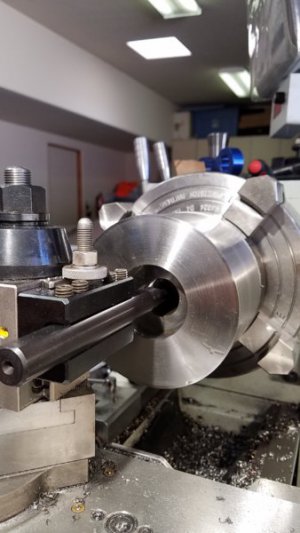
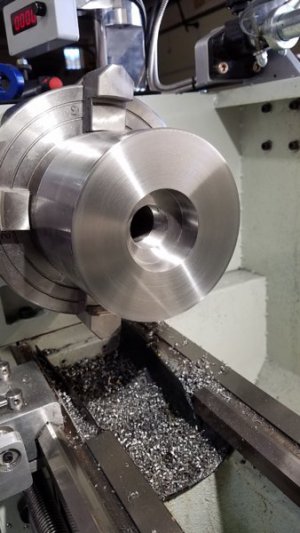
Cutting internal blind thread and finished thread (sorry did not clean the chips out)
20170924_105947.jpg20170924_111127.jpg

Threading with a proximity stop and electronic braking.
 
All good points, in particular on the HSS cutter sharpening/profile. I agree with the depth of cut probably being too much, and the tables you mentioned are often based on larger cutters in more rigid lathes. I would think that HSS cutter would do well/better in this application, I use carbide thread cutting inserts because they work decently in most of my applications and if they break (which happened when cutting the M50 1.5 thread), I pop a new one in and maintain the same cutter position. They also make HSS inserts, that I may try but they are more expensive then carbide ones. There are also issues of rigidity/deflection with smaller stock and sometimes the stock may twist slightly if the cutter gets caught or chatters. I would think this would not be a issue with the larger stock/thread you are cutting, just need more smaller passes.


The lathe stop system uses electronic braking, with 1 second stopping time. In reality it stops the cutter at the same exact position on every pass, the proximity sensor is triggered by the carriage position, with the P sensor attached to the micrometer stop. So one can adjust it with a high degree of resolution. No worries. There are some variations as to threading with the cross slide vs. threading with the compound slide (there have been some recent posting on this). Internal/blind threads I only use the cross slide to maintain the same ending cutter position, I do not cut a relief, just a end grove with the my threading insert. The cutter will always finish in the grove. External threads, it varies. Usually just the cross slide, but there are some cases where using the compound slide produces better chip formation and finish. Since the P sensor is triggered by the carriage, changing the compound changes the cutter finish position and requires a wider landing relief. When threading with the cross slide, I just cut a relief groove and can thread to the shoulder (usually within 0.001"). The other significant advantage with this system is that the half-nut stays engaged through the whole process. Nice because my reflexes and eyesight suck as I get (am) older. I have also seen mechanical stop systems that disengage the half-nut, but this wouldn't help me when I do metric threads.

Cutting internal blind thread and finished thread (sorry did not clean the chips out)
View attachment 243581View attachment 243582

Threading with a proximity stop and electronic braking.

Wow. Nice setup! What brand DRO is that? I had to go look up that lathe and realize it is actually affordable. Then add all the cool options and a little less affordable. :) I have one on my wish list for when I win the lottery though. So when you added all the proximity stop and VFD drive etc, how much more money did that add to the lathe? Just curious. I am just a hobby lathe user so I guess I will have to just tweak my Grizzly and learn more tricks for now. You have a nice lathe and a very clean one too. I have to agree 100% that my eyesight is sucking too and I hate it. I also need new lights out in the shop. I think I will post another thread for some ideas on that.

So that chart I posted should be disregarded and I will cut my next set of those threads I need to finish using your recommendations and see if that does the trick. First I need to sharpen my existing tool or I may just try to grind my first 60 degree tool. You make many great points and I have learned a lot from your feedback. Thank you.

Edit: So are you are using a phase converter for the VFD?
 
Last edited:
Next week I have to turn 6 parts, 3 1/2"-4 internal threads in a blind hole 4 1/2" deep using a manual lathe, this should be entertaining at best.
 
Here is another threading video using a proximity sensor. The VFD system and Prox are both MKSJ's creation. This is my Jet 1024.

Lately I've been threading with the cross slide after I set the compound to bore the same taper as the 223 Remington and I did not want to reset the compound back and forth.


Watch "Ken's Shilen # 2 Threading with Proximity Sensor" on YouTube


Repeatability

Watch "Testing Proximity Sensor Stopping Repeatability" on YouTube

Nice! You guys are making me jealous. :grin:
 
Back
Top