Threading 4140 troubles

These people (A. R. Warner Co.) are not the cheapest source, but have really good stuff, and have an interest in hobby/small shop needs. The website isn't very easy to navigate, so contacting them with your needs/questions would be the best route. I couldn't find it on the website, but they used to make HHS insert bits. They may have boring bits available, too.

https://www.arwarnerco.com/category-s/142.htm

If not, you can grind the tip of a bit and cut it off by notching (all four sides) the desired length with an abrasive cutoff wheel, like a Dremel, die grinder, air cutoff wheel, or hand grinder with a narrow cutoff wheel. Then put the piece you want in a vise with soft jaws, cover the bit with a rag in case of (rare) shattering, and hit the unused end with a hammer. It will break off pretty cleanly at the notch. Don't overheat the notch area, but if you do, keep it on the "non-use" end of the bit, where loss of temper won't matter.

Many people find it easier to use a carbide insert bit than grind up a HSS bit, including threading tools. I think that is the most common motivation of a non-production user. I remember Aloris introducing a threading tool insert holder, and my employer (a job shop/repair shop) chose to use HSS inserts in it, instead of carbide. They did a lot of work with 4140 and Stressproof (1144) and found that the HSS held up well enough, while leaving an excellent finish on the threads they commonly made. the HSS inserts lasted a long time, and were just discarded instead of re-sharpened because it wasn't worth the time spent.

There are lots of posts and videos about sharpening HSS tool bits, including how to hold them when sharpening. Many ways to hold small boring bits, and most are simple.
 
Last edited:
There's also an AXA-8 (or larger) thread cutter from Aloris that takes HSS blades for threading. That works rather well for many external threading tasks. I have one and I like it a lot. Pretty easy to use and has an adjustable helix angle, if you need it.
 
My guess is the stick out and larger depth of cut is causing the work to climb up on the tool and spring back, breaking the tip. I would expect live center support would solve the problem.

If you can't fit the live or dead center in there you can always (if you have the material) turn the part longer to mount the center and then turn off the excess afterwards
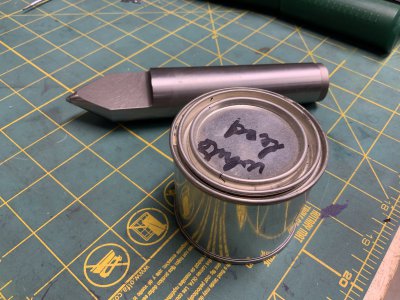
A half dead center with some white lead will give you the clearance you need.
(Thanks again John)
 

Attachments

  • 30BDC656-FE08-4B6A-BDB7-B57A112E9F7E.jpeg
    30BDC656-FE08-4B6A-BDB7-B57A112E9F7E.jpeg
    503.2 KB · Views: 5
This can work, but you need to make sure you take out the back lash, or you really won't know where you are. It's a lot easier to get good results the second way. Do you have a DRO on your lathe?

I can make decent threads in both my mini-lathe and my 10 x 22 lathe, both, using the second method. My lathes are probably far less rigid than yours. I take my time to set things up, and find things go smoothly. If I rush things - stuff happens - and it's rarely good.

Think you have made a bunch of simultaneous mistakes. Try doing all of them the "better, more standard" way, and your threads should improve a lot and you will break far fewer inserts.
Sounds good! You mean use the cross slide to back off and the compound to go forward as “standard” way?
 
A half dead center with some white lead will give you the clearance you need.
(Thanks again John)
That’s cool’s, I will look into getting a half dead center
These people (A. R. Warner Co.) are not the cheapest source, but have really good stuff, and have an interest in hobby/small shop needs. The website isn't very easy to navigate, so contacting them with your needs/questions would be the best route. I couldn't find it on the website, but they used to make HHS insert bits. They may have boring bits available, too.

https://www.arwarnerco.com/category-s/142.htm

If not, you can grind the tip of a bit and cut it off by notching (all four sides) the desired length with an abrasive cutoff wheel, like a Dremel, die grinder, air cutoff wheel, or hand grinder with a narrow cutoff wheel. Then put the piece you want in a vise with soft jaws, cover the bit with a rag in case of (rare) shattering, and hit the unused end with a hammer. It will break off pretty cleanly at the notch. Don't overheat the notch area, but if you do, keep it on the "non-use" end of the bit, where loss of temper won't matter.

Many people find it easier to use a carbide insert bit than grind up a HSS bit, including threading tools. I think that is the most common motivation of a non-production user. I remember Aloris introducing a threading tool insert holder, and my employer (a job shop/repair shop) chose to use HSS inserts in it, instead of carbide. They did a lot of work with 4140 and Stressproof (1144) and found that the HSS held up well enough, while leaving an excellent finish on the threads they commonly made. the HSS inserts lasted a long time, and were just discarded instead of re-sharpened because it wasn't worth the time spent.

There are lots of posts and videos about sharpening HSS tool bits, including how to hold them when sharpening. Many ways to hold small boring bits, and most are simple.
I can sharpen hss. I was testing these inserts as quicker method. I don’t have as much time as I want with my machine. I will use hss if I can’t get the carbide to work with all the fixes I need to make.
 
Sounds good! You mean use the cross slide to back off and the compound to go forward as “standard” way?
Yes. Use the cross slide to back off. Move tool to start point. Move cross slide back to 0. Move compound in. Don't move compound out at all during the entire operation. The key thing is to ensure that you take out the back lash. The back lash is easier to remove when making the larger movements of the cross slide.
 
Yes. Use the cross slide to back off. Move tool to start point. Move cross slide back to 0. Move compound in. Don't move compound out at all during the entire operation. The key thing is to ensure that you take out the back lash. The back lash is easier to remove when making the larger movements of the cross slide.
Will do. Thanks!
 
Something I forgot, I was advancing depth with compound and backing off with the compound. I should have back off to reverse with the cross slide instead, right?


You can do it either way. It's easier to read the dials if you back off with the cross slide. Once you have your threading position, zero the cross slide dial, and then use it to "back out" at the end of the cut, and to come back to position at the beginning of the cut. Then you advance the compound slide for the depth of cut. Easier numbers.

Or, you can back the compound up at the end of every cut, and leave the cross slide alone. By doing it that way, you have a "new" number to remember after each and every pass.

Mechanically, the machine and the thread don't care which way you do it. The only catch is you have to do it one way or do it the other way, and stay with it from the first cut to the last. Otherwise as I said above, your tool will "move" relative to the thread, and it'll be cutting in a different spot relative to the existing thread (or partial thread).
 
Back
Top