Spindle bearing woes

Thanks Izzy, That's brilliant.

Remeasure the tops of the pillars please ! I want to make sure that I'm right.

I'll assume that the bearings themselves are parallel to the line of the spindle.

Earlier you said that the tail bearing would bind up the spindle when you took the shims out. So lets correct that end first.
You can do this two ways. You can use a feeler gauge to determine how much out of parallel the cap and top of the pillar are or you can use plastigauge to do the same thing. Either way you need to correct the tail pillar and cap surfaces, so that you can make up new shims.

Now I know that we only took a 10 thou swipe off the top of the pillars, and that they are not flat all the way across, but if the bulk of the top of the pillar is flat I wouldn't remove any more material.

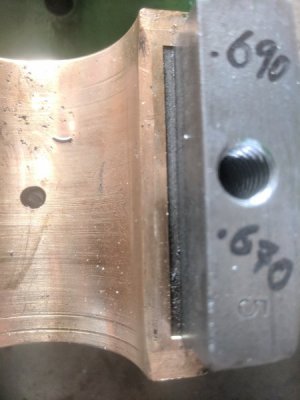
The way to get the caps flat is to put them into the mill vise and use the bearing shell edges to get the cap level in both directions. The fact that the caps are rectangular is nice insomuch as you have flat surfaces to grip in the mill vice. Do not take any material off the bronze bearing shell or the supporting edge, That shell edge is the only reference surface that you have.

Note that all this is without putting the spindle back in the headstock. Measuring with the spindle in place comes later.

The aim is to have the bearing cap supported on the edges of the bronze shell and the gap on top of the pillar supported with a shim in between. Ideally without any rocking of the cap. If you need to use the hold down bolts only make them finger tight.

Next we will sort the front bearing out.

I'll be around later on.
 
So I'm gonna be taking a cut off the caps mating surface?
The rear cap itself is pretty square though, it measured 1.550-552 all around it was the shell edges that had taper to them, all of them had 10thou or more.
I measured the pillars as carefully as I could with calipers anyways. I'm pretty confident in those numbers I can get a depth Gage if it needs to be more accurate.
the front bronze bearing sits slightly above the cast iron surface I measured to the bronze surface. Not sure if that's correct.IMG_20181010_140444.jpg
 
Looks like some progress. I would definately get a depth gauge. The more accurate your measurements the better the outcome. You want to measure in tenths if possible.
The ledge on the inside of caps where bearings sits flush with would be a good reference point to level the caps. I’d put a parallel spanning the gap and then dial it leveling to mill. Obviously don’t put in vise in direction of bearings it will distort cap. I’d make both caps the same or at least that would be the goal. Good luck
 
Hi Guys,

Yes the bronze shell edges are the only reference point on there. So getting a parallel mating surface would be good.
I can't suggest anything for the front rear pillar other than that is going to need a thicker shim on one side.

Cadillac: Yes a piece that sat across the edges of the shell that was like a parallel would be a great help in getting everything square. Then squaring up the mating faces.

If we can get the pillars and the cap mating surfaces square then we are on the way to being able to start and align the bearings to the spindle.
Basically we are going back to the condition when the lathe was first made.

In this case the tail bearing has much less wear than the chuck end and should be the easiest to setup. The chuck end is going to be difficult because of the badly fitted cap and how much the bearing shell is tapered.

I'm being very cautious about removing material, it would be easy to screw it up.

With regard to the "Primary" shims, primary for want of a better word. Are there only to provide the starting point for bearing adjustment. I would suggest thin aluminum plate, rubbed down to fit the gap, with steel shim material for fine adjustment. If I'm right it will be a matter of adding just a few thou of shim.
 
Ok so let me make sure I understand, it doesn't matter if the caps mating surface has a taper in it as long as the mating surface is parallel with the shell edge?
 
Hi Izzy,

All the edges ideally should be parallel to each other. When you come to fit the caps with the spindle in place the shells, with the shims, need to come together square even if they don't actually meet. You want to avoid having the bearing shells lifted at the front or the back when the cap is in place.

This is why I said that if the bulk of the top of the pillar is flat.

Now if there is only a small area that is flat, you will need to take a few thou more off to get that greater area. At this point the fixed shell edge and the top of the pillar should be parallel. So if you now put the cap in position it will rest on the shell edges and the gap for the shim can be assessed.

When the spindle is in place you will need to blue up and discover where you need to scrape. The tail bearing should be easy to set, its the front one, chuck end, that is going to be difficult.
 
Just thinking here. What if you took the caps and removed the bearings. Then take gauge blocks or set up blocks and mount caps to mill table. Machined side down so reference ledges are on set up blocks. Bolt them down lightly. Then take a woodruff key cutter or slit saw and cut the taper surface flat. That should bring all them surfaces parallel to each other. Then you should have a good starting point to check fitment of bearings to spindle.
 
Hi Cadillac,

Really the aim of the whole exercise is to be able to scrape the top shell in to suit the spindle, without altering the spindle center hight. The rear bearing seems to still have some adjustment in it, whilst the front bearing is badly worn. The sloping surfaces on the bearing caps don't help ! Making the gap between them larger will allow the bearing shell to come down and contact the spindle, which can then be blued and scraped to suit. Properly shimmed and done carefully would restore the lathe to a good working condition.

I did have a natter with an old time friend of mine, to whom I was discussing this thread, and he commented that in his day, you would have had the shells white metaled and scraped to suit. But no one does white metaling anymore.
 
So I understand this correctly. The bearings do mate together parrallel and flush with each other? It's the caps of the bearings that have a taper to the horizontal surfaces that mate to the headstock. Hope I described that clearly? Then work can begin on bearing fitment to spindle by means of scraping.
 
Sorry guys been busy lately but I think I better understand what's going on. So my next step would be to mill the slope off the bearing caps then blue up the spindle and scrape to size?
I thought about Babbitting the bearings but I think ultimately after this I'll probably make new ones the way things have been going for me I'll probably be working for the ole mold shop again then I'll have all sorts of machines at my disposal :p they allow you to use any machine you want when you're off hours so long as it's not being used for a job.
 
Back
Top