

-
Welcome back Guest! Did you know you can mentor other members here at H-M? If not, please check out our Relaunch of Hobby Machinist Mentoring Program!
You are using an out of date browser. It may not display this or other websites correctly.
You should upgrade or use an alternative browser.
You should upgrade or use an alternative browser.
Show us your 4x6 Bandsaw Modifications!
- Thread starter HMF
- Start date
- Joined
- Jan 20, 2018
- Messages
- 5,636
4X6 Vertical Conversion, Part 2
Finishing the upper guide mount


Finished, with the table mounted.


All in all, I'm pretty happy.
Still fine tuning the verticality to the table and trying to figure out a stand or wall-mount to reduce the footprint.
Considering relieving the frame casting to get to 6 in. throat. It looks plenty stout and will tolerate some stock removal.
edit: After staring at the saw for a while, I realized that something was wrong. The slot in the table is backwards, requiring the removal of the table to replace the blade. Can't decide whether to fix it or call it a feature.
Finishing the upper guide mount
Finished, with the table mounted.
All in all, I'm pretty happy.
Still fine tuning the verticality to the table and trying to figure out a stand or wall-mount to reduce the footprint.
Considering relieving the frame casting to get to 6 in. throat. It looks plenty stout and will tolerate some stock removal.
edit: After staring at the saw for a while, I realized that something was wrong. The slot in the table is backwards, requiring the removal of the table to replace the blade. Can't decide whether to fix it or call it a feature.
Last edited:
- Joined
- Nov 17, 2021
- Messages
- 63
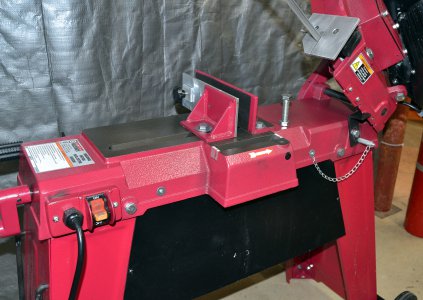
1. Sheet Metal "Bib" to prevent swarf from piling up on stand shelf/brace.
2. Extended reach Frame Lock Latch Pin.
3. Enlarged table for vertical use relieved to allow normal horizontal use without removal
4. Extended face of moveable vice jaw with adjusting pin for cutting short scraps
5. "Sights" in blade recess of base to allow quick rough positioning of stock
6. Lenox Die Master 2
I gotta say this absolutely one of the best bang-for-buck machine tool deals on the market. I love this little cheapo workhorse!
Attachments
- Joined
- Jan 20, 2018
- Messages
- 5,636
4x6 Vertical Conversion, Part 3
I just realized I had forgotten to finish this.
Up to this point, the saw head was still attached to the original base. Time to do something about that.
After removing it from the base, I put it on the mill and removed an unnecessary rib to get a little more throat clearance.

Then I fabbed a bracket to attach to the bottom of the head. It utilized the 2 bolts that serve as pivots for the motor as well as the 2 bolts that attach the angled pivot bracket to the head.

A collar welded to the bottom of that bracket allowed mounting on a pedestal.


I corrected the table slot situation,

and made a light so I can see.

It's getting a lot of use now that I can just walk up to it and flip the switch.
I just realized I had forgotten to finish this.
Up to this point, the saw head was still attached to the original base. Time to do something about that.
After removing it from the base, I put it on the mill and removed an unnecessary rib to get a little more throat clearance.
Then I fabbed a bracket to attach to the bottom of the head. It utilized the 2 bolts that serve as pivots for the motor as well as the 2 bolts that attach the angled pivot bracket to the head.
A collar welded to the bottom of that bracket allowed mounting on a pedestal.
I corrected the table slot situation,
and made a light so I can see.
It's getting a lot of use now that I can just walk up to it and flip the switch.
- Joined
- Sep 3, 2018
- Messages
- 14
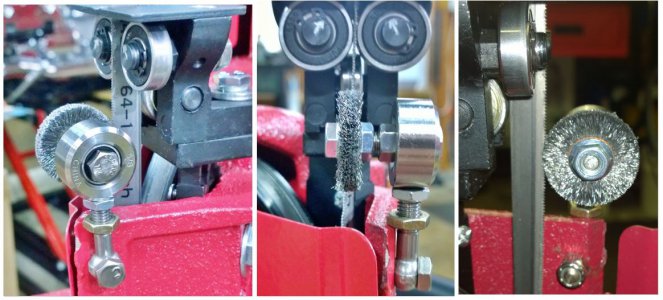
If anyone is looking for an easy method to mount a blade chip brush, this requires only one hole be drilled yet it's easily removed for blade replacement.
Parts used were an eye bolt, a shaft collar, two 1/4 x 5/8 ball bearings, a 1/4 x 1-1/2" bolt and a 1.25" crimped wire wheel.
Parts used were an eye bolt, a shaft collar, two 1/4 x 5/8 ball bearings, a 1/4 x 1-1/2" bolt and a 1.25" crimped wire wheel.
Attachments
- Joined
- Nov 17, 2021
- Messages
- 63
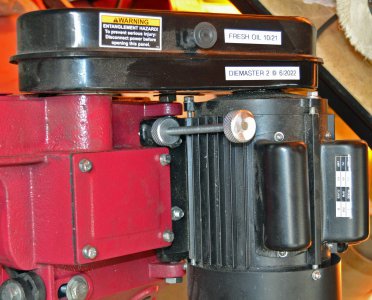
Quick(er) change frill to make speed changes easier/faster. What I like about this is that now I'm more inclined to actually change the speed!
Length of M8 rod, a couple of knobs, and a sleeve between the lower knob (for locking) and motor flange to space knob for easier access.
Length of M8 rod, a couple of knobs, and a sleeve between the lower knob (for locking) and motor flange to space knob for easier access.
Attachments
- Joined
- Jan 20, 2018
- Messages
- 5,636
Upgraded the hydraulic downfeed control
.
The lower valve is the rapid down control
The upper one is the fine downfeed control.
Everything came from parts on hand, most of it I've been carrying around since the 70s.
.
The lower valve is the rapid down control
The upper one is the fine downfeed control.
Everything came from parts on hand, most of it I've been carrying around since the 70s.
Last edited:
The lower valve is the rapid down control
The upper one is the fine downfeed control.
Is the idea that you open the rapid to allow free movement (while maintaining the fine setting) and then close the rapid to effectively engage the fine control?
- Joined
- Jan 20, 2018
- Messages
- 5,636
Yes, it allows dropping the head rapidly without disturbing the setting for cutting.Is the idea that you open the rapid to allow free movement (while maintaining the fine setting) and then close the rapid to effectively engage the fine control?