Replacing G0709 spindle bearings

It’s not only the radial eccentricity that is the issue, it’s also the axial. Every bearing is a very rigid spring, and the stiffness of the spring determines how rigid the system is. With potentially larger variation in rolling element size as well as runout with the standard bearings, you have less contact between the inner and outer races, so that means your spindle is less stiff than one where more rolling elements are in full contact. You also have a limit to how much preload you can put on a rolling element before it overheats. When the load is spread among more rolling elements, you can have a higher preload and thus more rigidity. As a thought experiment, consider a situation where one rolling element is maximum size and all others are minimum, all the load goes through one or two rolling elements and you can only preload the bearing up to the limit of those elements. Now consider all the rolling elements and races are perfectly the same, the load gets spread evenly between all of them, so your preload can be higher, and the stiffness is higher. A real bearing is somewhere in-between those two examples, and a higher precision bearing puts you closer to the perfect situation.

Having a P5 bearing at the chuck end helps a lot, but not having one at the outboard end could be an issue, or you might get lucky and that bearing has low variation and you don’t see a difference. I see this as a weak link in the chain. This could show up as chatter or poor finishes on your workpiece, or ability to take deeper cuts. What some people blame on the compound might also be poor stiffness of the spindle due to bearing choices. What it looks like Grizzly is doing is playing the odds that the standard precision bearing doesn’t cause issues significant enough to affect sales, and they can get away with just one high precision bearing to save costs. But, based on Cadillac’s experience, it doesn’t look like they are not even using P5 any longer since the bearings they shipped him were standard precision. If you opened the bearings, I would be curious to see if they are standard or high precision, the price indicates they are standard.

Having said all that, FAG X-Life bearings have some tolerances to P6 and would likely be better than standard precision if cost is an issue. They cost about the same as standard precision, but you get a better tolerance quality overall.
 
Ah. Yes, the P5 spindle end bearing is indeed etched not stamped. I didn't understand the point before, but got it now.


Looks to me like an engineering decision to manage cost. Close to the spindle, that potential eccentricity from the P6 outboard bearing is lost in the noise from simple ratio of lever arms — the eccentricity at the chuck will be a small fraction of the eccentricity of the outboard bearing based on the the length of the spindle; further out from the spindle, I'd expect material compliance to be the biggest problem and be resolved with tailstock support or turning between centers.

I'm still considering getting two clearly legit P5 bearings. I see separately "ZVL" and "ZKL" listed by "globalpower" on ebay — https://www.ebay.com/itm/115093856956 and https://www.ebay.com/itm/133933717848@Cadillac is that what you found?
Yes those are the bearings I have. Dealing with global power was a issue. Their listing had FAG bearings in a p5 rating for the same price. I ordered them and received a drivebelt for a snow mobile. Contacted them they said they send out the bearings and nothing for like 3 weeks. I tried contacting them and they said they were delivered on the date of the snow mobile belt. I stated what happen and they were like we sent you something. So I contacted eBay. They got involved and the seller refunded my money.
I ordered them again FAG bearings in a P5 rating from them again since I was refunded. When I received them they were KLF-ZVL 30210 & 30212 P5. I contacted the seller and they said that’s the only brand they have in a P5 rating. I asked why they have them listed as FAG brand and they said it must be a listing mistake. I said well that’s under your control and nothing ever came of it. I didn’t won’t to deal with them anymore seemed like nothing but problems.
So I have these bearings and they seem of good quality I have just not ever heard of them. They are made in the Czech Republic . There are not high spots etched in the bearing races but they are mark with the P5 rating on the races.
I have them installled in the lathe. Very similar to what you described. Once everything was clean I pressed the chuck side bearing on using a aluminum spacer on the inner race. Went smooth felt it bottom out seated with light pressure. Once installed in the headstock I had my wife hold pressure on the spindle toward the outboard side while I heated the outboard bearing with a heat gun. Once up to about 120* using my IR gun to verify. I slide the outboard bearing on. It bottomed out to the race. Then I installed outboard cover seal/spacer and retaining nut. I put a gauge on the spindle at that point and it had about .005-.007 endplay. It took some force to get the retaining nut to move the bearing. I’d say between 30-50 ft.lbs of force. Guessing here but I do use torque wrenches frequently. I’m a mechanic. I’ve got the spindle endplay down to 3-4 tenths running the bearings in. It’s been touchy and I’m trying not to rush it. Walking away and doing something else because I’m busy and I have another lathe so not pressing.
If and maybe when I do it all over I would probably go with know bearings. Meaning go to a bearing dis. and get them. I had contacted my motion industry dist. And he could get them I think all in for 400.00. He said he had to find the outboard but the spindle was available. Outboard would take a week. I took the chance with eBay purchase and didn’t get the FAG brand I wanted saving alittle but not getting what I wanted. Probably should have just went with the dealer and had the assurance of the quality and manufacturer. Idk
 
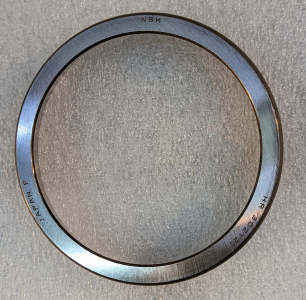
Here's the outer race of the spindle-side bearing. It think the writing is laser-etched (that's now relatively cheap), but it's certainly marked as a J-class bearing!

1653857332767.png

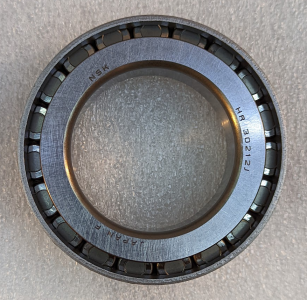
Cage and inner race:

1653857454811.png

The gaskets are cork, and except for some paint on the outside, are in very good shape, so I'm not inclined to replace them with paper gaskets; that's not obviously an improvement, and I don't know what the nominal thickness is to even cut my own. (I cut one out of paper before I realized that it was a bad idea.)

I'm going to put this all together and see whether play is acceptable. If so, great; if not, I have a motion industries supplier locally from whom to purchase quality.

I lightly coated the spindle-side seat with CorrosionX, and also the outer race, so that any condensation ice wouldn't stick. I soaked the outer race in the freezer for half an hour, and then it slipped easily into the seat. I held it in place for a few seconds as it warmed, then lightly tapped it to make sure it was fully seated, and it quickly warmed and fit securely.

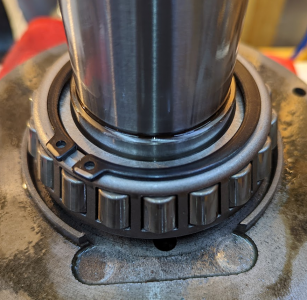
Then I heated the inner race and cage with my heat gun until it was too hot to touch (the IR thermometer was inconsistent with such a small target, but I saw as high as 175°F). It didn't seat right when I first set it in place, but I tapped it loose with the bearing retainer and set it on again, and that time it fell perfectly to the bottom and seated firmly.

Then I set the circlip in place so that I don't put everything together and then discover that I forgot. ☺

1653859839726.png
 
Last edited:
The J simply means the bearing contact angle meets ISO standards. The HR is a high load rating design. These definitely are standard tolerance bearings. If they were higher precision, P5 or P6 would have been written on them. The attached document from NSK goes through their numbering convention. Something to keep in mind is each bearing manufacturer is different, so the letters on an equivalent SKF bearing might be different.

Nothing wrong with your plan to try them and see how they perform for you. They most likely will not perform as well as a higher precision bearing, but you may not see enough of a difference to justify the cost of the higher precision, the differences may only become evident if you really push the lathe too. One place I would expect to see an issue if they are not suitable is surface finish, you might get more chatter with these than you would with the higher precision bearings, in addition to possibly higher radial and axial runout.

For the gasket material, you can order some from McMaster-Carr, or use their website to research what you might need and check with your local auto parts store and see what they have. My local Napa store has a lot of items that I need and saves me shipping, but I live in a semi-rural area with lots of farms. If you bring in a sample, they might know exactly what it is.
 

Attachments

  • download.pdf
    946.9 KB · Views: 1
The circlip that I removed near the spindle didn't need to come off; it just held together the package of low and high speed spindle drive gears. So I just re-installed it.

I bought paper gasket material at my local auto parts store, not having looked carefully at the existing gaskets, only the top gasket. I could have measured it, but really what I want to do for next time — if I'm unlucky and there is a next time — is either buy pre-cut from Grizzly or finish making my laser cutter and use that to do a better job. I think that the gasket around the top is paper, so I could have replaced that, but. it also wasn't leaking, and isn't under pressure, so hard to get excited about this. If the rear seal leaks, that's an easy fix — don't even need to take off the preload nuts — but if the front seal leaks, I'll have to take it all apart, at which point I pay a visit to my friendly local motion industries distributor.

Here's what I actually have done so far, leaving out the few do-overs I had to do:
  • Apply very light coat of CorrosionX to bearing seats and outer raceways
  • Freeze outer raceways solid in chest freezer
  • One at a time, slide very cold outer raceways into seats; hold and tap them in place as they warm up to make sure they are fully seated.
  • Lightly oil spindle shaft, heat new chuck-end spindle bearing, install on spindle shaft.
  • Re-install keys in spindle shaft
  • Oil gaskets both sides with way oil
  • Re-install speed shift block.
  • Set feed selector gear circlip into ratcheting circlip wrench.
  • With wood on ways for support under bearing retainer, re-install spindle, putting gears and the feed selector circlip back on as it goes through the headstock case.
    • Put the spindle barely into the head stock, keys up
    • Hold spindle drive gear roughly in position, large side towards the bed, keyway up, engaged with speed shift block
    • Slide spindle through spindle drive gear
    • Hold feed selector gear in position, keyway up. (Both gears are identical, it doesn't have a direction)
    • Slide spindle through selector gear but not quite through the case
    • Set circlip in ratcheting wrench around spindle
    • Slide spindle through the rest of the way
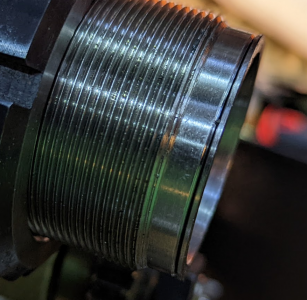
  • Screw outboard bearing retainer ring in place.
  • Install feed selector gear circlip.
  • Heat new outboard spindle bearing, install on spindle shaft.
  • Screw spindle side bearing retainer ring in place, seating the spindle bearing race to its intended depth.
  • Install the collar / spacer.
  • Use the inner spanner nut to tighten just enough to remove play, not the additional torque for setting normal preload.
  • Lock inner spanner nut with outer spanner nut
  • Install lots and lots of neodymium magnets, including many in the oil drip channel
  • Run clean oil through the taper bearing holes until it flows through
  • Refill the sump with clean oil, close the top.
  • Run each of the speeds momentarily to make sure that the gears mess correctly.
  • Run 20 minutes at 300RPM
  • Run 20 minutes at 2000RPM

Notes:
  • After 20 minutes at 300RPM, there was a negligible increase in temperature in the adjacent headstock (~1°F)
  • After 20 minutes at 2000RPM, there was a 5-8° increase in temperature near the bearings; slightly more outboard than by the nose.
  • It at least sounds better than it did, so feeling OK about not replacing the other bearings.

Next, I'll run the preload setting procedure from the manual.
 
That’s good news the others bearings sound good. Thanks for the writeup of your procedure, it looks like you did a great job on the reassembly. I am looking forward to hearing how the preload procedure goes and what the final runout is.
 
Before I ran the preload procedure, there wasn't that much play. It wasn't really noticeable, but I went forward with the preload procedure in the manual like a good person. I did the preload tightening procedure a bunch of times before running it in. Maybe five or six? I thought I finally got it right and ran it for 20 minutes and 2000 RPM. It says to check the spindle nose temperature and it should be warm after 20 minutes, but not uncomfortably hot.

After 10 minutes, I checked the spindle nose temperature with my IR thermometer, and it was about 105°F inside the nose, so I let it go to 20 minutes. At 20 minutes it was similar, about 110°F. Then I touched the outboard end, and it was: Hot. Too Hot. Too... Darn... Hot! 170°F!

So I backed off a bit, ran the procedure again but was a little more cautious, and ran another 20 minutes at 2000RPM. Now it's 115°F on the outboard, and 105°F on the nose. Putting a tenths indicator on the nose and tapping it with a plastic hammer I'm not seeing meaningful deflection radially or axially. It turns freely in neutral. I'll call that good enough preload for now.

And now for the part you've been waiting for! About a tenth of total radial runout measured with a tenths DTI both on the nose taper and the inside of the 5MT taper in the nose, no appreciable axial runout. I haven't cut a test bar yet, but for what I need to do right now this is probably going to be good enough.
 
The surface finish isn't as good as the old bearings before they died, and I got lots of chatter trying to part 1117 cold-rolled steel; I barely put a goove in, then gave up and used a bandsaw for the cut and faced it to finish.

Not a huge surprise that bearing precision might matter. @Cadillac I think you were wise to return the Grizzly parts and buy something else, and I'll be contacting my local Motion Industries supplier for bearings. Might as well get P5 for both ends if I'm going to go through this again.

Having been through this all once, it's much less daunting to think about doing it all again. I'd expect to be able to do the job start to finish in a long evening next time, working slowly and deliberately but knowing what comes next.

I did make the ER40 "spider" adapter. It works great. I have both US and metric ER40 sets, so I can just put the best fit from the other set in the outboard end and it trues up nicely.

1653934633811.png1653934682552.png
 
Last edited:
I agree once gone through the process it is much less daunting to do. I haven’t had much success with the KLF-ZVL bearings.
I cannot get the spindle less than .0002 endplay. When I try tightening the retainer nut more I get a lobbing feel in the bearings. Like a high spot And the spindle still has the endplay. Then I loosen the nut tap the outboard side to loosen. Spindle will spin freely but still .0002. I haven’t tried doing any cuts I don’t like the results to start.
I took the cover off after trying multiple times trying to see something. I can barely see the rollers on the spindle side. While turning by hand you can see the individual rollers rolling as you turn the spindle. I can see at least one roller not spinning like the others. It’s just skating along while all the others are rolling. From what I can see which is hard because of space is it’s only one.
There is no room to see the outboard bearing rollers.
When you had the bearings adjusted did you Try pushing and pulling the spindle to try and induce endplay? Did you try taking a bar and applying force to the bottom side of spindle with a indicator on top of spindle to see if theirs any deflection?
Before I had taken my spindle out I took readings with a indicator so I knew what I had and what I needed to duplicate. My spindle had zero endplay had maybe a tenth of runout on any matting surface To the chuck including the mt5. The killer with mine is I had no problems I thought one of the races wasn’t seated against the headstock bore when I was doing a oil change. I ended up taking the spindle out and saw wear marks on the outer races and figure it’s out might as well replace e them. Then I found out the world of counterfeit bearings and precision bearings what a mess.
I was hoping to hear good things from your rebuild. Sourcing a standard bearing is much easier and cheaper. Keep us posted on what you do. Good luck!
 
Back
Top