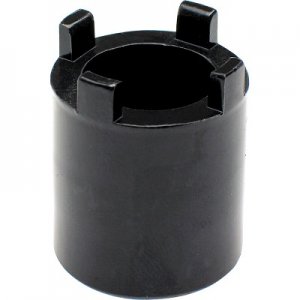
[How do I?] Remove This Nut. Lathe Disassembly

First, hit it with some good penetrant, I like a 50/50 mix of acetone and ATF(automatic transmission fluid)

Lots of good ideas above, let me add one more idea.....

find/make some keystock that fits the slots
find a pipe that fits over those four keys while held in the slots (maybe some magnets or tape to help hold stuff)
drill four holes thru the side of the pipe like little "widows" so you can see the four pieces of key stock
this to allow you to "plug weld" the key stock in place to the inside of the pipe while still on the nut. tack weld first, then you can remove from nut for more weld.

then either weld a socket into the other end of the pipe or use a pipe wrench on it.

-brino
 
Last edited:
Take a good look at the where the thread starts and make sure it isn't a left hand thread. They sometimes show up in the most inconvenient places. Personally I'd give it a good shot with a brass punch ground for a good fit, and a 2# hammer first. Don't be tentative, as that first shot will be your best chance of success. If you go the socket route, make sure you grind, or file the 4 pins flat, and all at the same height for full engagement. Sockets generally have rounded top edge. Pawn shop is a good source for cheap sockets. Hope it works out well. Mike
 
I think Bruce may have the winner there. The notches on the nut are pretty shallow and the socket around the outside of the pins would help hold every thing solid. He may have to grind the outside diameter of the socket to fit in the recess. I still think a punch would do it, but always better to be comfortable with your approach to problem solving. Mike
 
They use a similar nut on the front manual locking hubs of four wheel drives in the 70's and 80's and there is a special socket that you can pick up at UAP/NAPA or another automotive supply shop, for about $20. They're different between Ford/Chev./etc, so there must be several different sizes. Maybe you can even type it into the computer to find out what sort of socket it is and cross reference the proper size for your application. Could be the automotive engineers took their lead from machine designs.
 
OK, you guys are gonna hate me for this, I'll put on my flame suit. I just use a punch and a hammer on those :eek:[/QUOTE

Guilty as charged for a one-off removal. If I was going to do more than one, I'd make a socket to fit it.
 
Start with an old pair of water pump pliers with worn out teeth. After the nut is all buggered up and the slots damaged, then think about something else that also probably won't work. That seems to be how most people have gone about it when I inherit it!
 
This isn't gonna help, but I used to make sockets for them We called them bearing retainer nut drivers, they had a wall about 1/4 in thick. I bored a piece of 4140 rod to the right diameter to clear the shaft (not a problem in your case), and milled four 'teeth' on the end, broached a 1/2" square hole in the other end and gave them to the maintenance department, probably made 40 of 50 of them. I once thought about going into production on them but buying sufficient bar stock would have bankrupt me. Mac Tools would have distributed them for me.

This tool is illustrated below, thanks to Jmanb13.
 
Last edited:
I appreciate all the ideas guys! Unfortunately I only have this 1 tool at my disposal and it is currently disassembled so my options are limited as to what I can use/make. Maybe later once I have more metal working tools available I'll be able to come up with ideas as great as the ones you are coming up with.

How about cutting 2, 3 or 4 lengths of a dowel pin (or 1018) rod that fit into the notches on the nut. Measure across two opposites for the size, grab a 12-point socket that slips over the nut with the loose pins in the notches. It'd work like one of the Gator Grip sockets available from Wal-Mart, et all for under $15. Naturally, the Gator Grip socket would be an option also, fits up to a 3/4" nut.

Bruce

View attachment 141316

I'll look into these, you mentioned they fit up to 3/4" nut so they might be too small.

They use a similar nut on the front manual locking hubs of four wheel drives in the 70's and 80's and there is a special socket that you can pick up at UAP/NAPA or another automotive supply shop, for about $20. They're different between Ford/Chev./etc, so there must be several different sizes. Maybe you can even type it into the computer to find out what sort of socket it is and cross reference the proper size for your application. Could be the automotive engineers took their lead from machine designs.

I did find those type of sockets whenever searching but these type of sockets are generally much larger than this nut and I can ONLY find them in metric. Even if metric might be a close fit, the smallest ones I've found available are still slightly too big for this particular nut. It is 3/4 from slot to slot which is how they measure the size from what I learned when researching these 4 pin sockets.

With my currently available tools and supplies I think the grinding a cheap socket to resemble this picture is my current option.

X001-Y001.jpg


Start with an old pair of water pump pliers with worn out teeth. After the nut is all buggered up and the slots damaged, then think about something else that also probably won't work. That seems to be how most people have gone about it when I inherit it!

Isn't that the truth. This is my first foray into machine tools, but I find that crap all the time on the old cars I work on.
 
Last edited:
Yep, I have quite a few of the 4x4 sockets. They are all much larger. Not yet mentioned, but I've always had great luck with heat and candle wax. Use it often on engine block drain plugs, and there isn't much that gets more stuck than those. Mike
 
Get two nicely fitting pieces of key stock to go into one set of opposing slots. Have the key stock stick up over the nut a bit. Hold the key stock in place with a machinist parallel clamp. Get a Ford wrench and place it over the top of the nut and tight onto the key stock. And give it a go, good luck…Dave.
 
Back
Top