Redlineman's Logan 200 Rescue

Ya know, Ed;

That idea had occurred to me as well. It would be a good addition regardless. There is no real room for them, so something would have to get turned narrower to allow them to fit. I would guess that facing off LA-254 a touch might be the logical choice. Right now, I need to figure out a way to gauge the runout and give a try at straitening the screw. I need roller v-blocks for my surface plate.
Most likely for the compound that would work. I have not looked that close at the compound, or taken measurements. You could also recess 171 enough to fit the bearing (mostly) inside, then maybe face off the screw end of 254 enough to fit a bearing on the other end.

For the big dial set up I am working on (mothballed for winter) I have the outboard bearing all set (will mount between newly made pieces). The inboard bearing I plan on taking enough off the screw end of 172, to sandwich the bearing between it and the gear for the power cross feed. I have seen write-ups of the later being done.

With the bearings in place on each side, I should be able to tighten everything down enough to remove much of the "slop" related backlash and the assembly will probably turn much more smoothly.
 
Had the very same problem on both carriage screws.
My cross feed screw was so crooked it had to be knocked out of the bushing with a pin.
I put two jam nuts on the screw, held them with vise jaws (screw parallel to and inside the jaws) and carefully pushed it back into place. Sort of surprised how well it worked. Just don't push very hard, they bend easy. It helped to keep the lead screw within the jaws, to eye ball the bend, and prevent pushing too far.
Good luck.
 
Yeh;

Done lots of straightening like this before, just not on something this critical or expensive. I did some eyeballing with the screw set in a couple of v-blocks on the surface plate. Picked the high side, stuck in the vice, and bapped it with a rawhide mallet. Eyeball, repeat, etc. I got it pretty good. Not perfect, but much better. I may keep refining it a bit more, but i'm sort of happy as it is.

I looked into the thrust bearing notion a bit. It would be slick to cut a relief in them and inset the bearing, but there are no needle thrust bearings small enough to sit within the diameter of the screw bushing 254 or collar 171. A metric 10mm shaft bearing is 24mm OD. That's the smallest I saw on McMaster Carr. There may be another type of bearing or source I don't know about. I still like the idea a lot.
 
V-blocks and a surface plate... Isn't that considered cheating? :)
My screws didn't come out perfect either, but I also didn't want to break anything.
It looks like McMaster-Carr has wave disk springs that could be used for the cross feed. Maybe sandwich them with brass washers?
MMC PN's 9714K14/K15 have an OD of 0.662 inch, so that should fit within the Model 200 cross feed graduated collar. I think my carriage parts came from a Model 210 (not sure), and my dial is about a 1/4 inch bigger, so if you can find a collar and a bushing from one of those, maybe you have a better chance of finding a small thrust bearing that will work.
I think the bigger dial helps, but still tough for me to see.
 
Not needle bearings, but should still work fine on the coumpound MMC P/N 6655K15 3/8 shaft & 13/16 diam. It is nearly .25 thick though, because it us a ball thrust bearing.
 
LoganCrossfeed1.jpg

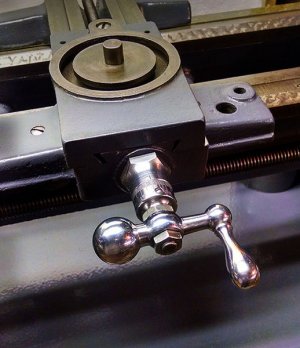
Like a lot of these machines, my crossfeed screw was not the best. It was sort of a good match for a lot of the other things that had been trashed on this poor old thing. The set-screw-to-key-the-handle idea is not really such a good one, it doesn't seem to me. If people do not keep the opposing nuts tight, the things that really lock the handle, the screw takes the load and buggers up the keyway and threads. Mine was gouged all the way around! So too are these the favorite target for any impact that might happen along, and so they are often bent and/or broken.

The threads on the end of mine were quite badly buggered due to the loose nuts crowd. Worse than that was that it was bent pretty severely within the length of the end threads. A significant part of the lash adjustment is taken here, and so a bent screw means extra room needed to keep it from binding as it wobbles. I don't begrudge Logan in getting $200 for a new one, but I just couldn't see it in my budget. I tracked and bought a used screw off ebay that looked quite good. Unfortunately, I traded one set of problems for another. It's a crap shoot, as they are all the same age.

When I began evaluating it, I quickly noted that it was obviously bent. There was noticeable wear from the bronze bushing in LA-254 on the plain portion of the shaft. The end threads were fair; better than mine. The big improvement was that it was not bent withing the threaded area, which is much harder to straighten. It is a tedious affair to build and tear down the feed over and over, trying to get the screw straight. The first attempt proved very beneficial, and I got it to the point that I could not accurately discern the location of the wobble that remained. Still, wobble it did, and so I employed the next strategy.

The first attempt was simply made by eye, and by carefully tapping with a hammer with the screw in the bench vise. For round two, since I could no longer tell exactly where to hit it, I hit it EVERYWHERE. In such instances, I take a soft mallet, in this case rawhide, lay the object on a hard flat surface, and work the entire length and circumference. The soft mallet will not pein of otherwise distort the metal, but any portions that are not touching the hard surface will be bent downward. This tends to drive out any discrepancies that still remain. I was able to get it so that the lash left in the end assemblies is very minimal, to the point of diminishing return, I think. Finish time.

About 45 minutes of detailed filing and strip sanding to get all the nicks and gouges out, and then it was over to the buffing wheel. I'm quite pleased with the results. At some point, it might be nice to replace the bronze busing in La-254, but radial play is far less important than axial in a screw like this. Pending further discovery when it actually makes chips, I'm happy so far.
 
Hey, Redlineman.

Glad to hear you were able to beat your cross slide screw into submission. I looked into replacing my cross slide screw from Logan but can't get past the price. If mine was unserviceable that might be another story. Sometimes, purchasing used parts are a pleasant surprise but other times create a new series of problems.

My cross slide screw has a little wobble to it as well. I don't think it has enough to take it back out and try to correct it. However, the threaded and keyway portion under the adjustable dial is chewed up from the hardened set screw and the locater pin in the hand crank has enlarged the cut keyway. I replaced the steel set screws in the adjustable dials with brass thumb screws to try to eliminate any more damage to the key slot and threads. I'll be looking for a small key to fill the groove so the brass thumb screw has something to tighten up on instead of jamming into the edge of the threads at the keyway. Another one of those small parts things.

Nice job on polishing your hand crank, dial, and bushing on your cross slide.

I'm sure your lathe will be running soon.

Mike B.
 
Hey;

The screw for the dial does not ride on the threads, eh? Is it not back on the smooth shaft? I like your brass screw though, and was contemplating something similar. I wouldn't get too concerned about damage, as long as you sanely snug it by finger tip. Doesn't require much tension. The large dial idea still appeals to me. I can't see shirt anymore, even with cheaters on! Who here was supposed to be figuring that out for us?....

Frankly, I think the set screw on the handle is utterly redundant. The jam nuts are plenty to keep the handle in position, and if the set screw is just for locating... who cares where the handle is? What do I know, but as long as it stay put and turns the screw, I can't see how its radial position matters. Mine had a regular screw in it, and it was buggered quite nicely. I might just leave that long gawky screw I had in there out!
 
I would have to see a photograph of the crank and feed screw that ya'll have been discussing. But I just counted, and I have a grand total of 12 places here (with three more inbound) that could be generically described as crank or hand wheel driven feed screws. None have any set screw in the crank or hand wheel, and all have a woodruff key in the portion of the screw covered by the crank hub. With a nut on both sides of the hub for end float adjustment. Some of the dials originally had Allen set screws but all have been replaced by thumb screws.

Could it be that some PO replaced the crank with one that wasn't broached for key? And instead of fixing it properly, just put a set screw in it? Or is my mental picture of what you have been talking about totally out in left field?
 
Back
Top