-
Welcome back Guest! Did you know you can mentor other members here at H-M? If not, please check out our Relaunch of Hobby Machinist Mentoring Program!
You are using an out of date browser. It may not display this or other websites correctly.
You should upgrade or use an alternative browser.
You should upgrade or use an alternative browser.
Recovery from mistake - how to shim one side of bush OD ?
- Joined
- Mar 26, 2018
- Messages
- 8,412
I've used this stuff. It's an amazing product.
262100102 | Brownells
Brownells is your source for 262100102 at Brownells parts and accessories. Shop our vast selection and save!shop.brownells.com
I read somewhere to use Pam, cooking spray as a mold release. I tried it, it worked just fine.
- Joined
- Nov 17, 2020
- Messages
- 1,723
yes.. if nothing else for a release agent.. pam itI've used this stuff. It's an amazing product.
I read somewhere to use Pam, cooking spray as a mold release. I tried it, it worked just fine.
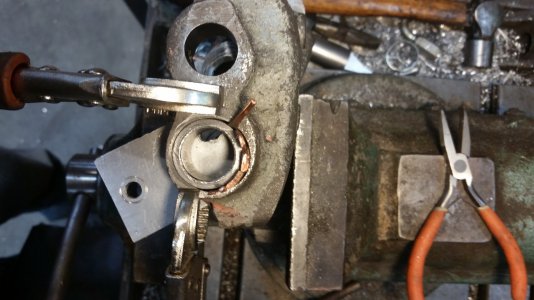
Below is a photo of where I have gotten. The steel bushing is in the hole at the bottom of the casting. It was aligned with the alignment shaft in place. I then fabricated copper shims with a curved form (I am not sure of the term) to roughly conform to the bushing on one side and the casting on the other.
The plan is:
1. remove the copper shims and 'dam'.
2. reinsert the aligment rod and 'loctite' the bushing to the left half of the casting. Let it cure
3. remove the rod and install the dam.
4. mix JB Weld and fill the hole about 2/3.
5. reinstall the shims as they appear in the photo. (this should cause the JB Weld to somewhat over flow and then cleaned.)
6. let it cure.
7. remove the dam and clean / cut the excess copper.
This should do it. Results to follow. Dan

Update: I have done things a littlie out of order. I removed the dam before it was hardened. It did not seem as though I had fully filled the gap, so I was planning on adding JBW from the bottom. However to my surprise and releaf there was a small arc of JBW on the dam. So now the whole thing is sitting horizontally over night.
Question: The bottom bushing has somewhat of a loose fit. It would seem to me that coating both the casting and the bushing with a thin coat of JBW and slowly rotating in would be better then simple thread locker. Does this sound reasonable? Thanks Dan
Question: The bottom bushing has somewhat of a loose fit. It would seem to me that coating both the casting and the bushing with a thin coat of JBW and slowly rotating in would be better then simple thread locker. Does this sound reasonable? Thanks Dan
- Joined
- Nov 24, 2014
- Messages
- 3,199
@dansawyer
There are various Loctite products for a wide range of clearance fits. Read up on it and choose what you like.
I think you said your bushings are made of "low carbon steel". I have zero experience with using low carbon steel as a plain bearing. Good luck.
There are various Loctite products for a wide range of clearance fits. Read up on it and choose what you like.
I think you said your bushings are made of "low carbon steel". I have zero experience with using low carbon steel as a plain bearing. Good luck.
Done and installed: The JB Weld went relatively straight forward. I cut off the extended ends of the copper shims on the side with the gap. That left a clean arc of copper imbedded in JB Weld. On the other bushing that iwas a slip fit the JB Weld seemed to apply evenly on both the bushing and the casting. I used the alignment bar to ensure the bushing were aligned while the bushings were setting up. The install is relatively straight forward, the only issue was the ball bearings used in the clutch mechanism, it is a bit fussy to get them started. It is all in place and working. The feed take off mechanism used to wobble, now it is solid and stable. Thank all for your advice and riding along. Dan

