Finally got the lathe in place. I tried checking to see if it was aligned, but didn't have much in the way of suitable stock.
My first try to see if it would cut straight was to use some 1/2" aluminum rod. That was a bad choice since the rod was bent") I went to bed a bit depressed since everything seemed way off.
I went to bed a bit depressed since everything seemed way off.
After sleeping on it, I realized that I needed something straight. I rolled the aluminum on the surface plate and saw it was not. The only other rod that happened to be around was an old 3d printer piece. Also 1/2", but designed to be a shaft. Chromed steel. And it rolled flat on the plate. So I chucked it up and made some measurements. I could indicate down a 15" length and was off by a few thousandths. I then got ambitions and shimmed under the tailstock and got it so that the 15" length was within a thousandth. I know this isn't the same as cutting w/o a taper, but I was still encouraged.
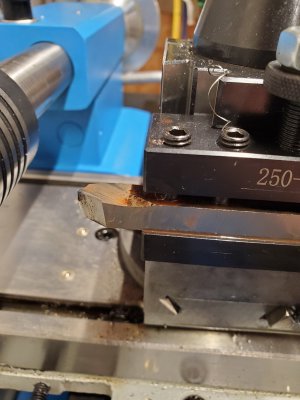
Finally, my neighbor showed up with some mystery stock. Some heavily rusted steel of about 1.4" in diameter. So we cut off a chunk on the hacksaw and prepared to do a test bar. Here's where things get problematic beyond my level of expertise. I attempted three operations. The first 2 had an inch of stick-out from the 8" long piece.
1) Facing to clean up the face
2) Center drilling
The part was pulled out 5" and a live center was installed in the center drill pocket.
3) A cleanup up pass over 5" of length
Center drilling worked fine.
But both the facing operation and the external cleanup pass had problems.
When the end was faced, I hand fed in and the cut seemed to work at the outer periphery. Chips looked OK. But at some point, the plane of the cut moved towards the tail by about 10 thousandths. There was clearly a concentric ring where the cutting action seemed "pushed" toward the tail. I persisted with a few additional cuts and eventually achieved a level (but rough) surface.
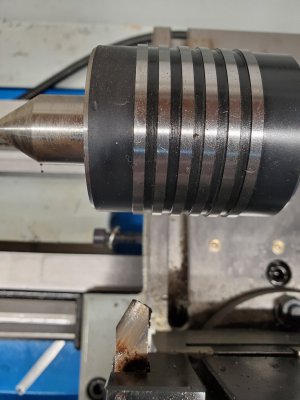
The cleanup pass of the OD had a similar issue. At the very start of the cut, the cutter was removing some metal. But, after a short distance (a few mm), the tool was just rubbing around the OD and not cutting. I adjusted in another 10 thousandths, and go it to cut the first 1/4". Went 15 thousandths deeper for cut 3, got perhaps an 1/2" of cutting. Went 20 thousandths deeper, got perhaps an inch before rubbing.
If I indicate down the bar (as seen in the picture), the shiny portion will move the indicator out about 10 thousandths. So the shiny part is tapered. But the rest of the bar is within 2 thousandths all the way to the chuck.
I have some 12L14 steel due to arrive tomorrow. I'm sure it's easier to cut than this steel. I've been using HSS pre-ground cutters from Little Machine Shop.....and imagine that they don't like the top surface on the mystery metal. So I am going to get some insert tooling. But I should be able to cut this stuff and it occurs to me that someone probably knows what I'm doing wrong. This seemed like a good time to ask for help.

My first try to see if it would cut straight was to use some 1/2" aluminum rod. That was a bad choice since the rod was bent
I went to bed a bit depressed since everything seemed way off.After sleeping on it, I realized that I needed something straight. I rolled the aluminum on the surface plate and saw it was not. The only other rod that happened to be around was an old 3d printer piece. Also 1/2", but designed to be a shaft. Chromed steel. And it rolled flat on the plate. So I chucked it up and made some measurements. I could indicate down a 15" length and was off by a few thousandths. I then got ambitions and shimmed under the tailstock and got it so that the 15" length was within a thousandth. I know this isn't the same as cutting w/o a taper, but I was still encouraged.
Finally, my neighbor showed up with some mystery stock. Some heavily rusted steel of about 1.4" in diameter. So we cut off a chunk on the hacksaw and prepared to do a test bar. Here's where things get problematic beyond my level of expertise. I attempted three operations. The first 2 had an inch of stick-out from the 8" long piece.
1) Facing to clean up the face
2) Center drilling
The part was pulled out 5" and a live center was installed in the center drill pocket.
3) A cleanup up pass over 5" of length
Center drilling worked fine.
But both the facing operation and the external cleanup pass had problems.
When the end was faced, I hand fed in and the cut seemed to work at the outer periphery. Chips looked OK. But at some point, the plane of the cut moved towards the tail by about 10 thousandths. There was clearly a concentric ring where the cutting action seemed "pushed" toward the tail. I persisted with a few additional cuts and eventually achieved a level (but rough) surface.
The cleanup pass of the OD had a similar issue. At the very start of the cut, the cutter was removing some metal. But, after a short distance (a few mm), the tool was just rubbing around the OD and not cutting. I adjusted in another 10 thousandths, and go it to cut the first 1/4". Went 15 thousandths deeper for cut 3, got perhaps an 1/2" of cutting. Went 20 thousandths deeper, got perhaps an inch before rubbing.
If I indicate down the bar (as seen in the picture), the shiny portion will move the indicator out about 10 thousandths. So the shiny part is tapered. But the rest of the bar is within 2 thousandths all the way to the chuck.
I have some 12L14 steel due to arrive tomorrow. I'm sure it's easier to cut than this steel. I've been using HSS pre-ground cutters from Little Machine Shop.....and imagine that they don't like the top surface on the mystery metal. So I am going to get some insert tooling. But I should be able to cut this stuff and it occurs to me that someone probably knows what I'm doing wrong. This seemed like a good time to ask for help.