-
Welcome back Guest! Did you know you can mentor other members here at H-M? If not, please check out our Relaunch of Hobby Machinist Mentoring Program!
You are using an out of date browser. It may not display this or other websites correctly.
You should upgrade or use an alternative browser.
You should upgrade or use an alternative browser.
Parting Trick
- Thread starter jschmidling
- Start date
Is that a screw on chuck? If not mount it in your tool post.
Looks like a bolt on. That doesn't mean that the mount plate isn't threaded though.
Does it matter for this though? With rear mounting, the machine is rotating in the standard direction.
I do it this way all the time on my 7x14 Mini-Lathe using P style cutoff blades mounted on my home made quick change turret. I can cut slices from 2" dia. steel bar. Email me at jayman03062@gmail.com for pics. TYPE "CUTOFF" ON THE SUBJECT LINE TO AVOID CONSIGNMENT TO MY SPAM BLACK HOLE.There are numerous videos on tricks for using parting tools but I found one that seems too simple and obvious not to be used universally.
His graphic makes it seem very simple but I don't quite see how it is not dependent upon the position above or below center.
I tried it on a piece of PVC in my mini and it works as advertised. To me, the most obvious advantage is the way it pushes the chips out the bottom.
Doing it the normal way, I have to stop frequently to remove the tangled mess of chip, including using a scissors to cut it loose.
I am interested in some opinions of this....
js
- Joined
- Jun 4, 2019
- Messages
- 91
I was saying if it's not a screw on chuck just mount the blade upside down in the tool post. Exact same affect as a rear mounted post.
I think you may find some who would argue with that point.
To me, the more stuff you can get rid of between the tool and the carriage, the better.
Rear mounting eliminates both the do everythig tool holder and the compound slide.
js
I meant as far as the cutting action they're the same. Of course a solid post mounted in the rear (rigidity) is probably better than a tool post mounted to the compound unless you use a solid post in the front then once again equal. Convenience is another thing. I used a rear mounted post for a long time and they're quite convenient.
- Joined
- Jun 4, 2019
- Messages
- 91
Patience not being one of my strong points, I came up with something to try while waiting for the bar stock.
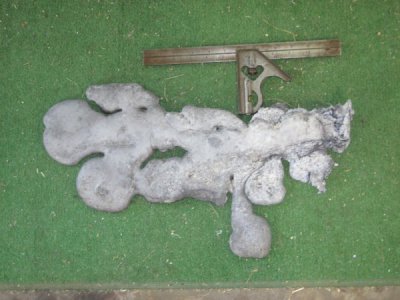
One of the "souvenirs" salvaged from our fire was a pattern for cranks used in our "Maltmill" which the fire turned back into an aluminum blob shown in the attached pic.
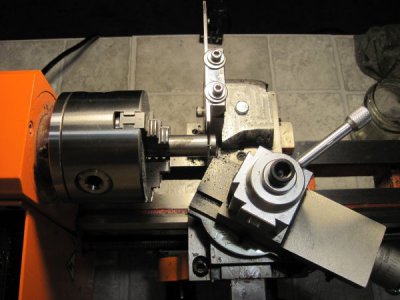
After a few hours of cutting and milling, I came up with the two pieces needed for the rear mounted parting tool holder.
A few more hours and I had a finished prototype that works better than anything I have tried so far on my mini.
I was able to cut off a a 5/8" steel bar with no problems at all at speeds faster than I would have used if I still had my South Bend doing it the usual way.
There are a few changes I need to make but basically, it works as advertised.
Thanks for all the ideas,
Jack


- Joined
- Dec 20, 2012
- Messages
- 9,422
Glad it's working better. I wanted to tell you to strongly consider using a ledge under the tool holder. It anchors the tool solidly and makes any off-axis movement impossible. This matters a lot because of the very high cutting forces experienced with parting.
The other thing I need to mention is that the thing that makes the parting blade so solid is the way it is held in the tool holder. You are using two bolts with washers and that may be enough but maybe not. If you do have issues with this design, consider a design that captures/traps the entire body of the blade like mine does. I found that this greatly increases rigidity.
The other thing I need to mention is that the thing that makes the parting blade so solid is the way it is held in the tool holder. You are using two bolts with washers and that may be enough but maybe not. If you do have issues with this design, consider a design that captures/traps the entire body of the blade like mine does. I found that this greatly increases rigidity.
- Joined
- Jun 4, 2019
- Messages
- 91
Glad it's working better. I wanted to tell you to strongly consider using a ledge under the tool holder. It anchors the tool solidly and makes any off-axis movement impossible.
I noted that on your design and didn't quite understand what purpose it served. By the time I figured it out, the vertical piece was too short to do the ledge. If I re-do it when I get the bar stock, I will add that. The way it is now, it is real easy to square up with a small square but with only one screw, it is not as stable as the ledge would be.
>The other thing I need to mention is that the thing that makes the parting blade so solid is the way it is held in the tool holder. You are using two bolts with washers and that may be enough but maybe not. If you do have issues with this design, consider a design that captures/traps the entire body of the blade like mine does.
Well, here is how that went....
After getting it to work, the first "improvement" I made was to make a full length strap with 1/8" steel. It hopelessly cocked the tool when the screws were tightened. I was able to get it to work once with a single washer as a shim on the non tool side. I was never able to find that sweet spot again so I went back to the washers.
A little ledge on the non-tool side would be the way to do it but again, I was out of altitude. As it is, I have about .020" of shim under the base to get it on center.
Will be interesting to see how the 1/16" blade works.
Thanks again,
Jack

