Parting Trick

[

Use this to make a tool height gauge and it will serve you well.

Just before reading this, I turned and faced a 1" piece of brass about 1.5" long.
I then turned it around in the chuck and faced the other end. I set the tool height to leave just the tiniest little point remaining.

To set a tool height, I just put this thing in the chuck and adjust the tool until it is "exactly" in the middle of the point.

Anything wrong here?

js
 
You should do whatever you need to do to have a reliable standard. It isn't that you can't do it in other ways but a gauge speeds things up tremendously.

Edit: I suppose I should elaborate a bit more than the above. If you ask a group of experienced machinists how important tool center height is you will likely get all sorts of answers but many will tell you that it isn't all that critical. Some will even tell you to go above or below center slightly. I'm no expert but my personal experience suggests that the closer to center height the better, and this especially applies to parting and turning tools.

Consider that a parting tool is essentially a form tool with a relatively large contact patch. You are applying a fair amount of force to feed it into the part. If the cutting edge is above center then the tool will rub; if below, it will dig in. If on center then it will cut. It follows that center height means center height, within a half-thou or less. My personal tool height gauge will get me on center within a tenth of so. It takes me maybe 15 seconds to set height or a few seconds to check a tool already installed in a tool post.

I should write up my tool height gauge when I have some time. It is simple and very nearly foolproof because it has no moving parts. When I have time.
 
Last edited:
Make sure that parting blade will fit the Eccentric Engineering FoR holder tool before you buy it. The site warns about Chinese blades being 13mm high not .500".
 
I keep thinking about making a parting tool holder. Anyone have drawings before I take the time to make some? I'm leaning towards upside down on the back, held straight. T slot cross slide on my lathe.
 
I keep thinking about making a parting tool holder. Anyone have drawings before I take the time to make some? I'm leaning towards upside down on the back, held straight. T slot cross slide on my lathe.

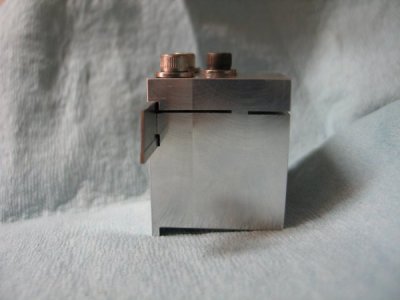
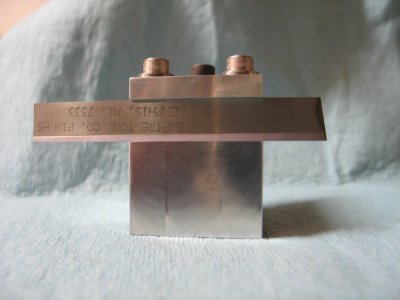
Here is the prototype I made for my Sherline lathe. Still using the same prototype tool after nearly 20 years because it just works. Meant to make the Mk II version but there hasn't been a need. I still need to make one for my Emco lathe when I have the time but it will be essentially the same thing - ledge that registers to the edge of the cross slide to resist turning forces and to assure perpendicularity to the lathe axis, bolts to the cross slide T-slot, blade slot puts the tip of the blade on the dead centerline of the lathe every single time. Because of these features, this thing can be mounted to the lathe and be in use within 15 seconds or less.

The whole thing is essentially a part of the cross slide when it is bolted down so it is extremely rigid. I can find no fault with this design and it should be easily adaptable to any lathe with a machined cross slide table. If I owned a lathe without T-slots, I would drill and tap a hole to enable this tool to be mounted; it would be worth it to me to be able to use this tool.
 
Some additional pics to hopefully clarify what this tool looks like. I made this one for one of our HM members without a mill who could not make one himself.

IMG_5303.JPGIMG_5300.JPG

The only critical feature is the bottom of the blade slot; it MUST be on the spindle centerline and it MUST be accurate. You can also see that the top and bottom of the blade slot is relieved. The bottom relief is to clear the wider cutting profile of the blade (EDIT: this allows the blade to be held perfectly vertical by the area of the body where the blade contacts). The top relief is to prevent the blade from being forced out of vertical as the top part of the tool is tightened down; this is important. Otherwise, very simple tool to make. Aluminum is strong enough for almost any hobby class lathe.
 
Last edited:
Maybe this isn't the time or place but I have an old General 6 tri square I use for everything not critical. It's always in my apron. So because I'm always wanting to set tool height I put some Dykem on the edge of it and pulled my chuck off and put in the dead center. Making sure my 6" was set flush with the square end, I stood it up on the carriage used the dead center to mark the edge of the Tri square ruler Dykem. Then took my little triangle file and made the scribe more visible. It's always handy so never have to go looking for it. :)
 
Thanks @mikey! That is easy enough and much like what I had in mind, though I had added a bunch of overcomplicated features in my head. :)

Is there any reason on a hobby size lathe to use a larger cuttoff blade? If I'm dropping the QCTP holder, I can use any size blade I want, after all.
 
In a rear mounted parting tool holder, I don't think you need to go larger than the P-type blades. Ordinarily, the size of the blade is supposed to increase with the part diameter but when mounted in a tool holder like mine the blade is held so rigidly that you can get away with a much thinner blade. In addition, the relief angle on an upside down parting tool acts like back rake but on a parting tool, this is essentially side rake. As we know, side rake is the most influential tool angle that affects cutting forces and you will feel the reduced feed requirement when using one like this. Essentially, a thinner P-type blade mounted upside down cuts with lower cutting forces and cutting temperatures so you can easily get away with using a P1 or P2 for almost all work.

An upside down blade also improves oil delivery because the oil gets to the cut first so the cut is cleaner and cooler. In contrast, the chips when using a right side up parting tool carries much of the oil away before it even gets to the cut.

The other advantage when mounting a blade like this is that it allows you to extend the blade however far you need to without worrying about the tip being off center. You will find that blade extension on a rear mounted tool is not critical; I don't even think about it as long as I can reach the center of the part. Sometimes the blade can be 2-4 times the required extension and the blade works just fine, even when I am parting at excessively high speeds.

Speaking of parting speeds, a sharp rear mounted parting tool cuts very fast and easily at higher speeds. You do not need heavy feed pressure with this set up. As long as you can feel a slight resistance to the feed and you can keep up with that, the tool will cut with no issues. I have parted aluminum at 2200 rpm, steel at 1200-1500 rpm and so on. No problems, no dig ins, no chatter.

Make one, Trav. It is worth it.
 
Back
Top