On VN-12 How are the dove tails of the ram lubricated?

Junkmaster

Active User
Registered
Joined
Sep 3, 2012
Messages
51
I don't see any oil cups on my machine that would oil the ram. There is a hole on the front, bottom of the ram right between the dovetails. It looks like a good spot to have an oil cup.

BrokenOilCupSmall.jpg

I've looked at the manual I printed off but it doesn't list the individual oil cups.

Thanks,

Evan R

BrokenOilCupSmall.jpg
 
Mine has a socket cap screw in it - I don't think an oiler goes there. There is ONE oiler in the back of my Ram - but it seems to the for the Yb Leadscrew, not for the ways - they sit a bit above the screw. See pics.
VN12 Front Ram.JPGVN12 back Ram.JPG
I hope this helps.

VN12 back Ram.JPG VN12 Front Ram.JPG
 
Evan,

There's no lubricator for the ram dovetails, nor is there one for the knee's vertical ways. Just run the ram to either end of travel and put a few drops of way oil on the ways from time to time. Also put a drop or two on the ram screw with the ram to the rear. The lubricator on the back of the ram screw only lubricates the screw's thrust bearing.

You lubricate the knee in much the same way. There is a cavity in the back side of the knee, against the column, that appears to be intended to hold oil. If you ever have the knee off you can add and oil cup to the knee and cut some oil passages to distribute oil.

The hole in the front of the ram that you are asking about is for the setscrew that holds the "profile stud" in place. If you look on the bottom of the ram, behind the tapped hole you will find a reamed hole for the stud. The profile stud is just a hardened pin with a flat ground on it for the setscrew; you can make one out of a dowel pin. It's used to follow a template for routing complex shapes, much like a pin router is used in wood.

Since this machine is new to you, you should plan on at least pulling the table and saddle to clean and check the lube system. The bevel gears in the table that drive the table feed are supposed to run in an oil bath. Usually they don't have enough oil and it can be a real mess in there. The lube hole on the bottom of the saddle that oils the way on top of the knee also tends to plug up and needs to be checked. You should also plan on draining and flushing the ram and feed gearboxes. You also need to flush and grease the spindle bearings.

Cal
 
Thanks Cal,

I had been trying to decide if I was going to pull the table and saddle off. Guess the decision is made.
I've read the other threads about removing the table and saddle. I can handle it. I'll have to get a lift to
handle the weight.

Evan
 
A hoist of some sort is a good idea when pulling the table. It's too easy to damage one of the dovetails if you try to have someone hold up the end while your pull it.

Cal
 
I purchased HF's Motorcycle High lift using the 20% discount coupon. It was a pretty good deal. It will lift 1100 pounds from 2.75 inches to 30 inches. I can see me using it more often than I would use an engine hoist. It is also smaller, easier to stash in the corner.

I stacked plywood and 4x4 posts on the lift as packing. I unscrewed the feed screw and raised the lift until the table just rested on the 4x4s. When the screw was disengaged I pulled the high lift and table away from the machine. It came out with a few tugs. It was pretty uneventful.

I am having trouble getting the retaining ring off the feed screw thrust assembly on the left hand side of the table. It is the one that requires a pin wrench to unscrew. It appears it was last tightened with a pin punch and a hammer. as the right side of the holes are mushroomed out. I've soaked it with some penetrating oil and wrapped it in paper towels for tonight. I'll give it a try tomorrow.

The load bearing surfaces on the table and saddle look really good. only one small patch of corrosion about 1/2 inch sq. The oil had long ago dried where the miter gears run. There were very few metal chips (swarf) in the cavity. I've posted to another thread a question about how to lift the drive train out so that I may clean the cavity properly.

Later,
Evan R.
 
Thanks for the picture of your pin wrench. I'm going to have to make one.

I've had penetrating oil on it for 48 hours, still no movement. How did you hold the lead screw while applying all the torque? I'm afraid of twisting the lead screw or breaking a hand wheel.

Is it critical that get these bearings out for inspection? They feel smooth when I rotate the lead screw.
I have rinsed most of the oil or grease that may have been in them during the cleaning.

Evan R.
 
I just had a flash of insight reading your response. I have the nut that goes behind the fixed part of the handle dog clutch. If I screw that tight to the small shoulder, I should be able to put a wrench on it while unscrewing the bearing retainer. If that fails, I will probably make a thick ( 0.5 to 0.75 inches) washer with a key way and take advantage of the woodruff key where the gear would sit on the shaft. I don't have a broach, so I'll be filing/hack sawing the key way.

I'll post some pictures when I get the pin wrench, thick washer made and get the puppy loose.

I measured my adjustable pin wrench last night, but I'll ask just in case someone else knows, is the pin circle have a radius of 0.9" (diameter of 1.8")? And the pins themselves are 0.15"? Being a novice, the odds of getting the measurement right and getting the holes in the right spot is low. I'm actually thinking about making some transfer "pins" to get a direct mark.

Thanks again for the info and guidance,

Evan R.
 
Evan,

If the bearings seem to run OK and there's no end-play, I would leave it alone.

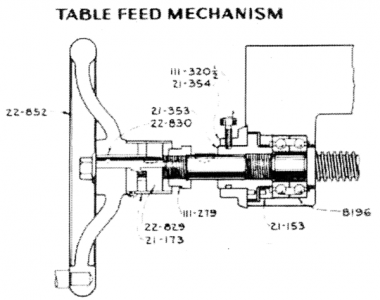
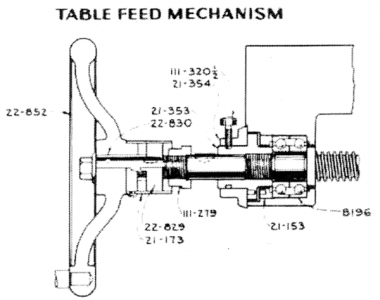
There are two threaded collars with holes for a face spanner. The outer one (21-353) is flush with the left end of the table casting and bears on the inner race. The inner collar (21-153) is recessed into the casting and retains the outer race. The bolt circle of the pins on the two collars are different, so you may wind up making two tools.
VanNormanNo12BBp12-tablefeedmechanismleft.png

I've only taken one of these apart and the outer collar didn't put up much of a fight. A standard two-pin face spanner was all that was needed and we just held onto the leadscrew with a gloved hand. If you need to keep the leadscrew from turning, put the left handle, dog clutch (22-829) and nut (111-219) back on and use the handle for leverage; put something through the handle's spokes if necessary.

You will need to make a 3-pin spanner for the inner collar. I tried to make one from axe's pin circle and it didn't quite fit (but was close enough). In would recommend making the blank for the tool and using blind hole transfer punches to mark the pins locations on the blank. Make the ID of the blank a close fit to the leadscrew shaft (7/8”) and the OD just small enough to enter the casting (2-1/4”). Put the transfer punches in the holes in the collar, slide the blank on and give it a few taps to mark the pin locations. Put witness marks on the casting and tool blank so you can put it back in the same way. The holes in the collar are 3/16”, but you should probably make the pins a bit undersize.

In our case, the inner collar didn’t put up much of a fight. The holes in the collar were badly deformed, so I used a 3/16” drill to clean up the holes. (Because of clearance issues, I used a hex-shank drill with and a socket wrench to turn it.) We used a Husky brand strap wrench from Home Depot to turn the tool and the collar came loose without too much force.

Cal
VanNormanNo12BBp12-tablefeedmechanismleft.png
 
I double and triple checked the feel of the bearings. They run smooth with no play. So I left them alone.

I moved on to checking for the plugged oil hole for the saddle. I tried for two minutes to blow air through the oil grove that goes to the right side of the saddle and into the corner of the dove tail. I could not detect where the other end of the hole was, so I got a piece of wire and was going to clean out the crude that was blocking the hole. I couldn't get the wire started in the hole. So I got a light and my glasses. Hmmmm, wasn't a hole, just a grove to move oil over to the right side slide. The hole was in the wide open center. It wasn't plugged after all, I took the screw on the front of the saddle out and blew air through, then degreaser.

I cleaned the crud and paint on the bottom of the saddle, gib, feed screw arm. I cleaned up the screws and bolts and put the saddle back on the machine. I have not attached the Y feed screw arm or the feed screw. I'm still cleaning the feed screw.

I've put the X feed screw gears and bearing caps back together. It was nice that they pinned each bearing cap so that it would fit on only one bearing and only in one orientation. Because I didn't think to make witness marks on any of them. The screws holes in the bearing caps also made it absolutely clear which cap went with which bearing.

Tomorrow I'm going to see about getting the table back on the saddle. I want to a better job of supporting the table while sliding it on. I think I got very lucky that I didn't damage the dove tails while removing it.

Can I leave the gib out while I slide the table in?

Thanks for the info,

Evan R.
 
Back
Top