Model making and our machine tools

Janderso

Jeff Anderson
H-M Platinum Supporter
Joined
Mar 26, 2018
Messages
8,407
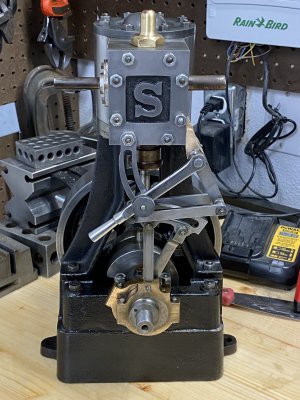
I've been working on a PM Research model steam engine.
While I have learned quite a bit so far, I have noticed the amount of work involved to change my 4 jaw chuck.
I only have one, it's a 10" Bison and weighs a ton.

I think if I'm going to continue to enjoy the model making hobby I need to buy a modeling lathe and mini-mill or mill drill.
Do you think my wife will buy it?

I have a 15X50 Colchester lathe that I love but for this model stuff it's a tad large. My mill is a 3hp full size knee mill with a 10x50" table.

I have an old Craftsman 109.20630 that is hiding on a shelf. It has all the accessories, change gears, 2 chucks etc. I am seriously thinking of breaking it out and getting it working. It's in very good shape.

A man needs more than one lathe right?
 
You can do small work on a big machine but can't do big work on a small one.
When I built my first model steam engine my wore out colchester wouldn't hold the tolerances I needed. The 16 by 80 Summit had no problems.
IMGP1200.jpg
IMGP1207.jpg

I've since acquired a Hardinge HLV thats a little easier to manipulate but its hard to beat 7000 lbs of cast iron for stability, lol
A full size Bridgeport style mill is hard to beat too.
IMG_4174.jpg


IMG_4205.jpg

Greg
 
The only real issue I've found with small work is that my three jaw won't clamp less than about a 5/16" round. To get around that, I sometimes hold a smaller jacobs chuck with a half inch straight shank in the lathe chuck. That's worked OK so far. I also have a 4 jaw and collets, so there are options if I was not so lazy.
 
I like your set up there turning between centers f350ca.
You guys understand what I’m talking about with the big machines.
How did you cut the radius on the reversing lever? Rotary table? Looks great!!
Did the instructions give the radius?
 
Pretty sure the radius was on the drawings, but don't really remember.
Yah, drilled the end holes then used them to locate it on the rotary table, cut the slider at the same time on the end of the quadrant, then separated it.

Greg
 
Did you build a 5A?
Pretty sure the radius was on the drawings, but don't really remember.
Yah, drilled the end holes then used them to locate it on the rotary table, cut the slider at the same time on the end of the quadrant, then separated it.

Greg
 

Attachments

  • A5E57B15-941C-46FC-AB68-974A3428F1FC.jpeg
    A5E57B15-941C-46FC-AB68-974A3428F1FC.jpeg
    794.5 KB · Views: 74
Was a number 4, good sized engine. Came across the castings by accident, and couldn't pass up the deal,

Greg
 
I came across this 5A. What a piece of art.
I’m just beginning to appreciate the difficulty of machining these models.
Keith Appleton Does a very good job of highlighting the steps of set up, machining, fit and finish.
 
They are a challenge making such small parts to the tolerances required. Very satisfying.
I powder coated the castings, then did the machining, gives nice sharp edges. Most of the sealing surfaces were ground, so no gaskets required.
IMG_4239.jpg

IMG_4240.jpg

IMG_4242.jpg

IMG_4245.jpg

Greg
 
Back
Top