How to solder to these round lugs?

Here is an update on soldering the round lugs.
I failed miserably. Everything fought me.
I had a very difficult time tinning the wires. The lugs tinned ok.
My only iron that would tin the wires was a160-240 watt pistol grip gun.
It also worked on the lugs, but the tip was too big to get on the large inside lug.

I clamped the business end (sleeves, rings and tip) in groves of a Panavise. Not so much for heat sink, but to hold it steady.

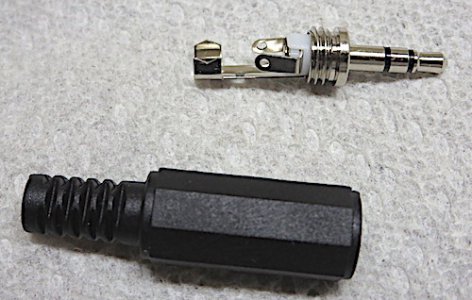
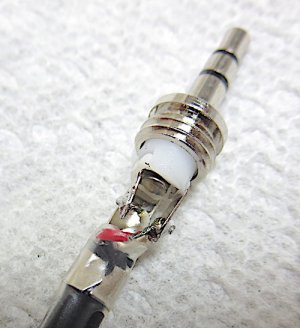
I gave up and used a plastic jack I picked up at Altex. The regular soldering lugs stuck out and I could get to them.
the big iron did the best soldering but was a little clunky fitting into tight spaces — but it worked and it is all soldered up and it works.
IMG_1021.JPG

IMG_1023.JPG

the plastic covers on the later jacks don't look as swavey as the metal ones but the work just fine.
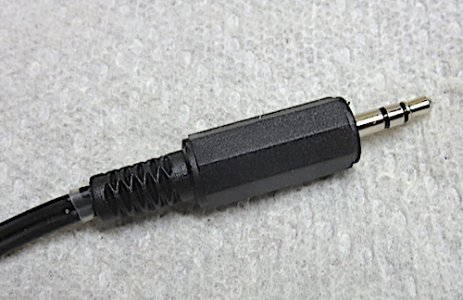
I covered the ground lug with a bit of shrink wrap tubing that extended about 1/5" beyond the plastic jacks strain relief. It provides a little more strain relief. I've used that trick on many guitar, instrument and PA cables.
IMG_1024.JPG
 
I apologise I didn't mention flux. When tinning you need to apply solder flux to the surfaces before heating. Even with flux core solder. It gives a much better result.

The pistol grip is much too big and hot for a job like this.
I'm glad you did get it sorted out in the end, tho.

Did you happen to check which wires were left and right so the balance is still correct?

If you have a multeter, select ohm test (or the beep test). Touch the black probe to the bottom ring and the red to the tip sleeve on the headphone plug. That should be left, then the bottom ring to the center ring should be right. Wearing the headphones you should hear clicking when the probes are applied.

In ohms testing, the meter uses a small amount of voltage in the probes. Enough to actuate the speakers.
 
Thanks for your comments, Shawn.
I did use flux on the wires and contacts.
I did check the polarity and continuity. It is all correct.
Even with flux, the pencil grip and smaller pistol grip irons didn't work for me on this project. The time on heat was just too long.

I was concerned about a short on the red (right) wire as the insulation burned back some. But the white wire insulation was ok and there is no contact between them and since the cover is non-conductive, they can't short on it. As you can see, those wires are tiny yet they fill up the area inside the jack's cover.

If they give me any trouble shorting, I'll just open it up and fill the gaps with silicone. The plastic jacks were cheap, so I picked up a couple spares, if it needs repair.
 
The 1/8" plugs are a pain. Especially when you get into the 4 sleeve plugs. NOT a lot of room in there... Soldering DIN connectors and VGA connectors are a nightmare.

I'm glad it worked out.
I wouldn't worry much about using the cheaper plug. For general headphone use you will never notice a difference between gold plated and nickel/chrome.
 
Thanks, Shawn.

One thing this project made clear. I need to get a good desk magnifying lamp, or maybe a head type. I had a very hard time seeing what I was doing.
 
Don't feel bad - you have to mess up one or two before you get reasonable at it. It sounds like the big problem you had was in tinning the conductors beforehand. Frequently, flex-service conductors will include an insulation around the individual wires, such as Litz wire, and sometimes you will find the dreaded aluminum. For copper conductors with a polymer insulation, or coating, you need to strip the insulation using something like MEK and/or a small flame (but not at same time). However, you got it to work and that is what counts. Congrats.
 
Thanks, Jack. You make good points.

I know the shield wire was copper. The other wires were silver colored and could have been aluminum. (I don't even know if solder will take to aluminum) Once I used the hot iron, I had no problem with them, or the shield wire.

Strangely, the hardest wire to tin was the copper shield. I lliked to never got it hot enough to take solder. I even tried flame from a butane cigar lighter. (it sooted up but did tin a little) I tried every trick I knew, pressing it against something, and clamping it in the vise and clipping a hemostat to it for weight so I could make good contact with the iron. None of those tricks worked, until I broke out the big pistol soldering iron.
 
Franko, In my experience, the plastic barrels have the same thread as the metal barrels. I have swapped them in the past.
 
RJ, you don't seriously think I'm going to take that thing apart to change the barrel, do you? :) My God, I can't think of anything I'd rather not do. It works now. I'm not going to poke it with a stick.

In spite of numerous admonitions, I still soldered the ground wire on the first try without slipping the barrel over the wire. I'm beginning to think it must be a necessary step when repairing a jack.
 
Thanks, Jack. You make good points.

I know the shield wire was copper. The other wires were silver colored and could have been aluminum. (I don't even know if solder will take to aluminum) Once I used the hot iron, I had no problem with them, or the shield wire.

Strangely, the hardest wire to tin was the copper shield. I lliked to never got it hot enough to take solder. I even tried flame from a butane cigar lighter. (it sooted up but did tin a little) I tried every trick I knew, pressing it against something, and clamping it in the vise and clipping a hemostat to it for weight so I could make good contact with the iron. None of those tricks worked, until I broke out the big pistol soldering iron.

No - aluminum will not solder. The wires may have been coated. Next time you can try cleaning the wires first with a solvent and see if that helps. Those tiny conductors always seem to be a pain.
 
Back
Top