-
Welcome back Guest! Did you know you can mentor other members here at H-M? If not, please check out our Relaunch of Hobby Machinist Mentoring Program!
You are using an out of date browser. It may not display this or other websites correctly.
You should upgrade or use an alternative browser.
You should upgrade or use an alternative browser.
How to indicate a workpiece clamped at an angle
- Thread starter compact8
- Start date
- Joined
- Dec 23, 2019
- Messages
- 1,138
Do you have any features which allow for using a tooling ball or hole:
Failing that, this is a job for a fixture that holds your part, machined with reference surfaces you can easily pick up that put you in the correct place for your feature.
Failing that, this is a job for a fixture that holds your part, machined with reference surfaces you can easily pick up that put you in the correct place for your feature.
Depends on the accuracy needed, but you could find z by touching off a piece of paper or shim stock. An indicator could be brought against the part for x/y, at the highest z to still show a flicker on the indicator (from both directions in the axis of interest, then using the center of those two as the zero).
Do you have any features which allow for using a tooling ball or hole
That’s a neat approach, thanks for posting.
- Joined
- Dec 23, 2019
- Messages
- 1,138
The result of spending too much time spent watching Stefan and Joe Pie! I've learned so much from YouTube, but particularly from those two. I can see it coming through in my thinking when looking at setups.That’s a neat approach, thanks for posting.
It all depends on how sharp the corner of your part is. chamfers or small radii, even just a swipe with a file makes the thing you measured different from the model you use trig on to figure things out. If your required accuracy can tolerate it fine.
- Joined
- Feb 1, 2015
- Messages
- 9,621
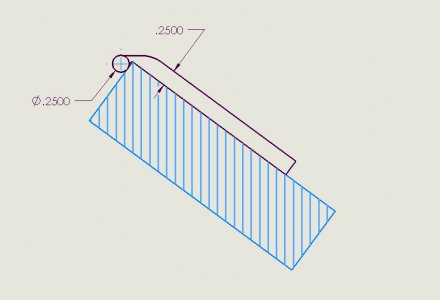
If you don't want to drill a hole in your part for a locating pin.can anyone shed some light on this ? In the simplest scenario of having a rectanglar workpiece clamped to the vise at an angle, how do I get the XYZ coordinates of the top-most corner ?
I made a simple device that I saw on one of Tom Lipton's (OxTool) videos. It is a corner finder and it will locate the virtual sharp of a corner of a part. I made mine from a 1/4" dowel pin and a small piece of flat stock. To use, you would find the vertical edge and the top of the pin. The center of the pin is exactly .125" from the two surfaces of the part. Knowing the setup angle of the part and using a little trig, you can determine the location of the intersection of the two surfaces. It also works well if the corner has a fillet.


