Help Needed

Cabro32

Active User
Registered
Joined
Aug 24, 2013
Messages
29
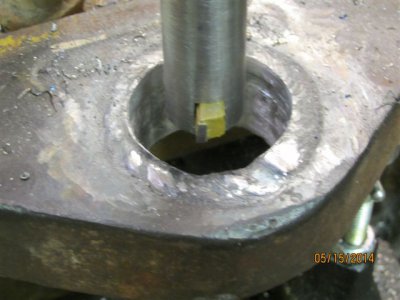
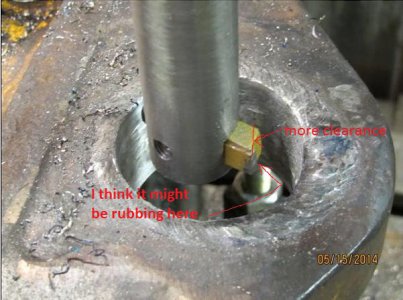
Using 7018 welding rod I welded up a badly worn hole. I intend to make a bushing for this hole to fit a pin after it is machined to size. I hit the high spots with a grinder and then tried to machine the hole. I started with HSS bits that I cut to size with a cutoff wheel on an air grinder. The point of the cutter would ware flat after 3/8" cut into the hole and need sharpened. I don't know if I got a soft batch of Interstate Hss or if I took the temper out of them when they were cut to length. After many hours the hole became round but still needed opened up more. Changed to a carbide tip cutter, but they keep breaking even though there is no interrupting cut. I never dreamed that 7018 would be this hard to machine, it seems the deeper into the weld the harder it gets.
Anybody got any ideas as to a solution? Is there a stronger cutting bit available?
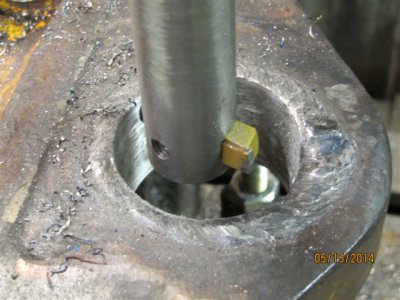
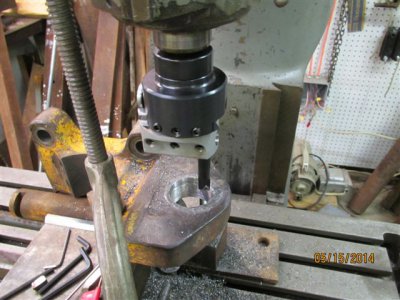
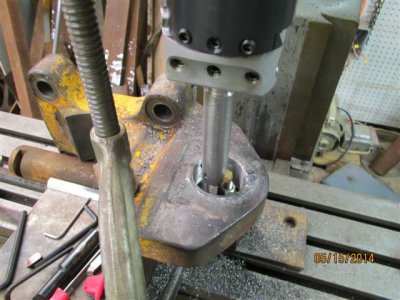
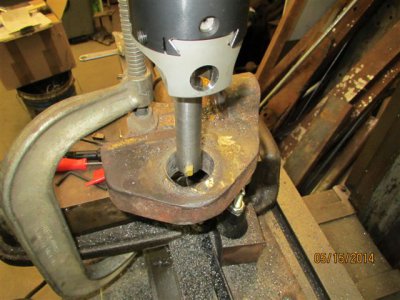
Picture 128.jpgPicture 122.jpgPicture 125.jpgPicture 126.jpgPicture 127.jpg

Picture 128.jpg Picture 122.jpg Picture 125.jpg Picture 126.jpg Picture 127.jpg
 
Judging from the looks of the part, it's probably some pretty tough material.
Welding can cause it to harden and it can transfer carbon and other additives to the weld.
The closer you get to the base material, the harder it becomes.
If you cant anneal it then try very low speeds and light cuts with light feeds.
Perhaps thats what you were doing but it wasn't mentioned.

What diameter will be the finished size of the hole?
 
7018 normally isn't that hard, and doesn't work harden that bad. Try slowing down the spindle speed, slowest speed in backgear. Don't try to take more than about 0.010. Keep the feed rate up at around 0.003/rev. Carbide should work fine if you don't have a lot of chatter. Also try rotating the tool in the boring head a bit to change the cutting angle, see if that helps. I have gotten through some pretty hard stuff this way.
 
It looks to me from the finish I can see that your getting some rubbing with the back side of the carbide, I think you need a little more clearance, it might help to thin the blank that the carbide is brazed to as well, this will bring it back closer to center and lesson the negative rake, best to not overdo it on the clearance though this will weaken the cutting edge.
And also as others have said, slow speed and feed, it might help some to use a little cutting/tapping fluid, good luck.:))


Tool.JPG

Tool.JPG
 
So here's the score on this type of issue... It makes little difference what rod you used (but 7018 was a good choice) weld caps are hard, even though it's fairly low carbon. The issue is how it cools off. With parts like that, I warm the entire piece up to 500F then weld it then, toss it back into the oven and allow it to gradually cool down. When you weld a cold piece, the weld caps rapidly cool off because the heat quickly travels into the rest of the piece. Any time some thing rapidly cools down, it's getting quenched and gets harder. I've been through this countless times...

Even with a gradual cool down, the weld caps will be harder but, it's more manageable. Also, there's nothing uniform or even about metal that's been deposited with an electric welding process. The grain structure is going to run the gamut and some areas will be harder than others.

Do the best you can with rotary cutting like you're doing and try different feeds/speeds. Each case seems to be different. If you need a precise hole, get a big hand reamer after it. Slow cutting should clean that up acceptably well.

Ray
 
All these guys are probably right and certainly know better than me. I just want to throw in here.
Whenever I weld something with the intention to machine it I put it in heat treat oven and bring it up around 800 F then I weld it. When welded I put it back in the 800F oven for 5 mins or so and then just shut the oven off and let it cool naturally over night. It always seems to keep the welds form getting hard. This is what I do anyways. Larger stuff I heat with a torch and weld, reheat and wrap in K wool to cool slowly.
Good luck


Yes, this is what prevents the weld caps from becoming hard as diamonds... Metal changes internal structure at different temperatures and almost universally, for carbon steel, the Martensetic phase begins/ends at 400 to 450 F. We tend to use 500 as a temperature to give a little degree of margin but 800 is fine too if you're not concerned about losing the temper in other areas of the part.

Anyhow, when heat treating, there are two important phases to consider. The first is the Austentizing phase which typically occurs around 1500-1600 F. This is when the metal is technically a "solution" and the atoms are free to move around and distribute evenly within. When the metal is quenched, it immediately drops below the Austentizing phase and it happens so quickly, the atoms get "frozen" into position and the martensite phase begins. The metal continues to cool off and at/about 400 F the overall martensitic phase completes.

Anyhow, the point is, if you start at 500 or above and then weld, the part will increase in temperature considerably from the welding heat. The weld areas will be well into the low to medium end of the martensitic phase. Tossing it back into a 500F (or higher) oven and letting it gradually cool to below 400 will slow down the quench until the metal reaches equilibrium.

And believe it or not, the phase changes continue for about another 24 hours after cooling before it's pretty-much done changing.


Ray
 
Here is what I do, and it works quite well. After welding, heat the part to a dull red, the color of cooked carrots as they say, then place it into a bucket filled with barn lime, making sure to completely cover the part with a nice thick insulating layer of lime. Barn lime can be purchased at your local feed store or farm supply store in 50 pound bags. Leave the part in the lime overnight at the very least, usually closer to twenty four hours. I have already started to dig a part out after an overnite stay in the barn lime and found it to still be quite hot, so had to cover it back up and let it cool longer.

Of course, if you live someplace like Twenty Nine Palms or Joshua Tree, you will probably have a hard time finding a farm store, much less find one that carries barn lime. :biggrin:

Barn lime is hard on the skin, it really dries it out, so you might want to wear gloves when handling it, but I simply wash my hands right away and don't have any problem.

Vermiculite works well also, and is not hard on the skin. You can purchase it in garden stores. Perlite is similar and would work also. I have always used barn lime, as it is cheaper, and readily available in my area year round. It runs about $2 for a 50 lb. bag, while vermiculite and perlite run about $10 per cu. ft.

Some other materials that I have been told work well are floor dry (white supposedly works better than brown or gray), silica sand, and ashes.

Regardless of the material you use, make sure that you bury the part very well. I make sure that I have a minimum 4" thick layer all around the part, and if it is a larger part, I make sure the layer is thicker yet.

Note that while barn lime is drying it is not corrosive. It's just powdered limestone, not calcium hydroxide. Very useful stuff. Coarse is excellent for slippery surfaces such as ice or spilled oil. Fine works in some sandblasters.
 
Back
Top