Floating reamer experiment

Rob Thule

Registered
Registered
Joined
Feb 19, 2022
Messages
24
I flirted with the idea of making a floating reamer holder in order to compensate for any misalignment in the lathe and mill.

I came across a design by Bill Zweig (https://www.practicalmachinist.com/vb/general/simple-floating-reamer-holder-306442/) and decided to give it a go as the build looked easy. I had a spare chuck and thought I could put it to some use.

The design is easy to understand and build. It is essentially a sort of universal joint with the joints being able to slip radially.

Unfortunately it failed consistently. Holes of various diameters were drilled and bored, then reamed using this holder. Holes resulted oversize by more than .03mm and halfway down the bore opened by .09mm and then returned to .03mm.

Tests were repeated with reamer held in regular chuck. Results were consistently satisfactory.

I was wondering if somebody had ever tried to build this type of holder, maybe I did something wrong.
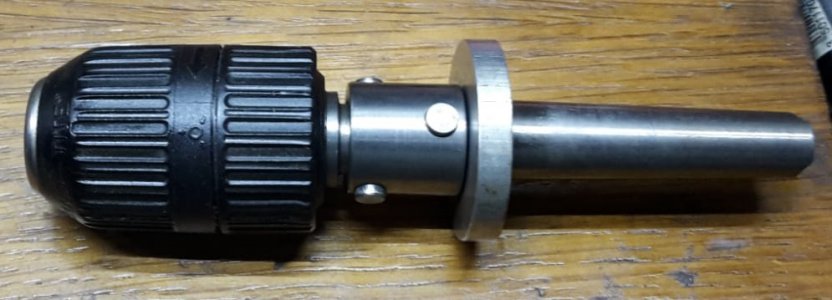
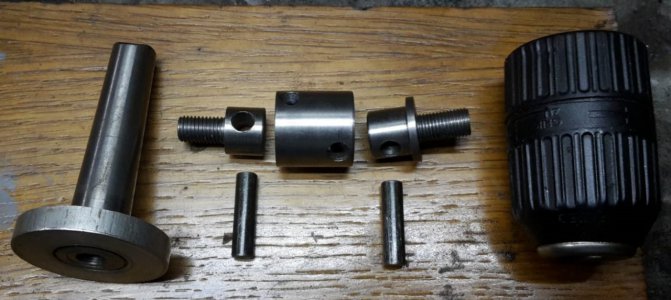
1650478060995.jpeg
1650478082434.jpeg
 
Last edited:
Seems like you may have to much play allowing it to wander from parallel

Sent from my SM-G900V using Tapatalk
 
I think that, generally, floating holders are not necessary where there is good alignment between the reamer and workpiece, especially if the chuck holding the reamer is a fairly accurate one so far as true running is concerned; the suspect looking one that you are using may be the source of the problem. Chucks made for portable electric drill may not necessarily be particularly accurate, no chuck that may cause gyrations of the reamer would be suitable for reaming operations and I do not think that a floating holder would compensate for that situation. Floating holders are made to allow for parallel misalignment between a machine spindle and the cutting tool, in this case, a reamer.
 
@Rob Thule

Thanks for posting your findings. It could prevent others from barking up that wrong tree.

Sometimes you're the windshield. Sometimes you're the bug.
 
I can see how it allows for axial float, but I dont see a mechanism for radial. What am I missing?


The two axles/pins allow tilt but which mechanism allows it to float while the holders axis remains parallel to the lathes Z axis?

Using that U-joint design, I think you'd need an additional joint and set of pins to get full axial/radial freedom of motion. That single set will only allow for decision from coaxial. Unless there's another part in there that I can't see.


I designed, built and tested one about a year ago, but a totally different design. Mine is loosely based on the Hemingway kit version. Not so much in it's design, but in it's mode of operation. It allows both radial and axial float, and also has the ability to be locked and used as a rigid tailstock collet chuck.

I've been using it since, and it works great. I just used it yesterday to make an ogive comparison. The holes came out perfect.

Here's a thread I started on mine awhile back.


Edited to add:

Nevermind..I got it now. I missed the part in your first post that explained the pin/hole slip fit allowing for radial float.
 
Last edited:
Did you guys see this?
This guy is the real deal. I subscribed to his channel.

I'm sure benmychree is correct. I've had limited success using my chucking reamers in my Rohm keyless chuck in the tail stock. Sometimes I get a perfect fit, other times it's oversized. Might be the Chinese reamers. Purchased individually, as needed from Travers.

Just for fun, I priced out some aluminum bronze and the 4130 he used to fabricate this tool.
A piece of 3" X 12" aluminum bronze was almost $600 delivered.
I couldn't find any 4130 (it's supposed to be easier machining than 4140??)
I don't have any material that large except a piece of 4" dura-bar that went through the fire.

I'll put this project away for when I win the lottery.
The price of material is so high, I am limited on what I choose to do in my shop.


Yes, I saw that video back when I designed the one in my link above. I used several of his ideas in mine. They work quite well!

Like you, I decided to pass on the aluminum bronze
 
My question is do you really need it? I switched to the Jo Pi method last year and it works perfectly. You drill the hole 2 sizes or so under size. Use a boring bar on a light cut to correct any irregularities or mis-alignment, then use the reamer. The reamer follows the existing hole, just enlarging it. I have made several motor arbor extensions in the last couple of weeks and to the best of my abilities, they all are within a tenth of perfect. That is checking on the lathe and on the motor. I have not added any run out anywhere. I looked at the floating reamer here on the forum last year and almost made it. I started checking my work and couldn't see where I would get any improvement. That is just me.
PM1228 lathe, 5/8 PM keyless chuck, PM AXA setup with steel boring bars.
 
Back
Top