First attempt at home anodizing

SEK_22Hornet

Active User
Registered
Joined
May 20, 2013
Messages
390
Spent a little time today trying my hand at anodizing. I had made a couple plates to help hold a poly AR15 80% lower while milling it out and thought I would see if I could anodize them. I had picked up some drain cleaner to etch the parts with and some pool PH reducer (Sodium Bisulphate) for the electrolyte. I found a piece of .062 aluminum sheet that i bent into an L shape for the cathode. I used an ice cream pail (small square one) as my anodizing tank. I mixed the PH reducer with water (just used plain tap water for now) and put the parts into a small plastic container with some water and drain cleaner in to etch. Used a 2 liter pop bottle to mix the electrolyte in and mixed as much as i could get to dissolve in warm tap water. Took the parts out of the etch and rinsed them, and hung one on a small piece of aluminum wire. I used an HP lab power supply so I could control the voltage and current. After a couple attempts, I found that for my small parts, I needed to run about 600 ma at around 10 volts into the parts for about an hour, then rinse in cold water and put into a dye made with RIT liquid dye in warm water for about 5 minutes or so, then rinse and into a pan of boiling water. I need to get some heavier wire and some distilled water, but the results were very promising. Here are the two parts after I finished:
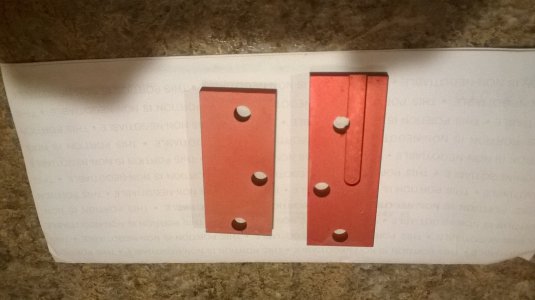
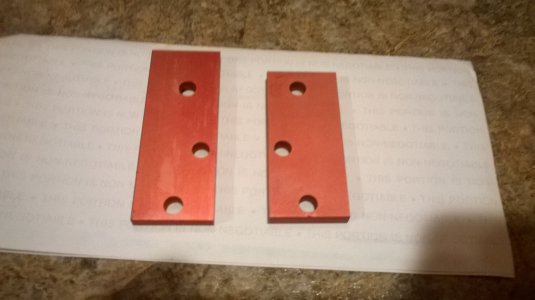
WP_20140223_001.jpg WP_20140223_002.jpg
 
Great job! That's something I'd like to learn at some point. I'm pretty sure there are calculators that you can use that calculate voltage, amps and time from the surface area of the part. A bunch of guys I know that make bike lights do it. Some of them also seal in the dye by raising the temp slowly to boiling before taking it out and finding as that helps prevent leaching.
 
Good Job...

I bought a kit and did it a handful of times but, I just didn't like having warm buckets of H2SO4 in the shop.

Ray
 
Great job! That's something I'd like to learn at some point. I'm pretty sure there are calculators that you can use that calculate voltage, amps and time from the surface area of the part. A bunch of guys I know that make bike lights do it. Some of them also seal in the dye by raising the temp slowly to boiling before taking it out and finding as that helps prevent leaching.

Thanks! I actually saw one posted on this site - need to download it and check it out. I'm keeping it small. Tried the Sodium Bisulphate rather than the battery acid route since I felt it would be less hazardous. Pretty pleased with the results for a first try. I wondered if a person could use the dye to seal the part as well by just raising the temp.
 
That looks quite impressive for a first try.

What type of dye is RIT, as I don't think I've ever come across that down here in Oz?

Cheers,

Si.
 
That looks quite impressive for a first try.

What type of dye is RIT, as I don't think I've ever come across that down here in Oz?

Cheers,

Si.

RIT is a brand of dye sold here in the US for dying cloth and clothing - commonly available at grocery stores here. Usually sold as powder to mix with water, they do have a few colors available now in a liquid concentrate form.
 
Makes me feel good to see it work so well. I have all the same stuff but have not gotten around to trying it yet. That and one of the cheap Craftsman powder coating kits.

Maybe if I finished more stuff, I would get to them. :)
 
Wow no way!! How cool is that?? I have been interested in that for a while now, as I purchased the Caswell book on Ebay ages ago, but never had it at the front of my priority list before. But this sounds so do-able!


Bernie
 
I dye fishing line with RIT, use the result to add details to plastic models. Adding vinegar sets the dye in nylon as it does with cloth as well.

No idea though how that would react chemically with what you are using. Chemistry class was 45 years ago!

Gerrit
 
Back
Top