Finding center...

shorton

Active User
Registered
Joined
Nov 25, 2013
Messages
81
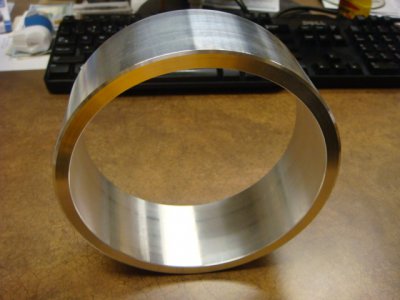
Just finished my first lathe part (here). Now, I need to drill a hole (and counterbore) in its side perfectly aligned (very close) radially. I have a small round column mill (RF31). I planned to chuck it in the vice (oriented so I'm looking through the hole) and drill. Finding the center from the front/back edges of the ring is straightforward. But I'm not sure how I'm going to center the ring left-right. I do have a DRO FWIW. The hole will be tapped and a post screwed into it, so the hole needs to "point" toward center. The assembly will rotate about that post in a special clamp (it's a big lens mount)

Suggestions?
DSC07281.JPG

DSC07281.JPG
 
If you have an edge finder you should be able to reach down to the center of the ring and find the edge. If you don't have an edge finder, you can use any straight shaft in the chuck and use a piece of paper or feeler gauge between the shaft and your part to find the edge.

It also might be possible to put plunger type dial indicator in the chuck and find the highest point on the work if your indicator has a sleeve on the top that you can chuck up. Check with the dial pointing to the right, then rotate 180* and check again just to eliminate any offset in the indicator, split the difference and that should be center.
 
I've never done this personally but I did see a video (I believe from Keith Rutger) where he had to do the same thing while making a gear on a mill. He stood a machinist square on the mill table and pushed it up against the side of the circle. Then he used an edge finder to locate the side of the square that touched the circle. He did this on both sides of the circle and split the difference.

ill see if I can locate the video.

hope this helps,

chris
 
In my 1947 issue of the Henry Ford Trade School text book, they suggest the following method. (Adapted from memory.)

Set up your piece in the mill vise and find your front-to-back centre. Lock that in. Place a small endmill in the spindle and touch off at the highest point of the piece, as lightly as possible. Take a cut at that light setting across the top of the piece. When you look at the place where the cut was taken, you'll see a small oval shape. You can now measure across the ends of the oval and split the difference to get the radial centre of the round.

Since you already set the half-way point the other way, you can split the difference across the oval to get the centre that way, too.
 
Straightedge or angle plate or square up against side and indicate off that. All you need is the diameter at that point.


Sent from my iPad using Tapatalk
 
Thansk guys.
My edge finder won't reach the middle
I can use a piece of drill rod and a feeler gauge, hadn't considered that.
Nervous about shaving an oval in it. I might screw that up.
The indicator plan sounds interesting.
The ring is about 6" OD, so I can't really get a straight edge up against both sides very well. It's exactly as wide as my vice so the vice mount gets in the way.
I could put a bigger square on 123 blocks or something, but I don't have enough room on both sides of my vise (without remounting vise), and my squares are limited, too.
 
Here is a case where a combined lathe-mill machine would be useful!
Chuck again the piece in the lathe, and use a tool, set at center height, to mark four tangential points, every 90°.
The lines between two opposite points, of course, will give you the center.
You can "materialize" a line with a straight bar and a couple of clamps.
When you'll have this line horizontal in the mill (you can check it with an indicator on the quill or simply with a level - it depends by the precision you want) all you have to do is to move the cylinder along the X axis until you are on the top mark.
Good luck! :)
 
Do you have (or can improvise) a mill stock stop? If so, set it to center, and zero the edge finder on it and move it over half the diameter (radius) of 3" and your set to go.
 
In my 1947 issue of the Henry Ford Trade School text book, they suggest the following method. (Adapted from memory.)

Set up your piece in the mill vise and find your front-to-back centre. Lock that in. Place a small endmill in the spindle and touch off at the highest point of the piece, as lightly as possible. Take a cut at that light setting across the top of the piece. When you look at the place where the cut was taken, you'll see a small oval shape. You can now measure across the ends of the oval and split the difference to get the radial centre of the round.

Since you already set the half-way point the other way, you can split the difference across the oval to get the centre that way, too.

I saw Keith Fenner use a similar trick:

[video=youtube;e0TTUQkU0d0]https://www.youtube.com/watch?v=e0TTUQkU0d0[/video]

Starting at ~4 minutes in Keith shows how he centers a keyway on a shaft. if you use a mill that is smaller than the hole, the flat will be completely gone. Another potential advantage of this method is that you get a nice flat surface for the drill to start.
 
Since you have a DRO, you could find center front to back with your edge finder. Then move off to one side on center. Lower the spindle down as far as you can. Come back and find the "edge" of the part at that height (even though the point of contact is somewhere along the arc of the part). Then go to the opposite side of the part, again at the center front to back, with the spindle/edge finder at the exact same height, and find the opposite "edge" at that height. Split the difference between the "edges" found. You will be pretty darn close! You could try the same process described above again at another height just to check yourself! A circle is a circle! One half is a mirror of the other.
 
Last edited:
Back
Top