-
Welcome back Guest! Did you know you can mentor other members here at H-M? If not, please check out our Relaunch of Hobby Machinist Mentoring Program!
You are using an out of date browser. It may not display this or other websites correctly.
You should upgrade or use an alternative browser.
You should upgrade or use an alternative browser.
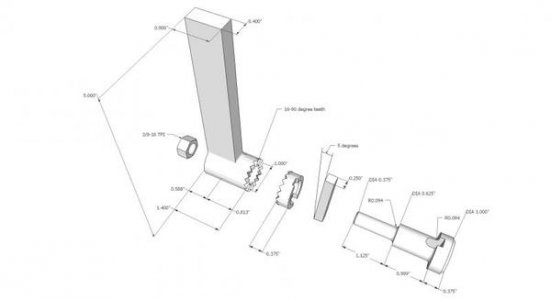
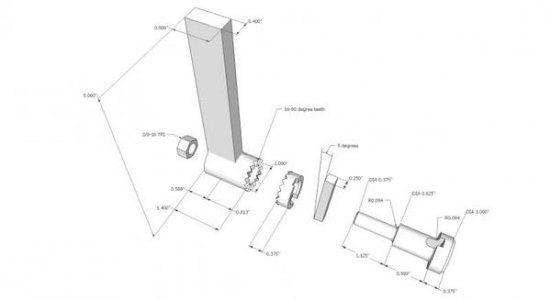
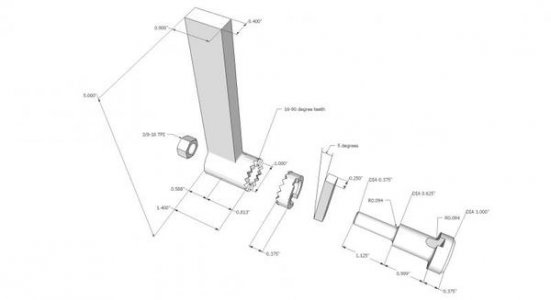
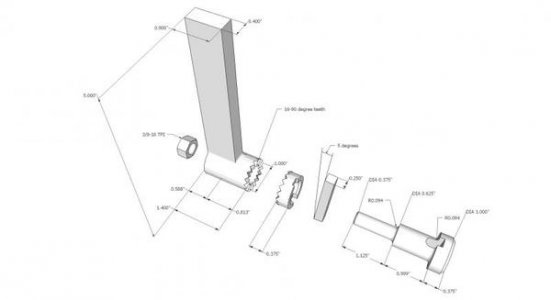
Cutting 90 degree v groove with pointed end mill
- Thread starter Jim2
- Start date
- Joined
- Mar 19, 2014
- Messages
- 2,681
The center of the cutter will have a hard time with cutting speed and will probably break the point of the carbide. I would tilt a standard endmill 45° and do your 90° notches that way…Good Luck, Dave.
- Joined
- Feb 8, 2014
- Messages
- 11,144
It should work fine. I have chewed through some nasty stuff with those. Just don't get too greedy with the depth of cut, and keep the spindle speed up. The center of the tool is running at 0 feet per min, so you are kind of plowing through the material at the very center.
Edit: What chips&more said will work well also.
Edit: What chips&more said will work well also.
Yeah, I was thinking the point wouldn't last. . . . I hadn't thought of tilting the head! I've got a Chinese RF clone, and tramming isn't much fun. But, I think that's the best option in this case. I've spent the day moving from one machine to the next trying to figure out how to make this work. . . . I had "eliminated" the mill earlier, so tried the lathe and the shaper. The work envelope was too small on both of them to accommodate my dividing head, so I'm back to the mill.
Jim
Jim
It should work fine. I have chewed through some nasty stuff with those. Just don't get too greedy with the depth of cut, and keep the spindle speed up. The center of the tool is running at 0 feet per min, so you are kind of plowing through the material at the very center.
Edit: What chips&more said will work well also.
Yeah, the thing is my setup probably isn't super rigid anyway. I'll snap some pics and post up later.
Thanks for the reply.
Jim
- Joined
- Sep 18, 2014
- Messages
- 254
Depending on how you are indexing, you could mount a plate at 45 degrees and use a standard end mill with out tilting the head.
A
Andre
Forum Guest
Register Today
I've done it both ways a few times, both seem to work well. Tilted endmill method is faster, and can leave a cleaner cut. Pointed countersink is easier in that you don't have to tram your head at 45* which is tough to do without a sine bar or angle block set. Be careful with the tip of the pointed endmill, if possible cut a small relief at the bottom of the groove so the very point doesn't have to cut or plow material.
Good luck, let us know how it goes )
)
Good luck, let us know how it goes
- Joined
- Mar 19, 2014
- Messages
- 2,681
Also IMHO, I believe you will want to index to each face of the V separately and cut each face separately. And not index to the whole V notch and cut both side at once. The sides of the V are not parallel to each other. They are angled to the center of the part. Hope I explained it…Good Luck, Dave.
Abom79 does exactly this in one of this latest videos
https://www.youtube.com/watch?v=5YpSssas90U
Think he starts around the 14 minute mark
https://www.youtube.com/watch?v=5YpSssas90U
Think he starts around the 14 minute mark
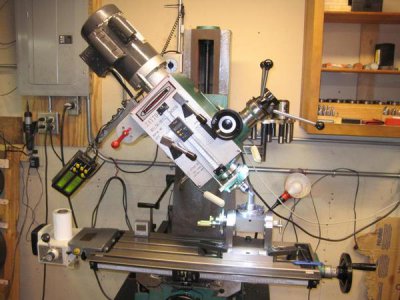
I tilted the head, gave it a try last night, and had some success! Also, had some problems, but just due to stupid mistakes on my part.
Here's a pic of the setup--sorry about the wonky angle I was holding the camera at. I guess I got disoriented with the angle the mill was at!
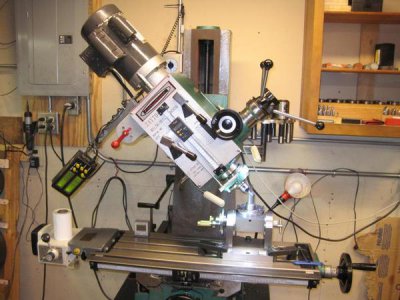
Paul in OKC, I don't have a tilting table, so had to tilt the head. Most times I use an angle plate clamped to my horizontal/vertical rotary table when I need an angle, but that's too small to hold the dividing head.
Andre, I've got one of those cheap, little, magnetic angle readouts--setting the head to 45 degrees is no problem with that! You can see it sitting on the mill table off to the left, out of the way there. I use it all the time for various things. It seems to be accurate enough for the work I do, and much easier to use than anything else lots of times. I just attached it to the mill head, zeroed it out, then reset the head until I was at 45 degrees.
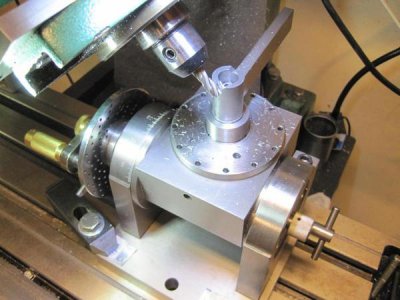
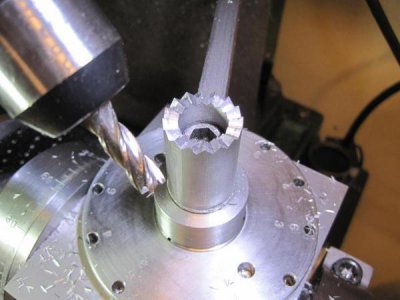
So anyway, I got the head tilted, got the dividing head set at the correct angle for 16 "teeth", which is about 5.7 degrees, lined the cutter up with the blank by eye, and took a test cut. I turned the blank around 180 degrees and took another cut to see if I was on center, and made some adjustments. I loosened the head dropped 'er down a little took another cut, rotated 180 degrees, took a cut, and checked the results a second time. It still looked just a bit off, so made another adjustment, and decided to drop the head down again. . . . Well, I wasn't thinking about everything that could happen at that point, and was probably rushing a little too much. I forgot to move the cutter free of the blank. When I loosened the clamps on the vertical dovetails, they were still holding the head. So, the head didn't move when I adjusted the crank until it suddenly dropped--maybe 0.200"? It was enough to drop the end mill (still running) into the blank and destroy the end mill! Here's what that looked like:
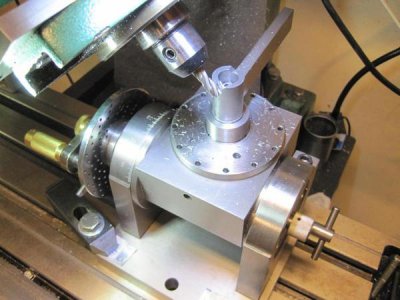
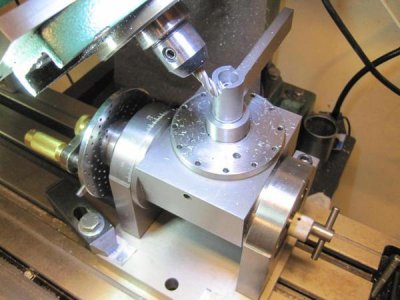
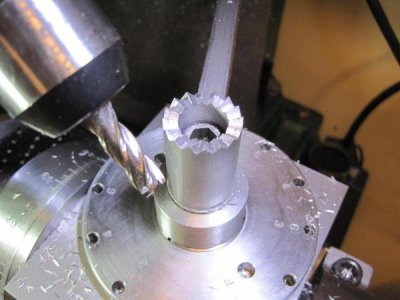
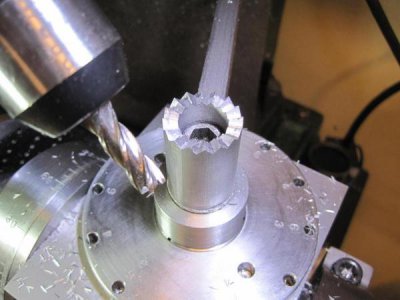
Luckily the setup was solid, and there was plenty of material. . . . So I swapped ends on the endmill as it was double-ended with another good end. But, I was so scattered by then that I started cutting on the wrong side of the blank, and proceeded to do all 16 teeth from the wrong side! So the teeth are sloped the wrong way--towards the center rather than away from the center. Luckily I had made some test pieces prior to this, so was able to check the results. So, the good news is that I caught it before I tore down the setup. It's still sitting like that now, so I'll just change the height of the head when I get back out there, and take another pass *on each tooth* to clean it up. . . . Here's what it looks like now:
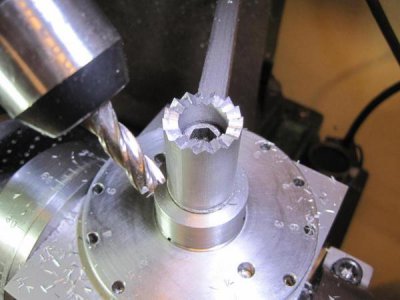
Dave, you're mostly right about indexing to each tooth or vee, I guess. The vee is 90 degrees along it's entire length, though--so no need to cut each face of the vee separately. My screw-up is that I cut all 16 teeth on the wrong side of the blank, so they're *all* angled wrong. . . . So, you're right--you can't increment 8 times and get the correct angle all the way around. You wouldn't want to do that anyway though because the blank is sitting at 5.7 degrees, so depth wouldn't be the same anyway.
Jim
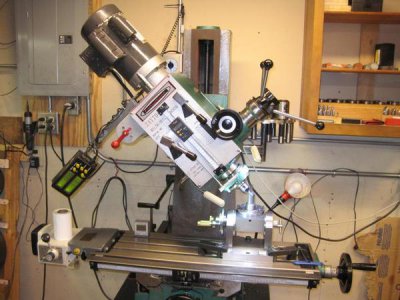
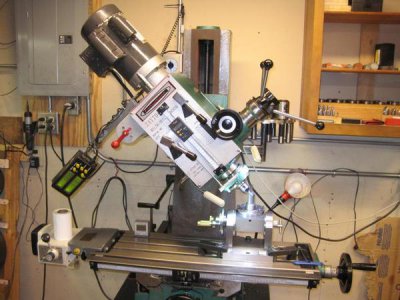
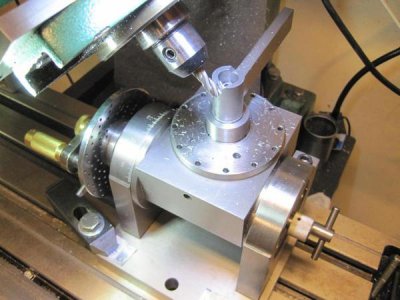
Here's a pic of the setup--sorry about the wonky angle I was holding the camera at. I guess I got disoriented with the angle the mill was at!

Paul in OKC, I don't have a tilting table, so had to tilt the head. Most times I use an angle plate clamped to my horizontal/vertical rotary table when I need an angle, but that's too small to hold the dividing head.
Andre, I've got one of those cheap, little, magnetic angle readouts--setting the head to 45 degrees is no problem with that! You can see it sitting on the mill table off to the left, out of the way there. I use it all the time for various things. It seems to be accurate enough for the work I do, and much easier to use than anything else lots of times. I just attached it to the mill head, zeroed it out, then reset the head until I was at 45 degrees.
So anyway, I got the head tilted, got the dividing head set at the correct angle for 16 "teeth", which is about 5.7 degrees, lined the cutter up with the blank by eye, and took a test cut. I turned the blank around 180 degrees and took another cut to see if I was on center, and made some adjustments. I loosened the head dropped 'er down a little took another cut, rotated 180 degrees, took a cut, and checked the results a second time. It still looked just a bit off, so made another adjustment, and decided to drop the head down again. . . . Well, I wasn't thinking about everything that could happen at that point, and was probably rushing a little too much. I forgot to move the cutter free of the blank. When I loosened the clamps on the vertical dovetails, they were still holding the head. So, the head didn't move when I adjusted the crank until it suddenly dropped--maybe 0.200"? It was enough to drop the end mill (still running) into the blank and destroy the end mill! Here's what that looked like:

Luckily the setup was solid, and there was plenty of material. . . . So I swapped ends on the endmill as it was double-ended with another good end. But, I was so scattered by then that I started cutting on the wrong side of the blank, and proceeded to do all 16 teeth from the wrong side! So the teeth are sloped the wrong way--towards the center rather than away from the center. Luckily I had made some test pieces prior to this, so was able to check the results. So, the good news is that I caught it before I tore down the setup. It's still sitting like that now, so I'll just change the height of the head when I get back out there, and take another pass *on each tooth* to clean it up. . . . Here's what it looks like now:

Dave, you're mostly right about indexing to each tooth or vee, I guess. The vee is 90 degrees along it's entire length, though--so no need to cut each face of the vee separately. My screw-up is that I cut all 16 teeth on the wrong side of the blank, so they're *all* angled wrong. . . . So, you're right--you can't increment 8 times and get the correct angle all the way around. You wouldn't want to do that anyway though because the blank is sitting at 5.7 degrees, so depth wouldn't be the same anyway.
Jim


